
User Guide


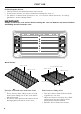
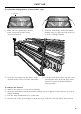
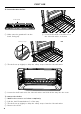
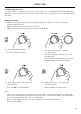
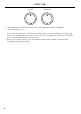

Table Of Contents
- User Guide
- Contents
- Safety and warnings
- Introduction
- First use
- Cooking guide
- Oven functions
- Cooking charts
- Setting the timer
- Auto Cook
- Locking the oven controls
- User preference settings
- Sabbath Mode
- Using your induction cooktop
- Locking the cooktop controls
- Using your cooktop’s special features
- Choosing the right cookware
- Cooking guidelines
- Using the storage drawer
- Care and cleaning
- Troubleshooting
- Alert codes
- Warranty and service

15
FIRST USE
1 Make sure the guard rail is at the
back, facing up and the slides
are not extended.
3 Hook the rear tags over the wires of the
desired shelf position on both side racks.
To remove the shelves
1 Wait for the oven to cool down completely.
2 Hold the shelf firmly with both hands, making sure you grip the wire shelf too to stop it
sliding forward.
3 Pull the shelf forward about ¾ of the way.
4 Lift the rear of the shelf slightly so that the tags clear the side rack wires, then remove.
2 Hold the shelf firmly with both hands,
making sure you grip the wire shelf too
to stop it sliding forward.
4 Push the shelf all the way into the oven,
ensuring the front and rear tags either
side are securely locked behind the
side rack wires.
1
2
3
4
5
6
7
3
4
Guard rail
To insert the sliding shelves (some models only)