
User Guide
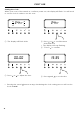
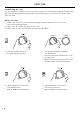
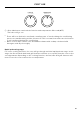
Table Of Contents
- User Guide
- Contents
- Safety and warnings
- Introduction
- First use
- Cooking guide
- Oven functions
- Cooking charts
- Setting the timer
- Auto Cook
- Locking the oven controls
- User preference settings
- Sabbath Mode
- Using your gas cooktop
- Cooking guidelines and cookware
- Using the storage space
- Care and cleaning
- Troubleshooting
- Alert codes
- Warranty and service
- Energy guidelines (GB IE only)

14
FIRST USE
Setting the clock
When your oven is first turned on, or after a power cut, the display will flash. You will need
to set the clock in order to use the oven.
1 The display will flash 24 hr.
4 Press
%
o
pm
88 88
24hr
24hr
19 35
00 00
or
%
o
pm
88 88
24hr
24hr
19 35
00 00
to adjust the time.
2 Press
%
o
pm
88 88
24hr
24hr
19 35
00 00
or
%
o
pm
88 88
24hr
24hr
19 35
00 00
to scroll between
24 hr and 12 hr.
z
The display will stop flashing.
3 3 Press
%
o
pm
88 88
24hr
24hr
19 35
00 00
to confirm.
5 Press
S1 OR90 CLAS GAS CP
1 KDM
4/05/17
Released for prototype only
LEP
2 KDM
8/06/17
Updated to include dash above hob
dials, repostioned FUNCTION and
TEMPERATURE
LEP
2576601 1:1 1/1
1. REFER F&P DRAWING No. XXXXX FOR PART FILE
2. ALL ARTWORK MUST BE APPROVED PRIOR TO MANUFACTURE
GRAPHICS TO BE LASER MARKED
GRAPHICS LOCATION
MODEL/FINISH
OR90 Series 1 Stainless Steel LASERMARKED PANTONE 440
GRAPHICS TREATMENT / COLOUR
and
S1 OR90 CLAS GAS CP
1 KDM
4/05/17
Released for prototype only
LEP
2 KDM
8/06/17
Updated to include dash above hob
dials, repostioned FUNCTION and
TEMPERATURE
LEP
2576601 1:1 1/1
1. REFER F&P DRAWING No. XXXXX FOR PART FILE
2. ALL ARTWORK MUST BE APPROVED PRIOR TO MANUFACTURE
GRAPHICS TO BE LASER MARKED
GRAPHICS LOCATION
MODEL/FINISH
OR90 Series 1 Stainless Steel LASERMARKED PANTONE 440
GRAPHICS TREATMENT / COLOUR
to set the time.
%
o
pm
88 88
24hr
24hr
19 35
00 00
%
o
pm
88 88
24hr
24hr
19 35
00 00
%
o
pm
88 88
24hr
24hr
19 35
00 00
%
o
pm
88 88
24hr
24hr
19 35
00 00
z
Pressing the cancel
%
o
pm
88 88
24hr
24hr
19 35
00 00
button at any point during the clock setting process will set the
clock at 00:01.