
User Guide


44
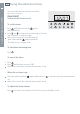
FOUR FUNCTION MODELSMODELS WITH CERAMIC GLASS COOKTOP
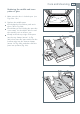
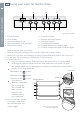
Fig. 44 Control panel
1 Control buttons
2 Clock display
3 Oven temperature knob
4 Oven temperature indicator light
5 Oven function knob
13567 89
2 4
6 Front left element
7 Rear left dual oval element
8 Rear right element
9 Front right dual element
10 Cooktop ‘Element on’ indicator light
11 Cooktop element ‘Hot surface’ indicator light
10 11
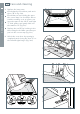
Using your oven for the rst time
Before using your new oven, please:
1
Read this user guide, taking special note of the ‘Safety and warnings’ section.
2
Remove all accessories and packaging. Peel the protective film off all surfaces and accessories.
3
Set the clock. The oven will not work until the clock has been set.
4
Condition the oven:
Put in the shelves and trays. Fit them between the metal runners or on the sliding
shelf supports, with the safety stop notch down and at the back. (If the side racks
and catalytic panels are not already fitted, see ‘Care and cleaning’ for how to do this).
Heat the ovens on maximum for:
60 minutes in the
position
30 minutes in the
position
15 minutes in the
position
There will be a
distinctive smell while
you are doing this.
This is normal, but
make sure your
kitchen is well
ventilated during
the conditioning.
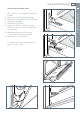
5
Once cooled, wipe out the
ovens with a damp cloth
and mild detergent, and
dry thoroughly.
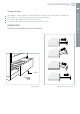
Fig.45 Correct position of
shelves and grill tray
Shelf positions
Guard rail
Stop notch
Stop notch
3
4
5
6
2
1