TM DEIX1 Dryer Installation instructions and User guide NZ & AU New Zea la n d Austra li a USA Canada Europe Asia Pacific
Contents Safety Instructions 5 Installation Instructions Location Requirements Exhausting Electrical Installation 8 8 10 13 14 Features 15 Getting Started Quickly 16 Fabric Type Heavy, Mixed, Casual, Dry and Wear Light, Air Dry 18 19 How Dry? Autosensing Dryness Levels 20 20 Display Screen 21 All About the Option Button 21 Progress Screen 22 The Options Creasables, Time Dry End of Cycle Beeps, Reminders, Cycle Tips, Troubleshooting 23 24 Lifecycles® Family Special Bulky 25 25 26 Allerg
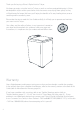
Thank you for buying a Fisher & Paykel Intuitive™ dryer. We hope you enjoy using the Intuitive™ dryer as much as we have enjoyed designing it. We’ve developed this dryer to treat your clothes with the utmost care, drying them gently so they will look better for longer. We know you’ll enjoy the benefits of its easy loading drum, reverse tumbling and lint removal system. Please take the time to read this User Guide carefully. It will help you to operate and maintain your new Intuitive™ dryer.
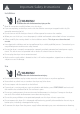
Important Safety Instructions Installation WARNING! To reduce the risk of electrocution, injury or fire: ■ Read all instructions carefully before using this dryer. ■ If you are replacing an old dryer, make sure that children cannot get trapped inside it by (for example) removing the lid. ■ Do not store or install the dryer where it will be exposed to water or the weather. ■ Before you use this dryer, it must be properly installed and located as described in these instructions.
Important Safety Instructions Note: Pressing the POWER button does NOT disconnect the dryer from the power supply, even though the lights are out. ■ When disconnecting a dryer that is plugged in, to avoid damage to the cord or junction of the cord plug, pull by the plug rather than the cord or junction of the cord plug. ■ Before the appliance is removed from service or discarded remove the lid and the drum door to the drying compartment.
Important Safety Instructions ■ If it is unavoidable that fabrics that contain vegetable oil, cooking oil or have been contaminated by hair care products be placed in a tumble dryer, wash them first in hot water with extra detergent – this will reduce, but not eliminate the fire hazard. Use the Air Dry cycle of the dryer to reduce the temperature of these items. Do not remove them from the tumble dryer or pile or stack them while they are still hot.
Installation Instructions Read the Important Safety Instructions on pages 5 – 7 before you start installing the dryer. Location Requirements It must be installed in a well-ventilated location. Do not install it in any room or cupboard which does not permit the free flow of replacement air. ■ It must exhaust air outside. ■ Before installing the dryer ensure that there is sufficient height to fully open the lid. ■ Allow sufficient room behind the dryer for the exhaust.
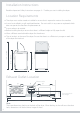
Alcove or Cupboard Installation Requirements ■ No fuel burning appliance can be installed in the same alcove or cupboard. ■ The top opening area in the door must be a minimum of 300cm2 and the bottom opening area must have a minimum of 160cm2. (Louvered doors with at least the minimum air openings are acceptable.) ■ These openings must never be obstructed. ■ Minimum installation clearances are required but more clearance is recommended.
Exhausting Designing and Installing a New Exhaust Duct System ■ The dryer must be exhausted outside. This will reduce drying time, prevent the build up of lint and moisture in the room in which it is located and reduce the risk of fire. ■ Do not exhaust the dryer into a chimney or gas vent, a wall, a ceiling or any concealed space in a building. Do not exhaust the dryer under a building or porch, or into a light well or other area that will accumulate lint.
Exhausting Determine Vent Duct Length and Route This dryer can only be vented from the rear. Choose a route that will provide the straightest and most direct path outside. Plan the installation to use the fewest number of elbows and turns. When using elbows (rigid duct) or making turns (thick wall flexible duct), allow as much room as possible. With flexible duct bend duct gradually to avoid kinking and avoid 90˚ turns.
Maximum Length of Exhaust Duct Maximum length of 100mm diameter duct with 100mm hood. Number of 90˚ elbows/bends Rigid Thick Wall Flexible Metal (fully extended) 0 19.5m 10.9m 1 16.5m 9.4m 2 13.4m 8.2m 3 10.6m 7.6m 4 8.2m 7.0m For exhaust systems not covered by the exhaust duct length charts (such as multiple unit hookups, plenums, and power-assist fans), contact our Customer Care Centre as on page 35. Alternative Installation for Close Clearances Venting systems come in many varieties.
Electrical Supply Requirements The dryer requires a 230 – 240 V single phase 50 Hz sinusoidal AC supply. It must be connected to an individual branch circuit rated for at least 30 amps and protected by its own fuse or circuit breaker. Either an isolating switch or a plug and socket (or both) rated for at least 30 Amps is required in the circuit in a position close to the dryer and accessible after it is installed. WARNING! Electric Shock Hazard ■ Use a cable clamp.
Installation Unpacking ■ ■ ■ ■ Only remove the packaging at the customer’s premises. This will ensure the appliance arrives in pristine condition and reduces the risk of transport damage. Make sure the dryer is in a suitable location for installation. Consider installing the dryer before the washing machine in a side by side installation, this will allow better access to electrical and exhaust connections. Remove Packaging 1. 1. Remove straps. 4. 2. 3. 2. Unfold the bottom flaps on the carton. 3.
Features Smart Loading ll l lll llll l l lllllllll lllllll 65˚C l l ll ll ll l lll l lllllllll l l llll l l lll lll lll ll l ll l ll l l ll l ll lll lll lll l llll l l lll l lllllllll l Superior clothes care is accomplished by an efficient high airflow fan and careful heat control. The Intuitive™ dryer provides the right heat for temperature sensitive delicate articles while still efficiently drying more robust regular and denim loads.
Getting Started Quickly A. Sorting ■ Sort clothes of similar types and loads that take similar times to dry. (Refer to Sorting page 27). B. Loading ■ Load clothes no higher than the transparent section of the lint bucket. (Refer to Loading page 27). C. Lint Bucket ■ Check to see if the lint bucket needs emptying. Empty before the lint reaches the top of the transparent section (refer to Lint Bucket page 28). Empty before this level is reached D E F G D. Press Power E.
Getting Started Quickly F. How Dry? ■ Choose how dry you want to dry your clothes, There are 5 dryness settings you can choose between, EXTRA DRY, EXTRA DRY/DRY, DRY, DAMP/DRY, or DAMP. (Refer to page 20 for descriptions). Press the HOW DRY button until the setting you want is lit. G. Start ■ Press START/PAUSE to start your machine. H. Display screen ■ Shows you what options you have selected and/or any Lifecycles® you may have chosen.
Fabric Type The Intuitive™ dryer is capable of drying many different fabric types. On the display screen the FABRIC TYPE button is located next to the POWER button. Use the UP and DOWN arrows to alter the fabric type you wish to dry with. When you turn your Intuitive™ dryer on it will automatically select the MIXED fabric type. This setting is suitable for drying your everyday garments, e.g. t-shirts, trackpants, sweatshirts etc. To change the FABRIC TYPE, press either the UP or DOWN Arrow.
Fabric Type LIGHT The LIGHT setting is ideal for delicate or heat sensitive items. Use this setting when care-labels recommend low heat settings or for garments with a synthetic fibre content, where overheating could cause damage to fibres. AIR DRY The AIR DRY option is for items requiring drying without heat. Perfect for airing clothes or to freshen up garments that have been packed in a suitcase or drawer. Press the FABRIC TYPE button DOWN until the AIR DRY light is glowing.
How Dry? AUTO SENSING Autosensing is automatically selected when your Intuitive™ dryer is turned on. When selected, your dryer automatically senses the dryness level of the load and turns off when the clothes are dry. Intuitive’s internal computer measures the moisture content of the load using metal sensor bars and together with a temperature sensor determine when the clothes have reached the selected dryness level. For optimum clothes care match the cycle to the load.
Display Screen The display screen on the right hand side of the panel shows you what the machine is doing during the cycle. The display screen also shows you the different drying options available. When you first turn your Intuitive™ dryer on it will briefly display the message “Welcome to Intuitive”. The main screen then appears with a big smiley face and tells you the machine is READY TO DRY, the setting it has defaulted to and also displays any options/lifecycles you select.
Progress Screen During the cycle the display screen shows you the progress of your load by displaying a series of messages that indicate what stage the dryer is up to. The display screen also scrolls through any options you may have chosen. When you first start your dryer the words SENSING Dampness will appear on the screen. During this period the dryer is sensing the dampness of your load. Once the dryer has sensed your loads dampness the words DRYING will appear on the screen.
The Options For all the options mentioned below select the OPTIONS menu (by pressing the UP Options arrow). Use the Options arrows to scroll through the options until the one you want is displayed. Press ADJUST to select it and HOME to return to the main screen. 1. CREASABLES The CREASABLES option minimises the likelihood of creases or wrinkles forming in clothes, if you are not able to unload the dryer straight away. This option rotates the drum periodically after the cycle has finished.
The Options 3. END OF CYCLE BEEPS You can change the number of beeps your Intuitive™ dryer sounds at the end of the cycle. Scroll to Options screen 3, use the ADJUST button to move to your desired preference. Press HOME to save your selection. 4. REMINDER – REMOVE DELICATES EARLY If you wish, your Intuitive™ dryer can remind you to remove your delicate items while they are still slightly damp. This can be useful if you have a mixture of light and heavy fabrics in your load.
Lifecycles® Your Intuitive™ dryer has a range of special, pre-programmed Lifecycles® to make doing the laundry even easier. ■ Push the LIFECYCLES button. ■ Use the OPTIONS button to scroll through the 3 Lifecycles® menus, or you can press the LIFECYCLES button repeatedly. ■ Use the ADJUST button to select a lifecycle. ■ Press HOME to return to the main screen. L1 Family ALLERGY This cycle has been designed to complement the Allergy cycle currently available in the Intuitive™ washer.
Lifecycles® L3 Bulky Items BLANKETS You will need to check the care label to make sure that the item can be dried in the dryer. It is a good idea to include 4 – 5 medium sized towels along with the blanket for cushioning. This will reduce shrinkage from over tumbling. If you are drying more than one blanket, ensure that they do not sit higher than the top of the lint bucket, otherwise there will not be enough room for them to tumble.
Using Your Dryer Check the care labels inside the garments to determine whether the garment manufacturer recommends tumble-drying. Sorting It is best that you sort your garments before placing them into the dryer. Sort into loads of similar types, and loads that take similar times to dry. Heavier items (e.g. towels, t-shirts and flannel sheets) are best dried separately from lightweight items (e.g. synthetics, poly-cotton sheets and shirts).
Using Your Dryer Lint Bucket The Intuitive™ dryer’s lint removal system is unique. Unlike other dryers, the Intuitive™ dryer automatically removes the lint for you, from the lint screen – all you have to do is tip the lint out! The lint filter is hidden behind the lint bucket. As the air passes through this filter the lint is caught on the fine mesh. Once the lint is about 2mm thick it comes into contact with a scraper which deposits it into the bucket.
Lid Lock Your Intuitive™ dryer locks it’s lid at the start of the drying cycle, providing added safety for you and your family while it is operating. This lock ensures the lid cannot be opened while the drum is rotating. A lidlock symbol (padlock) appears in the corner of the screen when locked (it disappears when unlocked). If the lidlock symbol is flashing the lid is in the process of being unlocked. During this stage, the lid still cannot be lifted.
Cleaning Clean your dryer with a soft damp cloth and wipe dry. Do not use scouring cleaners as they can damage the paint and plastic surfaces. Removing the Lid You can remove the lid for cleaning. Open the lid fully, hold one side with one hand and tap the other side with an upwards motion. To replace the lid, hold the lid vertically and align both hinges before clicking back into place.
If Your Intuitive™ Dryer Beeps For Help Your Intuitive™ dryer is capable of diagnosing its own troubles. If your dryer is displaying a message on the display screen and is sounding a musical series of beeps every 5 seconds, it has a problem that you may be able to solve using the checklist below. (It’s the same sound Intuitive™ dryer makes when you plug it in). If you are unable to solve the problem from the checklist below call for service.
Trouble Shooting Pressing POWER does not turn the dryer on Is the electrical cord plugged in? If not plug the cord in. If there is a switch, is it switched on? Could your household power supply be at fault? (If your plug is suitable, try plugging another electrical appliance into the same outlet). Check your house circuit breakers and fuses. If they are at fault contact an electrician. Dryer does not heat Is the dryer set to the AIR DRY Fabric Care Setting? Has the dryer progressed to COOLING.
Trouble Shooting Linting Problems Is the lint bucket full? When lint reaches the top of the transparent section of the bucket it needs emptying. Have you separated lint-shedding garments (e.g. towels) from lint receiving garments (e.g. synthetics). Have you checked your pockets for tissues or other items that could have been left in them? Have you over-loaded your dryer? Over-loading can result in linting problems due to reduced airflow and lint not being able to collect on the filter.
Manufacturer’s Warranty When you purchase any new Fisher & Paykel whiteware Product you automatically receive a two year Manufacturer’s Warranty covering parts and labour for servicing. Fisher & Paykel Undertakes to Repair or, at its option, replace without cost to the owner either for material or labour any part of the Product, the serial number of which appears on the Product, which is found to be defective within TWO YEARS of the date of purchase.
Customer Care Check the things you can do yourself. Refer to your User Guide and check: 1 your appliance is correctly installed 2 you are familiar with its normal operation 3 you have read the Trouble shooting section. If after checking these points you still need assistance please refer to the following: In New Zealand If You Need Assistance...
Copyright © Reserved Copyright Fisher & Paykel © Fisher 2005. All & rights Paykel reserved. 2004. The product specifications in this booklet apply to the specific products and models described at the date of issue. Under our policy of continuous product improvement, these specifications may change at any time. You should therefore check with your Customer Care Center Centre to ensure this booklet correctly describes the product currently available. www.fisherpaykel.co.nz www.fisherpaykel.