
Installation Guide
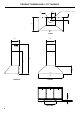
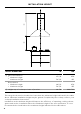
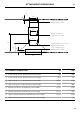
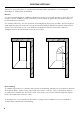
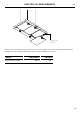
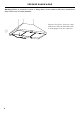
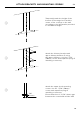
Table Of Contents
- INSTALLATION GUIDE
- Contents
- Safety and warnings
- Parts supplied
- Prior to installation
- Product dimensions – 24" models
- Product dimensions – 30" models
- Product dimensions – 36" models
- Installation height
- Attachment dimensions
- Venting options
- Prepare range hood
- Attach brackets and mounting screws
- Hang range hood
- Electrical connection
- Attach chimney
- Final checklist

19
EN
ATTACH BRACKETS AND MOUNTING SCREWS
1
2
3
Temporarily mark the height of the
bottom of the range hood and the
centre of the cooktop on the wall
according to the information provided
in 'Installation Height'.
Attach the chimney bracket and
upper chimney bracket (if using
the upper chimney). Use the 1 3/16"
(30mm) screws and expansion plugs if
attaching to masonry.
Attach the upper hood mounting
screws. Use the 1 3/16" (30mm)
screws and expansion plugs if
attaching to masonry.
Ensure that there is a 1/16" (2mm) gap
between the screw head and the wall.
1/16"
(2 mm)