
Installation Guide


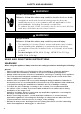

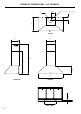
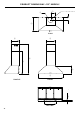
Table Of Contents
- INSTALLATION GUIDE
- Contents
- Safety and warnings
- Parts supplied
- Prior to installation
- Product dimensions – 24" models
- Product dimensions – 30" models
- Product dimensions – 36" models
- Installation height
- Attachment dimensions
- Venting options
- Prepare range hood
- Attach brackets and mounting screws
- Hang range hood
- Electrical connection
- Attach chimney
- Final checklist

7
EN
PRIOR TO INSTALLATION
The manufacturer is not liable for any damage caused by not following these instructions.
z
Unpack the range hood.
z
Ensure the voltage (V) and the frequency (Hz) indicated on the rating plate
matchthevoltage and frequency of the installation site.
z
Check that the area behind the installation surface to be drilled is clear of any electrical
cables or pipes etc.
z
The range hood surfaces can be damaged during installation if grazed or knocked by
tools. Please take care to protect the surfaces during installation.
z
Protect the cooktop surface with cardboard, or the like, to prevent damage
occurring whilst the range hood is being installed above.
z
The wall used for mounting the range hood should have sufficient strength and a
flat surface.