
User's Manual


5
2. Default Value of DHCP Service Configuration
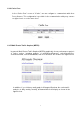
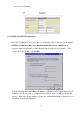
Then click “DHCP” in the “Service” screen. A NIC screen showing that DHCP is enabled
will appear as shown in the figure below:
The above figure shows that the NIC (eth1) had enabled DHCP. If you want to use
other NICs to enable DHCP, you can select “Enable” for the specified NIC on the
“Configuration” screen as shown in the figure below:
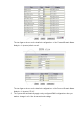
3. Change in NIC Configurations of DHCP
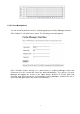
In the “Configure” screen of “DHCP”, we can choose to carry out related configurations
for the NIC that starts the DHCP. As shown in the figure below, check the Sub-domain
“192.168.2.0” (pointed out by the arrow) to enter the configuration screen of that NIC.
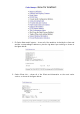
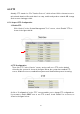
In the NIC Configure screen with DHCP of 192.168.2.0 as shown below, we have
set up such parameters as “172.16.100.1” for the server, “172.16.100.1” for the
router, and the IP-address range available in the DHCP server. These settings are
related information provided by the DHCP server when DHCP clients request the