6.2.4 Cache Peer In the “Cache Peer” screen of “Cache”, we can configure to communicate with other Proxy Servers. This configuration is possible for the communication with proxy servers on upper levels or on the same level. 6.2.5 Multi Router Traffic Grapher (MRTG) In general, Multi Router Traffic Grapher (MRTG) graphically shows performance analysis of cache service, including analysis of cacheServerRequests, cacheServerErrors, cacheServerInKb, cacheServerOutKb, and CPU utilization.
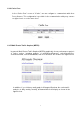
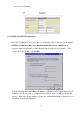
6.2.6 Cache Management You can check whether the cache is operating properly via Cache Manager Interface. Click “Statistics” in Cache service menu. The following screen will appear: Click “Continue” button directly (it is unnecessary to complete Manager name and Password since the system will enter the data automatically).
1. IP Cache Stats and Contents – shows all of the websites visited by the client-end and the corresponding IP addresses, plus the log data of pre-caching, as shown in the figure below: 2.
6.3 DHCP Service DHCP (Dynamic Host Configuration Protocol) is a communication protocol used to distribute IP addresses and other configurations between Client PSs and DHCP server. It mainly features to enable one computer broadcasts through its own MAC address to obtain configurations related to IP, Netmask, Default Gateway and DNS.
2. Default Value of DHCP Service Configuration Then click “DHCP” in the “Service” screen. A NIC screen showing that DHCP is enabled will appear as shown in the figure below: The above figure shows that the NIC (eth1) had enabled DHCP. If you want to use other NICs to enable DHCP, you can select “Enable” for the specified NIC on the “Configuration” screen as shown in the figure below: 3.
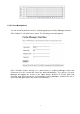
server for an IP address. 6.3.2 DHCP Client-End Configuration Client-end configurations are very simple, just requiring a few of steps as shown below: 1. DHCP Configuration (Microsoft Windows 2000 taken as an example here) Click the right mouse button on “My Network Places” and select “Properties”. Then select “TCP / IP” Æ NIC (e.g. NE2000). Except selecting “Automatic Obtain IP Address” (Shown as in the figure above) on “IP Address”, you do not need to configure related options.
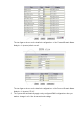
6.3.3 DHCP Logging After selecting “Logging” of “DHCP”, the system will display the utilization status of DHCP clients, such as IP addresses and lease time, MAC addresses, and host names of the client PC, so that MIS staffs are able to conduct related administration, as shown in the figure below: 6.4 DNS Select “DNS” in “Service”: (Related configurations below are for demonstration only) As shown in the figure above, configuration list for “DNS” appears. The list shows all current configurations of “DNS”.
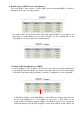
Select “New Master Zone” to add a new primary domain: Note: 1. (master) eflash.com.tw, (master) 192.168.2, (master) 172.16: are the Forward and Reverse of DNS. “(master) eflash.com.tw” is the Forward Domain Name Analysis of this domain, while “(master) 192.168.2” and “(master) 172.163” are its Reverse Domain Name Analysis.
The two figures above are the detailed configurations of the Forward Domain Name Analysis of “(master)eflash.com.tw”. 2. The two figures above are the detailed configurations of the Reverse Domain Name Analysis of “(master)172.16”. The system will automatically apply newly configured DNS configurations after you make a change in all of the aforementioned settings.
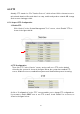
6.5 FTP Actually, FTP stands for “File Transfer Protocol”, which allows LAN or Internet users to upload and download files and data in a snap, and thereby makes network HD storage and resource sharing possible. 6.5.1 Steps of FTP Configuration 1. Enable FTP Click “Service” in the “System Management Tools” screen, select “Enable” FTP as shown in the figure below: 2. FTP Configuration Then click “FTP” in the “Service” screen, and you will see a FTP service default offered by the system.
6.5.2 Anonymous Configuration Click “Anonymous FTP” in the “FTP” screen. As shown in the figure above, configuration list for “Anonymous FTP” appears. This list shows all the applied configurations of “Anonymous FTP”. This item is used to enable each configuration. ※ Note: “Anonymous FTP” means that the FTP is obtainable via universal user account, requiring no account authentication. Whether to enable this function depends on “Anonymous FTP status”.
sometimes caused by the mistakes of these configuration files’ content or those of file permissions. 6.6.1 Mail Configuration It is mainly used to configure email size limit. Please select “Configure” in “Mail Service” interface. Then a screen will appear as follows: Now you can configure mail size; if you do not specify, mail size will be 0 Bytes. (Note: The unit is Bytes. So if you want to configure as 1MB, you should configure as 1024000 Bytes.) 6.6.
You can configure accessed domain range for mail service. Access service is not available for those not listed on the Access List. The range can be Domain Name or IP address. (Note: The rule fields of the system allow continuous entry of data, without any limitation on the space shown in the screen.) 6.6.4 Configure Mail Domain for Localhost Here you can configure the domain names or other names that are available in the host, with default values automatically configured during installation.
(Note: The rule fields of the system allow continuous entry of data, without any limitation on the space shown in the screen.) 6.6.5 Configure Email-Relay Domain Here you can configure the domain or IP address block to have the mail service accept relayed emails. During installation, the management interface will automatically configure a default value for the properties here.
The range here can be on a basis of domain names or IP addresses. (Note: The rule fields of the system allow continuous entry of data, without any limitation on the space shown in the screen.) In order to prevent from any unauthorized utilization of mail relay. Maat system included an authentication facility to challenge user with user ID and password. When user’s domain that is not in “Relay” list, system will prompt for user ID and password. User will be denied if authentication does not successful.
The range here can be on a basis of domain names or IP addresses. (Note: The rule fields of the system allow continuous entry of data, without any limitation on the space shown in the screen.) 6.6.7 Mail Queue The main function of Mail Queue is to display all mails waiting for sent (shown as follows). You can click “Delete all mail in queue” to delete all mails waiting in queue. 6.6.
6.6.9 Mail Logging(Simple) By clicking “Mail Logging(Simple)” of “Mail”, you can view the mail service in simpler format, It include “From” , “To” , “ID” , “Size” and “Subject” as shown in the figure below: 6.6.10 Mail for root & sysop Managers After you finish configuring the system, “rootalias” will be set up automatically as a default account and there is no way to delete it.
Click on “Mail Tool” button on the upper right side of screen. The Mail Tool management screen show as below: Change Password: It allows you to change user password. Mail Forward Setup: It allows you to set mail forwarding to another mail account. Mail Box Quota Check: It allows you to check status of mail quota. Clean Mail Box: It allows you to clean up mailbox content. 6.
system default is “Enabled” SNMP. If not, please enable on “System Management” of “System Management Tool”.) Click on “MRTG” from “Service” to begin traffic monitoring, and then click on “Configure”. As shown in the figure below, full in IP address in the “MRTG Target” field, and then click on “MRTG Rebuild” to complete the configuration. (Note: Here the MRTG address stands for local host or other node needing traffic monitoring.) 6.7.
Click one of the traffic graphs above and then a screen will be shown as follows: The figure above displays MRTG traffic monitoring, which generate traffic graphs on a basis of days, weeks, months, and years. In addition, it separately presents a graph of Max In / Out, Average In / Out, and Current In / Out, offering administrators with referential data to conduct system tuning and improve network performance. 6.
transparently across the Internet. 6.8.1 Configuration It is also very simple to configure NAT in this host. To start, please click “Service” and “NAT” from “System Management Tools”. Then click “Configurations” to configure which NIC is for the public network and whether to enable NAT and whether to log, and log directory、size and times as shown in the figure below: 6.8.2 Port Redirection Port Redirection function can redirected the packet externally connected to specified port number to specified host.
6.8.3 NAT Logging Click ”Logging” from “NAT”, then you can see the user records of NAT as shown in the figure below: 6.9 NetBios Services NetBios Services features to make all users using Windows operating system see and share local file services on My Network Places. 6.9.1 NetBios Configuration Click “Service” from “System Management Tool”, then click “Configure” from “NetBios Services”. You can configure the following item: Netbios Name: It’s the host name configuring from “Network Interface”.
Maat file server. Netbios Interface: It’s to activate the network interface for file share function. Workgroup: It is the workgroup name that designate in Microsoft network environment. Share Printer: It allowed you to “Enable” or “Disable” the printer share function. Codepage: It’s to define the language code that you using in your nation. For example, in Japan area you will choose the “Japanese” to correctly show any file name that in Japanese word. 6.9.
You are allowed to modify the parameter for specific volume. There is default value shown as above. 6.9.3 Connection Click “Connection” from “NetBios Services”; you can see the whole user connections established as shown in the figure below. They include “Volume Name”, “Machine”, “IP” and “Date”. 6.9.
6.10 PostgreSQL PostgreSQL is a powerful object associated database containing many support capabilitites that are not provided by other databases. PostgreSQL features its support to various programming languages and provides commonly used accesses such as ODBC and JDBC. It also provides excellent support to Chinese. For the information of technical support, please refer to our official website: www.postgresql.org. 6.10.
6.11 MySQL The Maat supported MySQL database from release of v3.01. MySQL database is more friendly and simple for programmers even their functions are very similar to PostgreSQL. The programmers can use PHP script language and MySQL to build a database function of web page. Any further questions please refer to the URL: www.mysql.com. As the same as phpPgAdmin in PostgreSQL, The Maat also provided phpMyAdmin for MySQL database management.
function) 6.13 TELNET Telnet is a host, enabling login into remote-end host from near-end terminal (For example using Windows built-in telnet or other Terminal Freeware such as NetTerm or MultiTerm.) 6.13.1 TELNET Configuration Click “TELNET” from “System Management Tools”. After clicking “TELNET Configure” you can optionally choose to start this function or not (For safety consideration it is recommended to close this function.) As shown in the figure below: 6.
6.14.1 Operation Procedure to enter Open WebMail Open browser directly to enter the system’s “hostname• domain” or “IP” in the web address column. Remember not to add “10000” and directly enter the system’s main screen. Click on “Web Mail” of “Service” , main screen of Web Mail appears as shown in Figure below: Here are basic instructions to use Open WebMail. If you want to configure or view other functions, you can click to login your User ID and password.
6.14.2 User Preferences Now configure personal data and personalized settings: Click “Save” to save the configurations: After clicking “Continue”, you can enter the Open WebMail screen. Select the folder on the upper left to enter the desired working mailbox, and then use tool icons on the Tool Bar to continue operation.
6.14.3 Compose Message Click on “Compose Message” icon (shown as the Figure above) on the upper left to display new Compose Window. Its usage is similar to other e-mail software. After composing a new mail, click “Send” below the screen. As shown in the figure below: 6.14.4 Check Mails Click “Refresh” icon to receive your new mails. Remember to go to “Inbox” to view the received mails. As shown in the figure below: 6.14.
if you want to select all mails, click on “All”. Then click on “Move” to move these mails to “Trash” (at this time these mails are not really deleted yet.). Go to “Trash” to make sure you want to delete the mails, click on “Empty Trash” icon, you can delete these emails permanently. As shown in the figure below: 6.14.6 Address Book Click on “Address Book” icon, you will enter “Edit Address Book”. You can input data manually or import data.
6.14.7 Web Mail Configure Click “Configure” under “Web Mail” on “Service” of system management tool interface to set up language and domain name used on Open WebMail. The properties are automatically generated by the management interface when installing. Except to be used in modifying settings of DNS, normally they do not need to be modified. (Note: This is closely related to mail services mentioned above. If the mail services are not activated, you cannot receive and send web-based mails either.
6.15 Web Service “Web Service” provides WWW Services. System presetting is “On”. If not activated, please click on “Service” on system management tool to change activation status. 6.15.1 Web Port Configure Click on “Configure” you are allowed to configure “Port Number” for the web traffic. The default number is “80”. 6.15.
6.15.3 Place Homepage 1. Place System Homepage To place the finished homepage to Maat server, you must be administrator sysop, then you can use ftp to upload. For example, if the established web page is named index.htm(or index.html) and the host name is test.steptech.com.tw. Open a DOS Prompt (MS-DOS Mode) on Windows NT or Windows 9X. C:\> ftp test.steptech.com.tw User (test.steptech.com.tw:(none)): sysop Password: steptech ftp>put index.htm /www/data/index.htm ftp>bye C:\> Note: The preset homepage name i
ftp>bye C:\> Note: The preset homepage name is index.htm or index.html for the host. In addition to using standard ftp command mode to upload web pages, you can also make use of various FTP package available on the market to meet your need and to upload more easily and quickly. 3. Show Web Page We can enter “http://your host name” in browser web address column, then we can see your system main pages.
Chapter 7 Firewall Maat system provided packet filter function for user to filter specific traffics. It allows user to define firewall rules by IP, port, protocol and direction of packet. This firewall function provided user a basic security infrastructure. Please click on “Configure” of “Firewall”. The diagram show as below: Click on “Enable” to activate the firewall function. 7.
7.2 Deny IP Configure System allows user to deny single or multiple IP connections. User can input rules by IP address, Domain Name or Network. For example: 192.168.2.10, 172.16.0.0/16 or www.hinet.net. The input field will automatic expand without limitation.
Chapter 8 Timefinder Timefinder is mainly used to backup and recover system data files. As for user data (such as homepage and mails) tape driver and disk array are needed to provide protection. The focus of host system design is an Internet Server, not a File Server. So the major function of Timefinder is to protect system’s data files. Timefinder features four main operations.
The following operations are quite easy. Flow chart and figures are provided to help users understand. 8.1 Backup to Host Select “To Host” on “Timefinder” of management interface, as shown in the figure below: Click “OK” to complete backup. 8.2 Backup and Download Select “To browser” on “Timefinder” of management interface, as shown in the figure below: You can change directory and name and click “Save”.
Click “Save” as shown below: Now “Backup to Current Computer” is completed. Please remember the saved directory and file names for next restore. 8.
Click on the time you want to restore and click ” Submit”. This means “Timefinder from Host” is completed. The system will be rebooted and restored to your selected time point. 8.4 Timefinder from Browser When you select “From Browser” from “Timefinder” as shown in the Figure below: Click “Browse”, the Figure below appears.
Click ” Submit” to begin restoring files. When it has finished, the system will reboot.
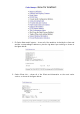
CHAPTER 9 Online Help In this version of Maat is capable to support Online Help function. User just click on “Online Help” in left side of the GUI screen. The user manual’s text will pop on as shown as picture below: Click on the text will link to the section that you required. If you finished to view the Online Help just close the screen box. If any further questions please contact with your local representatives for technical support.
WARNING: FCC Note: This equipment has been tested and found to comply with the limits for a Class B digital device, pursuant to Part 15 of the FCC Rules. These limits are designed to provide reasonable protection against harmful interference in a residential installation. This equipment generates, uses and can radiated radio frequency energy and, if not installed and used in accordance with the instructions, may cause harmful interference to radio communications.