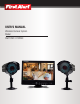
USER’S MANUAL Wireless Camera System Model DW702M | D702MC
WELCOME WELCOME Thank you for choosing First Alert for your security needs! For more than half a century, First Alert has made the home-safety and security products that make your job easier. Our products are built to the highest standard which has earned us a leadership role in the home-safety and security product categories. We are committed to serving our customers, from the professionals who install our products, to the families and businesses who count on them.
TABLE OF CONTENTS TABLE OF CONTENTS Safety.. . . . . . . . . . . . . . . . . . . . . . . . . . . . . . . . . . . . . . . . . . . . . . . . . . . . . . . . . . . . . . . . . . . . . . . . . . . . . . . . . . . . . . . . . . . . . . . 4 Getting to Know Your System. . . . . . . . . . . . . . . . . . . . . . . . . . . . . . . . . . . . . . . . . . . . . . . . . . . . . . . . . . . . . . . 6 System Set Up - Installing Cameras. . . . . . . . . . . . . . . . . . . . . . . . . . . . . . . . . . . . . . . . . . . .
SAFETY PRECAUTIONS SAFETY PRECAUTIONS • • • • • • Do not drop, puncture, or disassemble the cameras or DVR. Do not tug on the power adapter. Use the plug to remove it from the wall. Do not expose the cameras or DVR to high temperatures. For your own safety, avoid using the DVR when there is a storm or lightning in your area. Use the cameras and DVR with care. Avoid pressing hard on the cameras or DVR body.
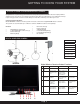
GETTING TO KNOW YOUR SYSTEM GETTING TO KNOW YOUR DW702M SECURITY CAMERA Congratulations on purchasing your First Alert Security Camera product. First Alert has been helping families and businesses stay safe for over 50 years. By having a First Alert Security Camera, you’re taking the first step in protecting your home or business from damage or theft. We’re watching, even when you’re not. CHECK PACKAGE CONTENTS Model DW702M is a wireless monitor system.
GETTING TO KNOW YOUR SYSTEM Remote Control Press to Power the Monitor ON. CH 1 CH 2 CH 3 CH 4 CH Menu Press to select Channel 1. Press to select Channel 2. Press to select Channel 3. Press to select Channel 4. Press to Exit Menu Press to bring up Menu options or to confirm a selection Press to move selection downward Press to move selection upward _ + Directions for Installing/Changing Batteries: 1. Open battery compartment on back of remote and insert (1) 3V Lithium battery (provided). 2.
SYSTEM SET UP - INSTALLING CAMERA SETTING UP YOUR DW702M SECURITY SYSTEM GENERAL PRECAUTIONS • • • • • Use only the power supply provided with the system. Unplug the power supply when the system is not in use for extended periods. Do not place any of the equipment near a radiator, vent, or other place where it might be exposed to heat, moisture, dust, vibrations, or strong magnetic fields. Do not attempt to repair the camera. Contact a qualified technician or the dealer for service.
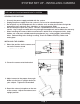
SYSTEM OPERATION CONNECTION GUIDE Connecting the Camera 1. Connect the supplied power adapter (5V) to the power input on the camera. 2. Plug the power adapter into a wall socket. Connecting the Monitor 1. Connect the supplied power adapter (5V) to the power input on the Monitor. 2. Plug the power adapter into a wall socket. 3. Press power button on the monitor for 2 seconds to power on. OPERATING MENUS This chapter provides information about the menu screens.
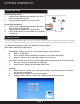
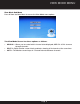
VIEW MODE MENU View Mode Sub Menu Press M from the Main Menu to access the View Mode menu options. The View Mode Screen has three options as follows. • MANUAL – Allows you to control which channel to be displayed; USE CH- & CH+ to move through channels. • SPLIT 4 – Splits monitor screen into 4 quadrants showing all 4 channels at the same time. • AUTO – The Monitor screen loops in 5 second intervals between channels.
RECORDING & STORAGE MENU REC – STORE Sub Menu Press M from the Main Menu to access the REC Store menu options. The Rec Store Sub-menu provides 2 selections: • Rec Files - allows you to view recorded files that reside on the SD card. • Store Format - provides the ability to format the SD card. SCREEN 1 To Review a Recording: 1. Highlight Rec Store to bring up Record Search Video Screen 1 screen. 2. Highlight Video on Record Search Video Screen 1 and Press M. 3.
RECORDING & STORAGE MENU Store Format Screen To Format the SD card Note: Formatting should be performed whenever a new SD card is to be used. The formatting process 1. Store Format in the Rec Store Sub screen to bring up Formatting Confirmation screen. Press M to confirm selection. 2. Highlight OK (or cancel if in error) to format the SD card. Press M to confirm selection. 3.
SYSTEM MENU MOTION RECORD System Menu The System Menu provides 3 options. The options include Motion Record settings, (setting of the system time) Clock setting and Pairing Camera with the system. Motion Record – allows the user to set cameras to record for 5 seconds, 10 seconds, all of the time (on), or No Record (OFF). • • • • 5 S – Records 5 seconds after motion stops. 10S – Records 10 seconds after motion stops.
CLOCK SETTING Clock Setting The clock setting menu allows the user to set the time for the system. To set the system time do the following: 1. Highlight the Clock Setting selection from the Systems Sub Menu and press M. 2. The screen will display the Clock setting menu screen. From here you can set the Year, Month, Day, Hour and Minute for the system. Use AN+ and AN- to move from Year, Month, Day, Hour and Minute fields. 3. The field to change will be highlighted in RED. 4.
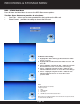
SYSTEM MENU - PAIRING OPERATION Pairing Camera Sub Menu 1 2 3 4 Press M from the record store submenu. 1. Select camera to pair by highlighting camera channel in RED. Use AN- or AN+ to select camera. 2. Press M to start pairing process. 3. While screen shows Open flap on camera power line and press button to pair. System will show Success when pairing is complete.
TECHNICAL SPECIFICATIONS Technical Specifications Camera C5734VD Image Sensor NTSC: 1/4” Color CMOS Horizontal Resolution 420 TVL Active Pixels 649H x 583V Pixel Size 6.0µm x 6.0µm White Balance Auto Signal/Noise Ratio ≤50dB Gain Control Auto Sensitivity 10V/Lux-Sec Lens 3.
TROUBLESHOOTING Troubleshooting Problem Possible Causes Remedies No power supply to camera If camera power status indicator light is off, check power adapter and power cable connection. Channel is not linked up to camera Move the camera closer to the receiver, and connect the camera to the desired channel. Go to “Camera Setup” in the Menu. Use the “Pairing” sub-menu to connect the camera to the receiver. Service out of range Move the camera closer to the receiver.
WARRANTY Product Limited Warranty BRK Brands, Inc., (“BRK”) the maker of First Alert® brand products warrants that for a period of one year from the date of purchase (the “Warranty Period”), this product will be free from defects in material and workmanship. BRK, at its sole option, will repair or replace this product or any component of the product found to be defective during the Warranty Period. Replacement or repair will be made with a new or remanufactured product or component.
©2012 BRK Brands, Inc. a Jarden Corporation Company (NYSE:JAH) 3901 Liberty Street Road, Aurora, IL 60504-8122 Phone: 630-851-7330 Tech Services: 800-323-9005 www.firstalert.