
User's Manual


Page 5
MOUNTING & PAIRING
INSTALLATION
3
CAMERA PAIRING
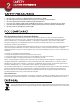
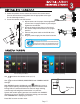
Camera Setup-Sub Menu
Camera Setup-Pairing
Use to select the camera to set up (1-4).
Use to select PAIRING, BRIGHTNESS and CAMERA ON/OFF
settings.
With PAIRING section highlighted, press MENU key once to
begin camera pairing. Press Pairing Key button on Camera cord.
Pairing LED on camera will blink once then will begin blinking
continuously indicating data transmission is in process.
System will confirm pairing process is successful with “PAIRED”
displaying on screen. System will indicate pairing process failed
with “PAIRING FAIL” displaying on screen.
Press ESC to return to main menu.
Pairing Key
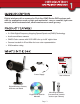
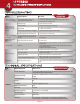
INSTALLING CAMERAS
1. Select the position for the camera and secure the camera stand.
(Screws and anchors are supplied. Use an appropriate screw type
for the mounting surface.)
2. Screw the camera onto the bracket.
3. Adjust camera to the proper view angle Make
sure the lens is upright relative to your subject.
Tighten the thumb bolt.
4. Screw the antenna into place on the rear of
the camera. Adjust the antenna to an upright
position.
5. Connect the power cable to the DC IN of the
camera.
6. Plug the power supply into the electrical outlet.
Camera Orientation
It’s important the camera is mounted correctly
to ensure the image is not upside down as the
camera lens can only be positioned one way.