
Installation Sheet


22
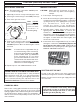
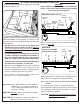
INSTALL THE COOKING GRIDS
Note: Wear heat-resistant gloves if necessary.
Note: Do not leave the lifter on any hot surfaces.
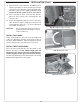
1. With the prongs facing downward, insert the notched-
end of the lifter between two grid rods, then rotate,
as shown in Fig. 22-1, A & B.
Note: To balance, insert the notched-end of the lifter
in the middle front half of the cooking grid.
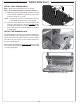
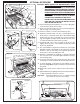
2. Insert the rear pointed-end of the lifter between the
same two rods (Fig. 22-1, B) and carefully lift the
cooking grid and place onto the front and rear grid
rests of the grill (see Fig. 22-2). Repeat for all other
cooking grids.
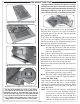
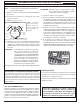
INSTALL THE WARMING RACK
The warming racks (Fig. 22-3) are packed separately. To
install a warming rack, carefully insert the rack hangers
into the two holes in the back of an inner oven hood, then
lower the front of the rack to a level position. Repeat for
the other warming rack.
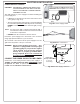
Removing the warming rack on the gas side before using
the rotisserie will leave more clearance for the meat being
cooked (if applicable).
INSTALLATION (Cont.)
Fig. 22-1 Install cooking grids
A
B
Fig. 22-2 Install warming rack
Fi
F
F
F
FiFi
Fi
Fi
Fi
Fi
Fi
Fi
FiFi
F
Fi
Fi
Fi
Fi
g.
g.
g.
g.g.
g.
g.
g.
g.
g.
g.
g.
g.
g.
g.
g.
g.
g.
g
22
2
2222
2
2
2
22
2
2
2
2
2
2
2-
2-
2-
2-
2-2-2-2-2-
2-
2
2-2-
2
2-
2-
2
2
2 2
2 2 2 2 2
2
2
2
2
2
2
2
2
2
2
2
In
In
In
In
InIn
In
In
In
In
In
In
InIn
In
In
In
In
In
stst
st
st
ststststst
st
st
st
st
st
alalalal
al
al
al
al
al
al
a
a
al
al
al
al
l
al
l
l
l
l
l
l
l
l
l
l
l
l
l
l
l
l
l
l
l
l
wawawa
wa
wa
w
w
w
wa
wa
wa
wa
w
wa
wa
wa
rm
rm
rm
rmrm
rm
rm
rm
rm
m
m
m
m
m
m
m
r
ininin
in
i
i
in
in
in
in
in
in
in
g
g
ggg
g
g
g
g
g
g
g
ra
ra
ra
rara
ra
ra
ra
ra
ra
ra
ra
ra
ra
ra
ra
ra
ra
ck
ck
ck
ckck
ck
ckck
ck
ck
ck
ck
ck
c
c
c
Warming rack
Fig. 22-3 Install warming racks
Fig. 22-2 Install cooking grids