
Installation Sheet


21
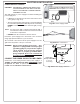
4. Turn all burner control knobs to the OFF position.
Turn the gas supply on. Then carefully check all gas
connections for leaks with a brush and half-soap/
half-water solution before lighting. NEVER USE A
MATCH OR OPEN FLAME TO TEST FOR LEAKS.
5. Close the shut-off valve, then slide the grill into
place. Do not to pinch, kink, or damage the gas
connector line.
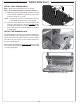
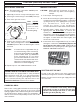
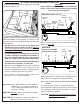
6. Rotate the adjustable support screws to the left to
raise and to the right to lower the respective side
of the appliance grill. Use a
7
/16" open-end wrench
as needed. See Fig. 21-1.
Important: Do not extend the support screws so
far that any part of the hanger is raised
off the counter top.
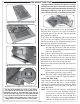
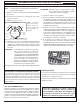
INSTALL THE CRANK
Fit the crank handle into the hole on the front right side
of the face. Aligning it carefully, screw it into the nut on
the frame. After installation, crank the handle in and out
to raise and lower the charcoal pan. See Fig. 21-2.
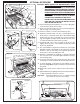
INSTALL THE FLAVOR GRIDS
Place the fl avor grids directly onto the studs on the
burners. See Fig. 21-2. The slightly larger grids are
designed to be placed over the outside burners,
and the slightly smaller grid over the inner burner.
The fl avor grids allow heat from the burners to be evenly
distributed throughout the cooking area.
INSTALLATION (Cont.)
Fig. 21-3 Install fl avor grids
Place onto studs
Fig. 21-2 Install crank
Fig. 21-1 Adjust support screws
Adjustable
support
screw
Bottom of
control panel
Bottom of
cut-out opening