
Installation Guide


Contact us for assistance: (866) 985-7877 | www.wtliving.com 7
ASSEMBLY
7
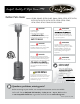
Attach Head Assembly C to Upper Post F. Route
Gas Hose E down into Upper/lower Posts F/G and
Hardware Used: 4 x Small Bolt w/Lock Washer
8
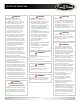
NOTE: MAKE SURE TO REMOVE
PROTECTIVE PLASTIC COVER ON REFLECTOR PIECES
PRIOR TO ASSEMBLY!
Ass
sections, loosen each screw prior to further assembly and
retighten after sections are aligned.
Slide two
A
together. Insert one Small Screw.
Screw on Cap Nut loosely.
Repeat with the other
A
.
Slide
B
onto assembled
Panels
A
. Insert one Small Screw and screw on Cap Nut
loosely. Repeat with two more Small Screws and Cap Nuts
cap nuts.
Hardware Used: 12x Small Screw | 12x Cap Nut
align 4 small holes on the Head Assembly C with 4 Small
holes in the Upper Post F. Insert the 4 Small Bolts with
Lock Washers through the aligned 4 holes and tighten
securely with the wrench.