
Troubleshooting Guide


Contact us for assistance: (866) 985-7877 | www.L>ggg¦U 5
ASSEMBLY
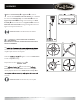
*Sandbox: /¸¿g>Ágµ¿come¸ with a sandbox¿¡µg>¸¸gLg_¿Á¿Ág¿L>¸g¦¿/¿t¿Ág
¸>_LÒ\¿ ¡ull open the plastic cap on top¿of the¿¸>_LÒ¿>_¿t¿ÑÁ¿Ñ>Ágµ¿µ
¸>_¿£¸>_¿¸¿µgUg_g_¿t¿Ág¿g>Ágµ¿Ñ¿Lg¿gÒ¡¸g_¿Á¿tµgg×y¿Ág¡gµ>Áɵg¸¤¦
,g¡>Ug¿Ág¿plastic cap.¿9É¿>Ó¿t_¿Á¿g>¸gµ¿Á¿t¿Ág¿¸>_LÒ¿¡µµ¿Á¿>ÁÁ>Uy
Ñgg¸¦
¿Ág¿gÐgÁ¿Á>Á¿ÓÉ¿gg_¿Á¿µgÐg¿µ¿µg¡>Ug¿Ág¿¸>_LÒ\¿µgÐg¿Ág¿w¿>µyg¿
-UµgѸ¿>_¿>µyg¿ ÉÁ¸¿Á>Á¿¸gUɵg¿Ág¿L>¸g¿Á¿Ág¿¸>_LÒ\¿Ág¿tÁ¿Ág¿L>¸g¿tt¿t¿
Ág¿¸>_LÒ¦¿/¿µg¸Á>\¿¡>Ug Base back over the sandbox and align the¿holes in
the base with the holes in the sandbox. Insert Large½Screws through the holes in the
base and secure by tightening¿Large Nuts ¿g_¸¿t¿Ág¿LÁ¸¦¿
1
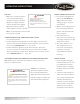
Attach Wheel Assembly
K
to Base
J
. Align holes in
Wheel Assembly with corresponding holes in Base,
and insert 2 g_Å Bolts¿ÁµÉy¿Ág¿g¸¿>_¿>_¿
ÁyÁg¦¿Be sure that the Wheel Assembly is parallel to the
Base
J
and tighten with the Wrench.
Hardware Used: 2x g_É Bolts
2
Attach the Post Supports
I
to the Base
J
. Align the holes
in the bottom of each Post Support with the hole on the
Base. Insert 1 g_Å Bolt through the hole in the support
and into the Base and handtighten. Repeat with the other
2 Post Support¶ and then tighten all ¿¶ with the Wrench.
Hardware Used: 3x g_É Bolts
Plastic Cap
Sandbox
Base
PREPARATION
Before beginning assembly of this appliance, make sure all parts are present. Compare all parts with package contents list
and hardware contents as listed on page 4 of this manual. If any part is missing or damaged, do not attempt to assemble
this product. Contact ustomer -ervice for replacement parts.
ESTIMATED ASSEMBLY TIME: 60 minutes
Tools Required for Assembly (NOT included):
T *¡¸¿¸UµgÑ_µÐgµ¿Ñ¾g_É¿L>_g¿¿¿¿¿T¿g>¿Ág¸Á¿¸ÉÁ¿£¸gg¿¡>yg¿Ù¤