
Installation and Operating Instructions

5
NO. L-C2-27409
Rev 4 - 0901121556
Place blender in blender mounting
Open the domed lid attached to the right back of
the countertop. Unpack the blender and read the
instructions.
Attach the plastic plug to the three-pronged electrical
cord. Feed the cord through the cutout that is located
on top of the counter in front of the domed lid. Be
sure to snap the plastic plug in place. (See Fig.
4-4 on page 4). From there, plug the cord into the
nearest grounded electrical outlet.
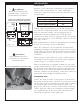
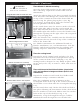
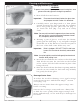
In the stand-alone unit, the nearest outlet is located
in the right-side wall. Lower the cord towards the
right-side wall and then open the doors and remove
the middle right-side drawer. Locate the blender cord
through the opening on the right above the receptacle
(Fig. 5-1) and plug it in.
Place the blender base carefully onto the blender feet
depressions that are located on top of the counter in
front of the domed lid.
See blender instructions for additional details on
blender installation, use, and maintenance. Test the
blender and electrical connection by applying and
turning off power without the container in place.
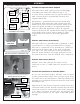
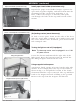
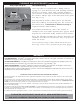
Place the cutting board
Unpack the wood cutting board and place the four
(4) rubber feet into the four (4) depressions on top
of the counter in front of the sink (Fig. 5-2). The
cutting board is designed to stay fi rmly in place while
in use and yet be easy to remove, clean, and store as
needed.
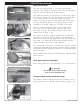
Place stainless-steel bottle/food holders (stand-alone
only) and condiment storage containers (built-in and
stand-alone)
Unpack the stainless-steel bottle/food holders and
condiment storage containers with lids.
Place the condiment storage containers in the
rectangular holes in the top of the counter in front of
the blender. Cover them with the rectangular lids (Fig.
5-3).
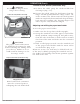
On the stand-alone only, lift the left shelf and lock it
into place following the instructions below, then insert
the two stainless-steel bottle holders into the circular
holes in the top of the shelf (see Fig. 5-4).
Alternately, a tap for draught beverages could be
installed/inserted through the rear circular hole.
ASSEMBLY (Continued)
Cutting board
Match cutting board feet to holes
Stainless-steel
counter
Fig. 5-2
WARNING
Do not use blender in
rain or wet conditions.
Fig. 5-1
Drawer slider
Inner wall
Plug-in blender inside left stand-alone wall
Outer wall
Receptacle
Slide the holders into the shelf-top holes
Fig. 5-4
Slide the containers into countertop
Fig. 5-3