
Installation and Operating Instructions

4
NO. L-C2-27409
Rev 4 - 0901121556
ASSEMBLY
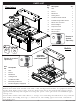
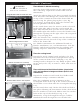
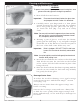
Plumb or set up waste water disposal
The sink comes with a plastic trap and drainpipe
extending just below the sink (see Fig. 4-1).
A waste water container may be placed under the
sink. It must then be periodically checked and
emptied when full.
Alternately, a permanent waste water drain may
be plumbed from under the sink out through the
knock-out in the rear left (stand-alone only) or the
enclosure (built-in only) to an appropriate drain.
Observe all locally applicable codes. If required,
remove the knock-out (stand-alone only) by striking
it forcefully in the center with a mallet or other
appropriate tool. Observe all locally applicable
codes.
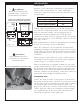
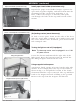
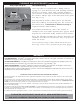
Attach a water source (stand-alone)
The sink comes pre-installed and is plumbed so that
a garden hose or other pressurized water-supply
line can be connected to the female hose connector
centered in the lower end of the back of the unit
(see Fig. 4-2). The connector on the garden hose
must be clean and free of foreign material. Screw
the end of the hose onto the female hose connector.
Attach a water source (built-in)
Plumb a water line through the inside of the
enclosure to the
1
/
2
” NPS connector attached to the
faucet.
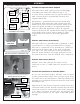
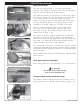
Connect the stand-alone to electrical power
To use the electrical outlets, blender, and electrical
sockets (stand-alone only), the beverage center must
be connected to electrical power. This is performed by
plugging in a grounded electrical extension cord rated
for outdoor use.
Plug the male end of the extension cord into an active
electrical outlet and the female end into the left-most
electrical connector on the right side of the unit (Fig.
4-3). Other electrical devices may be plugged into
the electrical outlets on the right of the line-power
hookup.
Fig. 4-2
Stand-alone water hookup
Female hose
connector
Waste water
knock-out
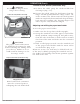
Blender
Fig. 4-4
Fig. 4-1
Knock-
out
Waste
water
container
Drain
spout
Drain
clean-out
Faucet
base
Drain sink to container or drain line
Fig. 4-3
Electrical connectors (stand-alone only)
Blender placement (side view)
Domed
lid
Cord into cutout
plastic plug
depressions