
Installation Instructions and Owner's Manual


18
INSTALLATION (cont.)
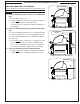
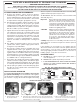
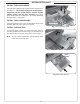
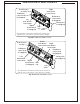
INSTALL THE WARMING RACK
The warming rack (Fig. 18-1) is packed separately. To
install the warming rack, carefully insert the rack hangers
into the two holes in the back of the inner oven hood, then
lower the front of the rack to a level position.
Note: Removing the warming rack before using the
rotisserie will leave more clearance for the meat
being cooked (if applicable).
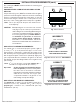
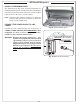
CONNECT THE POWER SUPPLY TO LINE
POWER
Connect the cord coming from the rear of the unit to a
120VAC (15 AMP minimum) GFCI GROUNDED 3-wire
receptacle. The GFCI receptacle must be a WEATHER-
PROOF IN-USE COVERED RECEPTACLE.
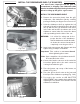
WARNING: Electrical Grounding Instructions - This
appliance is equipped with a three-pronged
(grounding) plug for your protection
against shock hazard and should be
plugged directly into a properly grounded
three-prong receptacle. Do not cut or
remove the grounding prong from this
plug.
Fig. 18-2 Electrical setup detail
3-wire GROUNDED
cord from unit
120VAC (15 AMP minimum) GFCI
GROUNDED 3-wire receptacle
Fig. 18-2 Install warming rack
FiFiFi
Fi
FiFi
Fi
Fi
Fi
Fi
Fi
Fi
Fi
F
Fi
F
F
Fi
F
g.g.
g.
g.
g.
g.
g.
g.
g.g.g.
g.
g.
g.
g.
g.
g.
g.
11
1
11
1
11
1
1
1
1
1
1
1
1
1
1
8-
8-
8-
8-8-
8-8-
8-
8
8
8-8-8-
8-
8
8-
8-
2 2
2
2 2 2 2 2 2 2 2
2
2
2
2
2
2
2
2
InIn
In
In
In
In
InInInInInInIn
In
In
In
In
In
In
st
st
st
st
st
ststst
st
stst
st
st
st
al
al
al
al
al
al
al
al
al
al
a
a
l
al
al
al
al
l
l
l
l
l
l
l
l
l
l
l
l
l
l
l
l
l
l
l
l
l
w
w
wa
wawa
wa
w
wa
wa
w
wa
wa
wa
wa
wa
wa
rmrmrmrmrm
rm
rm
rm
m
m
m
m
m
m
m
m
r
r
ininin
i
i
i
in
in
in
in
in
in
in
in
gggg
g
g
g
g
g
g
g
g
ra
rara
ra
ra
rara
ra
ra
ra
ra
ra
ra
ra
ra
ra
ra
ra
ck
ck
ckckck
ck
ck
ckck
ck
ck
ck
ck
c
c
c
c
Warming rack
Fig. 18-1 Install warming rack