H2i support@fingertec.
CONTENTS 3-4 CHAPTER 1 • GETTING STARTED Viewing the User Guide in the Internet Included Accessories Included Printed Materials Activating H2i Registering H2i 5-7 CHAPTER 2 • BASICS Introduction to H2i H2i Overview Security Features Restarting and Resetting H2i 8-18 CHAPTER 3 • CONNECTION – SYNCING Installation Mount on Well Communication Description of Available Connections Ingress Online Activation Installation and Setup of Ingress Connecting Terminals to Ingress Using USB to Download/Upload Data C
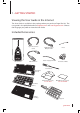
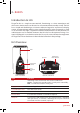
1 • GETTING STARTED Viewing the User Guide in the Internet The User Guide is available in the package when you purchase FingerTec H2i. The user guide is also published online at fingertec.com and user.fingertec.com. Choose the language you prefer to view the User Guide. Included Accessories Door Accessories Cable RS485 Wiegand Output Cable Diod Power Supply Cable A Packet of Bolts H2i support@fingertec.
Included Printed Materials • • • • • FingerTec Comprehensive DVD Quick Start Guide Pamphlet User Enrollment Template Form Warranty Card Activating H2i Connect all the cables correctly at their specific points and turn on the power supply. The H2i terminal does not have an on/off button. Registering H2i Make sure that you register your H2i’s warranty with us at www.fingertec.com/ ver2/english/e_main.
2 • BASICS Introduction to H2i FingerTec H2i is a simple master terminal, functioning as a time attendance and door access device and it can be used as a time attendance recorder as well. The H2i has a simple and sleek design as it comes without a keypad or any form of a display screen. It communicates with its users mainly through its voice commands, as well as its dual color LED light. To perform administrative functions on the terminal, an administrator card is needed.
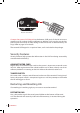
B s p ac k ac e . De l 3 Pg Dn 2 me End 0 Keypad Ins Bottom of Terminal 1 4 Ho 7 5 N Lo um ck 8 6 En ter Pg Up / 9 + - Reset Connect the external USB keypad to the bottom (USB port) of the H2i to insert a specific user ID number during enrollment or deletion. You can also use the keypad to input commands to reset settings of the H2i back to its default factory settings. Refer to page 19 for details. The external USB keypad is an optional item, and is included in the package.
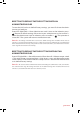
RESETTING TO DEFAULT FACTORY SETTINGS WITH AN ADMINISTRATOR CARD To reset the H2i back to its default factory settings, you must first have the administrator card with you. Green LED light blinks > Wave Administrator card 5 times at the induction area > “Restore to default settings. Please wave your administrator card to confirm” > “The operation is Wave the administrator card to induction area to confirm > successful”. The system will return to verification mode.
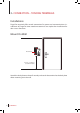
3 • CONNECTION – SYNCING TERMINALS Installations FingerTec terminals offer several connections for power and communications. Installations of FingerTec time attendance terminals are simple than installation for door access functions. Mount On Wall Back Plate H2i support@fingertec.com 4 feet / 1.2 meter (recommended) Attach the back plate on the wall securely and attach the terminal to the back plate when mounting it on the wall.
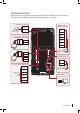
Communications Connection points for power and communication are available on top of the terminals. Refer to the following diagrams for the terminals you require. POWER SUPPLYPORT WIEGAND INPUT CONNECTION PORT +12V GND DC12V Power Supply +12V IWD1 IWD0 RS485 CONNECTION PORT 1. RS485 Single Connection RLED RX+ 485A GLED RX- 485B BEEP RS485 Data Converter GND 2.
FOR NC (NORMALLY CLOSE) DOOR LOCK SYSTEM POWER SUPPLY PORT DC12V Power Supply +12V GND ACCESS CONNECTION PORT 485485+ EM lock (NC) + - Emergency break glass (NC) 2 3 Key switch (NC) A C Optional to use with Diode GND GND Release button BUT BUT NO1 Door sensor SEN COM1 NO NC1 Door lock system COM NC ALAL+ FOR NO (NORMALLY OPEN)DOOR LOCK SYSTEM POWER SUPPLY PORT DC12V Power Supply +12V GND ACCESS CONNECTION PORT 485485+ EM lock (NO) + - Emergency break glass (NO) 1 3 Key switch (NO)
Descriptions of Available Connections USB PORT Linking with USB flash disk for remote data transfer. 1 8 1 8 TOP FRONT TCP/IP PORT Connect with a CAT 5 cable for LAN connection, one end to terminal’s port and another end to the computer’s TCP/IP Port. JOINT 1 PIN TCP/IP for Single Connection Linking the terminal to a single computer using TCP/IP requires Ethernet 10/100Base-T Crossover Cable. The cable can be used to cascade hubs or to connect Ethernet stations back-to-back without a hub.
ACCESS CONNECTION Linking the terminal to door lock system. BELL PORT Linking the terminal to doorbell. NOTE Link all cables to the correct connection point(s) before attempting to connect the terminals to software. Ingress Online Activation Ingress is a genuine software by FingerTec. Every FingerTec access control model comes bundled with a unique license key. To start using the terminal with Ingress, you must connect the terminal to Ingress and perform online activation.
At the Devices Tab, user can either choose to add device via Add Device (to individually add) or Scan Device to add multiple terminals at one go. For single terminal, after filling in the relevant information, click Add and Continue to proceed by adding another terminal or Add to add only one terminal. To add multiple devices at one go, click Scan Device and Scan. IP Address range can be set to search for devices. The bigger the range of IP address, the longer time needed to scan for devices.
Once the device has been added, a pop up window will appear indicating that the device has been successfully added. Click Ok to proceed.
HOW TO CHANGE IP ADDRESS Terminal does not have a keypad thus to change the IP address users can do it via Ingress software. Steps to change IP address via Ingress are as below. Go to Doors tab and click on Add Door. Once the door is added, click on Add Device at the Doors tab. Check/Tick the terminal(s) to be added to the specific door. Click OK. Double click on the device. At the Network tab, click Edit. Change the desired IP address at the IP Address / URL column.
Once done, a popup window will appear indicating the update is successful. Click OK to proceed. The Ingress software has to be synced with all relevant devices in order for the changes to take effect. A small window will appear at the bottom left corner of the screen once any changes are made. Click on the underlined blue sentence to sync the terminals. Any changes made will appear in the Synchronize Device Settings window. Check/Tick the changes needed to be synced to the terminals.
Using USB to Download Data The USB flash disk feafure is useful in cases where the terminal is installed far from a PC or there is a connection problem. To determine the type of USB compatible with the terminal, please refer to this link at fingertec.com/newsletter/HL_74.html.
4 • MANAGING USER Administrator and Administrator Card Enrollment of an Administrator Card is required before any other operations could take place in a terminal. Once an Administrator Card is available, an administrator can perform these 3 major functions. 1. Unlock a terminal for enrollment or/and deletion of users with fingerprints or cards 2. Download data from a terminal with a USB flash disk 3.
with other fingerprint if you want to enroll more fingerprint for the same user > Wave the administrator card at the induction area to end process > “System returns to verification mode” It is recommended to enroll 2 fingerprints for each user but the system allows you to enroll up to 10 fingerprints for a user. Enrolling Fingerprint Users Green LED blinks > Wave the administrator card at the card induction area > “Register user”.
FINGERPRINT OR CARD Refer to the above explanation. FINGERPRINT AND CARD Green LED blinks > Wave card at the card induction area > Terminal reads card and “Please press your finger” > Press finger to scan fingerprint > beeps once > “Thank you” > Green LED blinks > Verification is successful > At“Beep once” > tendance record is captured and access is granted.
Using the USB Numeric Keyboard ASSIGNING KEYBOARD PASSWORD Assign a password when you are using the keyboard for the first time. This is important to avoid unauthorized access into the terminal via keyboard.
inserted for example user ID 12345” > “Deletion is successful. Delete User. Please input user number” > Repeat to insert user ID to delete > (undetermined steps ) > “The system returns to verification mode” To delete all users including the user for an administrator card: Plug keyboard to “Password terminal > The LED of keyboard lit up > Insert keyboard password > confirmation is successful” > Press button 9 > Press ENTER > Press button 9 > Press “Delete All Users. The operation is successful.
5 • OTHER RESOURCES COPYRIGHT NOTICE All rights reserved. No part of this book may be reproduced or transmitted in any form or by any means, electronic or mechanical, including photocopying, recording, or by any information storage and retrieval system, without written permission from FingerTec Worldwide Sdn Bhd. Every precaution has been made to supply complete and accurate information. Information in this document is subject to change without prior notice.
© 2013 FingerTec Worldwide Sdn. Bhd. All rights reserved.