User Guide Version 1.0.0.
CONTENTS Part 1 : FTDP User Guide (General) 4 Chapter 1 • INTRODUCTION 5 Chapter 2 • INSTALLATION 6 Chapter 3 • TERMINAL MANAGEMENT Adding FingerTec Terminals Via TCP/IP Connection Via RS232/RS485 Connection Via URL Configuring Terminals Deleting a Terminal 8 Chapter 4 • USER MANAGEMENT Downloading Users from the Terminal Uploading Users to Terminal Deleting Users from the Terminal or Software Adding Users Manually into the Software Exporting User Information 12 Chapter 5 • ACCESS CONTROL Time Zone
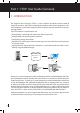
Part 1 : FTDP User Guide (General) 1 • INTRODUCTION The FingerTec Data Processor (FTDP) is a basic software designed to interact with all FingerTec terminals. The FTDP was developed to help ease the system integrator or software developer’s job of fully integrating their FingerTec terminals with their company’s existing systems.
2 • INSTALLATION Follow these steps to install the FTDP in your PC successfully. Double click on the “FingerTec Data Processor.exe” icon to run the installation file. The installation process will initialize automatically. Click Next. Read and understand the license agreement and select “I accept the terms in the license agreement”. Click Next to proceed. Click Next to install the software into the recommended path. Click Change if you wish to specify the location to install the program.
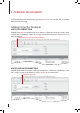
3 • TERMINAL MANAGEMENT To enter the terminal management page, click on Terminal. You can add, edit, and delete terminals from this page. Adding FingerTec Terminals VIA TCP/IP CONNECTION To Add: Click Add > Insert the terminal’s IP address > Check that “Port No.” value is 4370 > Check that “COMM Key” value is 0 > Assign a name to the terminal > Click Connect to start connection.
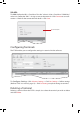
VIA URL To Add: Define the URL > Check that “Port No.” volue is 4370 > Check that “COMM Key” volue is 0 > Define the “DNS” > Assign a name to the terminal > Click Connect to start connection > Check for the correct terminal details > Click Save. Terminal details Configuring Terminals The FTDP enables you to configure the settings in a terminal via the software. To Configure Settings: Click Advance Settings > Click Get Settings > Define settings (Refer to TCMS v2.
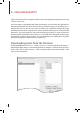
4 • USER MANAGEMENT FTDP can also be used to manage user information (e.g. fingerprint templates, password, Card ID, names, etc). User data needs to be downloaded from the terminals and saved into the software before bering uploaded into other terminals (if any) without having to re-enroll the users. Alternatively, you can opt to use an OFIS scanner to do enrollment through this page. Enrollment can be done using the OFIS scanner without requiring users to enroll at the terminal(s).
All users are now downloaded into the software, and their basic information is displayed on the screen. You can insert the User Name (users’ short names to display on terminal during verification, max 9 characters) and Name (users’ full names). You can opt to insert passwords for users as their alternative verification to the terminal (max 5 digits for normal terminals, 8 digits for color screen). You can also insert the Card ID into the Card No column to register a user for card verification.
Adding Users Manually into the Software With this function you can add users manually through the software, and upload it to any terminal(s). To Add Users via Software: Click Add User (PC) > Insert the relevant information > Privilege : “User”(refer to terminal manual) > VerType : FP/PW/RF > (Fingerprint, Password, RFID Card) Select Valid checkbox > Click Save when done. A new user is now created. This user, however, does not have a fingerprint enrolled into the software yet.
Note 2 If you are going to export using the txt file format, you can select the delimiter by [;], [,], [TAB] or [/]. The delimiter acts to separate every data field.
5 • ACCESS CONTROL This chapter discusses everything about configuring various forms of access control for users. The FDTP software has a few methods for tightening security to restricted areas of a workplace. The first is through Time Zones & Group Time Zones, the second is through Different Verification Method. **This chapter only applies to terminals with an access control feature. Kindly skip this section if your terminal does not come with this feature.
Note 2 Time Zone 2 - Example of Time Zone setting: DAYS TIME PERIOD FUNCTIONS Sunday 23:59 – 00:00 No access Monday 10:00 – 16:00 Only can access from 10:00am to 4:00pm Tuesday 10:00 – 16:00 Only can access from 10:00am to 4:00pm Wednesday 10:00 – 16:00 Only can access from 10:00am to 4:00pm Thursday 10:00 – 16:00 Only can access from 10:00am to 4:00pm Friday 10:00 – 16:00 Only can access from 10:00am to 4:00pm Saturday 23:59 – 00:00 No access GROUP TIME ZONES To Configure Group Time
Different Verification Methods Check with your terminal’s hardware user manual or with your FingerTec reseller to make sure that your model comes with the Different Verification Method. Kindly skip this section if your terminal does not come with this feature.
6 • TRANSACTION MANAGEMENT Downloading Transaction Logs from the Terminals To download transaction logs and users’ activities, you must first connect to the terminal concerned and then perform the download.
Part 2: FTDP for Home Users 7 • FTDP FOR HOME USERS An Introduction Congratulations! You have chosen to secure your home with FingerTec access control devices. Now that your device is installed and is in its place, it is time to learn how to manage and maintain the device. The FingerTec Data Processor (FTDP) is a basic software designed to upload and download various information from a FingerTec device without much hassle.
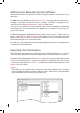
Now you can view all the activity that has been occurring in your FingerTec device. You can also search for specific transaction logs according to date or user name, using the steps illustrated below. To search for records: Click Transaction > Click Search > Define search criteria by user ID, user name, or date > Click Search. Erasing Access Records in Your Device Each FingerTec device comes with a maximum memory limit for storing the access records.
INFORMATION ABOUT FINGERTEC TO LEARN ABOUT GO TO? Company and the products www.fingertec.com The latest updates Facebook Fan Page: FingerTec Worldwide Twitter: FingerTec Worldwide To subscribe for FingerTec newsletter: info.fingertec.com/subscribenewsletter Technical Tips and Latest Product Updates and Upgrades user.fingertec.com Email info@fingertec.com (Sales) support@fingertec.com (Technical) Register for Warranty info.fingertec.com/productwarranty FingerTec Accessory accessory.fingertec.
© 2012 FingerTec Worldwide Sdn. Bhd. All rights reserved.