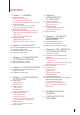
We Make Things Easy 1 2 4 5 7 8 9 0 MENU 3 ESC 6 OK WelcomeCheck-In 01-01 09:00 Fri 10/01/01 MENU 1:1/1:N Friday Switch to Fingerprint Mode (F6) 09:00 /00 Check-In F1 F2 F3 F4 F5 F6 F1 F5 F2 F6 F3 OK F7 F8 F4 1 2ABC 3DEF 4GHI 5JKL 6MNO 7PQRS 8TUV 9WXYZ * M/ 0 # ESC i-Kiosk 100 FRIS II F i n g e rT e c R e m o t e I d e n t i f i c a t i o n S y s t e m Operation User Guide Version 1.
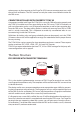
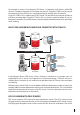
CONTENTS 4 Chapter 1 • OVERVIEW 4 Major Components FRIS Server (Data Server) FingerTec Model /OFIS Scanner Computer installed with FingerTec TCMS V2 5 The Basic Structure FRIS server with FingerTec Terminal FRIS server with FingerTec TCMS V2 6 Multi Servers Structures Multi FRIS Server with FingerTec TCMS V2 Multi FRIS Server with Multiple FingerTec with TCMS V2 OFIS Scanner with FRIS Servers 8 Data Management Management of FRIS Server Management of FingerTec TCMS V2 10
1• OVERVIEW Before using your FingerTec models to connect to FRIS 2 server, please check 1. For black and white screen display model : Menu > Option > System option > Advance Option. Make sure you see Auth Server IP and Auth Mode. 2. For color screen display model: Menu > Communication. Make sure you see Auth Server IP and Auth Mode.
cation process to the computer as the FingerTec OFIS scanner cannot prompt users with the result of verification. The OFIS scanner can only be used as an enrollment station for the FRIS server. Computer installed with FingerTec TCMS V2 A computer installed with FingerTec TCMS V2 is a must for FRIS to function properly and the TCMS V2 installed must have accessibility to the FRIS server.
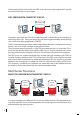
If the fingerprint fails to be verifed, the FRIS server will return a message to the FingerTec terminals to alert the user to try again. FRIS server with FingerTec TCMS v2 User fingerprint TCM S TCM V2 S V2 Transaction log PC FRIS SERVER PC Computers with FingerTec TCMS V2 installed can access into the FRIS server to pull transaction logs of all users. These transaction logs will be arranged according to the clocking rules, which have been predefined in TCMS V2.
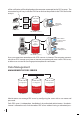
For example, as shown in this diagram, FRIS Server 1 is located in a HQ (zone 1) while FRIS Server 2 is located in a branch or in a remote site (zone 2). FingerTec TCMS in HQ has to pull transaction logs from FRIS Server 1 to generate reports through the LAN network. FingerTec TCMS in HQ is able to access FRIS Server 2 in the branch, by Internet or WAN, to pull the transaction data.
of the verification will be displayed on the computer connected to the OFIS scanner. The transaction log will stay inside the FRIS Server and can be pulled via the TCMS for further analysis.
word. Administrator are given the authority to configure and to manage FRIS server for these functions: Add or remove any FingerTec terminals that are linked to the FRIS server; Add or remove users into the FRIS server; Check user information, fingerprint templates, times zones, and transaction logs; and Perform housekeeping of database. FingerTec TCMS V2 must be linked to a FRIS to be able to pull data for analysis, but not to delete or to edit this database.
2 • INSTALLATION There are 3 steps of FRIS installation: Installation of MySQL server (database server) Installation of FRIS server Installation of FRIS client at any computer equipped with OFIS scanner. Note Ignore this installation if you are not using FRIS client Installation of MySQL Server (Database Server) MySQL server is suggested to be installed into a database server (or computer storing database). The server must be protected to avoid any interruption to the database.
Step 7 Click “Next” to start to configure your MySQL server. Step 8 Choose “Standard Configuration” . Click “Next” button. Tick “Install as Windows Service” and “Launch the MySQL server automatically”. Click “Next” button to proceed. Step 9 Tick “Modify Security Settings” and predefine your root password to login to MySQL. Tick “Enable root access from remote machines”. Click “Next” to proceed.
Step 11 Click “Execute” to start the configuration process. Step 12 Click “Finish” to complete configuration of MySQL server. Congratulations! You have completed the MySQL server installation and configuration. Please continue with your FRIS server configurations. Installation of FRIS Server The FRIS server’s function is to connect to all FingerTec terminals, to carry out verification process done at FingerTec terminals.
Step 6 Click “Install” to start the installation. Step 7 Please wait for the installation to complete. Step 8 Click “Finish” to complete installation. Step 9 Click “Next” to continue installing the FingerTec RIS v1.0.0 (FRIS server) Please read the License Agreement. Choose “I accept the terms in the license agreement”. Click “Next” to proceed. Step 10 Step 11 Please enter the user name of this server (or computer). Click “Next” to proceed.
Step 12 Enter the name of database server (with MySQL installed previously) or you can browse to find it. Choose “Server authentication using the login and password below”. And enter Login ID and password of your MySQL database server. Click “Install” to start the installation process of FRIS server. Wait for the process to complete. Step 13 Step 14 Click “Finish” to complete the installation.
Installation of FRIS Client Please do not install this FRIS client, if you are not using the FRIS client an any other computer for time attendance reporting. You only need to install FRIS client on a computer with an OFIS scanner attached. Users can use the computer with the OFIS scanner attached to report time attendance to the FRIS server. Follow the steps below to install, Open the folder CLIENT from the CD. Click “FRIS Client v1.0.0 Setup.exe” icon to start installation process.
3 • CONFIGURATIONS OF FINGERTEC TERMINALS FRIS 2 requires an administrator to insert a password before access is granted. The default password is 123. You can change the password after you login. Go to “System Option” to change it. FingerTec terminals must be added into FRIS server during the first run. FingerTec terminals are important to capture users’ fingerprints, to prompt users with the result of the verifications, and to control the door locks. This is the Main control panel of the FRIS server.
Option Function Option To add FingerTec terminal(s) into FRIS. A click on this function will prompt a new popup WIndow to set configuration for a new FingerTec terminals. Function To save settings or changes. To edit the existing FingerTec terminal in FRIS server. You must choose the FingerTec terminal before you click on this function. To cancel any settings or changes. To delete FingerTec terminals from FRIS server. You must choose the FingerTec terminal before clicking on this function.
Add New FingerTec Terminals Step 1 Click on “Terminal Management” in the Main control panel. Step 2 A new window will pop up. Click “Add” to start. Enter an IP address and the ID of FingerTec terminal, and click Read Terminal Details to connect to the FingerTec terminal. Step 3 Step 4 Terminal details are read from the terminal. Choose “Enable” to “Yes” to start to use the FingerTec terminals. Ignore the “Server” and the “Zone” columns. Step 5 Click “Save” to keep all settings.
4 • USER MANAGEMENT All the fingerprint templates are stored in the FRIS server, but not in the FingerTec terminals. Enrollment of users can be done using 3 ways: Via an OFIS scanner Via FingerTec terminals Via theFRIS client To enter User Management, click “User” at the Main control panel. A new window will pop up. Here are the details for each portion. Option Function To add a user into FRIS, click on this function. A window will pop up to enable administrators to add new user.
Option Function User ID The ID assigned to FRIS user and the user ID is a 5-digit number. User Name The name of the user which will be displayed on the screen of a FingerTec terminal. The user name will only be displayed if the user is verified by FRIS. The user name cannot exceed 9 characters. Name The full name of the user. Emp. No The employee number of user. You can ignore this if your users do not have any employee number. Issued The date when the user is added into the system.
Auth Server IP: the IP address of the PC working as FRIS 2 server Auth mode LO (the terminal will only search local memory to match users’ fingerprints) NO (the terminal will only search FRIS 2 server to match users’ fingerprints) NL (terminal searches FRIS 2 server to match users’ fingerprint. upon failure, terminal will search in its local memory) Enrollment of users You must activate FRIS to allow enrollment to be done via FingerTec terminals.
Enrollment Via FRIS Client You can enroll new users via an OFIS scanner at any computer. The computer must be connected to the FRIS server, which has the FRIS client(s) installed in it. You can enroll a new user via the FRIS client via the following steps. The FRIS 2 client requires an administrator to insert a password before access can be granted. The default password is 123456. You can change the password after you login. Go to System Settings to change it. Step 1 Run FRIS client.
5 • CONFIGURATION OF FRIS SERVER In FRIS, you can manage the structure of a company easily by dividing the staff into several levels. In FRIS, four levels are catered for: Zone Server 1 Server 2 Departments Departments Administration Engineering Finance R&D Sales & Marketing Productions Customer Service Technical Support Sections Oversea Local Sections Oversea Local Sections Team 1 Team 2 Zone The companies (or branches) applied with FRIS.
Option Function Option To add a zone into FRIS. A click on this prompts a popup window, enabling administrators to configure a zone. Function To save settings or changes. To edit existing zone available in a FRIS server. Please choose a zone before proceeding to edit. To cancel any settings or changes. To remove or delete zone from FRIS server. You must choose a zone before clicking on this function. To leave the page and return to the Main Menu.
To show the total servers stored in the selected zone.A click on the button “Zone – Server Management” will lead to another window. Please see setup of server for more details. To show the departments stored in the selected zone. A click on the button “Zone – Department Management” will lead to another window. Please see Setup of Department for more details. Add In New Zone Step 1 Click on “Zone” in the Main control panel. A new window will pop up. Step 2 Click “add” to start configuration of Zones.
Delete a Zone Step 1 Click “Zone” on the main control bar. A new window will pop up. Step 2 Select a zone to delete. Step 3 Click “Delete” to delete the selected zone. Setup of Servers Click on “Server” in the Main control panel to enter the Server Management. The complete view of Server Management is as shown below: Option 26 Function Function To add a server into FRIS. A click on this will lead to a new pop up window to configure for a server. To save settings or changes done to the system.
To show the information of the selected server. To show the information of the connected server. AddinG A server Step 1 Click on “Server” in the Main control panel. A new window will pop up. Step 2 Click “Add” . Step 3 Fill in the required information of the server. Step 4 Click “Save” to save changes and settings. Delete A Server Step 1 Click “Server” on the Main control panel. A new window will pop up. Step 2 Select the server you wish to delete. Step 3 Click “ Delete” to delete the server.
The list of connected servers, ready to use in FRIS. The servers appear in this column is not assigned under the selected Zone. To display the name of the selected Zone. You can choose any Zone before you start to assign servers into the zone. The list of connected servers, already assigned under the selected zone. Control pane To move the selected server into selected zone. To move all servers into selected zone. To remove selected server from the selected zone.
Option Function Option To add in a department into FRIS. Clicking on this will lead to a new pop up window to configure for a department. To edit the existing department in FRIS server. You must choose the department before clicking on this button. To remove or delete department from FRIS server. You must choose the department before clicking on this button. To show the information of the selected department. Function To save settings or changes done to the system.
Delete Department Step 1 Click on “Department” in the Main control panel. A new window will pop up. Step 2 Select the department to delete. Step 3 Click “Delete” to delete the department. User management in Departments Step 1 Click on “Department” in the Main control panel. A new window will pop up. Step 2 Click “User” to assign users into departments.
Setup of Sections Click the “Section” on the Main control panel. A new window will pop up. To list all created section in system. You need to choose the section before any configurations. Option Function To show the information of the selected section. Option Function To add in a section into FRIS. Click on this will lead to a new pop up window to configure for a section. To save settings or changes To edit the existing section in FRIS server.
Delete Sections Step 1 Click on “Section” in the Main control . Step 2 A new window will pop up. Select the section to delete. Step 3 Click “Delete” to delete the selected section. System Settings You can configure the FRIS system to suit your requirements. You must make sure all settings are done properly to avoid any interruption to the FRIS system. To configure settings in the FRIS system, perform do the following, Click on “Sys Settings” in the Main control panel. Step 1 Step 2 pop up.
6 • CONFIGURATIONS OF TIME ZONES Every time a fingerprint is captured and sent to FRIS for verification, the process occurs as below, Fingerprint captured by AC800 Plus If time zone group is valid, User ID and user name are showed “Verified” is showed Terminal says “Thank you” Door is unlocked Fingerprint sent FRIS server Verification is done and transaction is recorded into FRIS database RFIS checks time zone group of the user Result returned to AC800 Plus and message prompt to user If time zone grou
Setup of Time Zones Click on “Time Zone” at the Main control panel. A new window will pop up Option Function Function To add in a new time zone into FRIS. Click on this to start to configure for a time zone. To save settings or changes To edit the existing time zone in FRIS server. You must choose the time zone before clicking on this button. To cancel any settings or changes. To delete time zone from FRIS server. You must choose the time zone before clicking on this button.
Add in a new time zone Step 1 Click on “Time Zone” in the Main control panel. A new window will pop up. Step 2 Click “Add” to add a new time zone. Step 3 Fill in the name and time zone for each day. Step 4 Click “Exit” to save changes and settings. Delete Time Zone Step 1 Click on “Time Zone” in the Main control panel. A new window will pop up. Step 2 Select a time zone to delete Step 3 Click “Delete” to delete time zone. Time Zone Group Step 1 Click on “Time Zone” in the Main control panel.
Step 3 A new page will appear. Step 4 Click “Add” to add a new time zone group. Step 5 Fill in the name and time zones of the group. Step 6 Click “Save” to save changes and settings Delete Time Zone Group Step 1 Click on “Time Zone” in the Main control panel. A new window will pop up. Step 2 Click the Time Zone Group page. Step 3 A new page will appear. Step 4 Select a time zone group to delete. Step 5 Click “Delete” to delete time zone group.
User Time Zones Step 1 Click on “Time Zone” in the Main control panel. A new window will pop up. Step 2 Click User Time Zone page. A new window, will pop up. Step 3 Adjust your settings Step 4 Click to close the page to save changes and settings. To display the name of the selected Time Zone Group. You must choose to any Time Zone Group before you start to assign servers into the zone. Available Users- The list of users available in the FRIS system, but not assigned into the selected Time Zone Group.
7 • FRIS SERVER AND TRANSACTIONS MANAGEMENT Start and Stop FRIS Services When the FRIS server starts, it will not run automatically. You must order the FRIS server to start the service before all connected FingerTec terminals can interact with it.
On with this page, you can find and read important information of FRIS server and FingerTec terminals. Furthermore you can view the operation of FRIS and its operation status, to make sure the system is running properly. Reminder FRIS server only operates when service starts and running. Closing the application will cause interruption to all connected FingerTec terminals. You can minimize the window so you can run other applications at the same computer or server.
Data Analysis by FingerTec TCMS V2 FRIS 2 server only stores all transaction logs, it is not able to provide any reports. Therefore, use the FingerTec TCMS V2 to download transaction logs from FRIS 2 server. Follow the steps below to connect FingerTec TCMS V2 into FRIS 2 server. Step 1 Add in the product key and activation key of FingerTec terminals connected with FRIS 2 server. Activate the terminals. Step 2 Click Device > FRIS database server management.
Step 4 Under the tab User Enrolments, you can download users from the FRIS 2 server into the FingerTec TCMS V2. Leave the column Department (or Section) blank, and the software will download all users from the FRIS 2 server. However you can choose to define either the department or section to download. Click the Connect button to start.
Tick the column “Select” to include the users to download. Click Synchronise TCMS v2” to download users. Step 5 In case you have multiple FRIS 2 servers to manage, and you would like to copy users among the servers, click Copy Database. Fill in the information and select the FRIS 2 server to copy to. In case you have multiple FRIS 2 servers to manage, and you would like to transfer users among the servers, click Transfer User.
Select the users to transfer. Fill in the information and select the FRIS 2 server to transfer to. Under the tab Transaction logs, you can download transaction logs from the FRIS 2 server into the TCMS v2.
Define the method and click the Connect button. You can check and view the transaction logs one by one. Click “Download Log” to save all into the TCMS V2. Now you can generate reports as you want to. However, make sure you already configured your clocking schedules and group duty rosters properly so you can view and print reports. The “Passowrd” control In the FRIS 2 server, you can define a password for each department.
Under User Enrollments, click “Connect “. TCMS v2 will only download users assigned to the Engineering department. Under the Transaction Logs tab, click the “Connect” button and the TCMS V2 will only download transaction logs of the users assigned under the Engineering department.
8 • FRIS 2 SERVER AS DATA STORAGE SERVER (NO ONLINE VERIFICATION) To Use FRIS 2 with Normal Fingertec Terminals These FingerTec terminals stores all user data in the FingerTec terminals. User data are transfered to all connected FingerTec terminals such as fingerprint, password, time zones etc. In this design, FRIS II acts as a control station to interact with all connected FingerTec terminals for user data modification transferring.
For FRIS II with normal FingerTec terminals, group time zones and time zones are defined locally in a server, and uploaded to the readers to take effect. Start to Use FRIS 2 FRIS II can act as a data management center for normal FingerTec terminals. FRIS can be used to, Store user data (user names, fingerprints, passwords, RFID cards etc) Transfer user data between all connected FingerTec terminals Configure time zones to control user accessibilities to all connected FingerTec terminals.
In this page, administrators can modify user data and upload them to connected FingerTec terminals. Function Function User ID: The user ID assigned to users during first enrollment. Not allowed to change. Password: Password for users verifications. Maximum is 5 digits. Allowed to change and upload to connected FingerTec terminals. Name: The official names of users. Not displaying in FingerTec terminals. Department: Department which users are assigned to. Not displaying in FingerTec terminals.
Upload Users User data stored in the FRIS II can be uploaded to all connected FingerTec terminals. This is to avoid users repeating the enrollment or registration. Kindly take note of the following during the upload process, Select the correct FingerTec terminal to upload to. Select the correct users to upload. Include the desired data field before upload starts. Choose the IP address of the connected FingerTec terminals. Total users stored in FRIS II.
Kindly take note of the following during delete process, Select the correct FingerTec terminal. Select the correct users to delete. Include the desired data field before the delete process starts. We suggest to select all data fields during the delete process from the FingerTec terminals. Delete Users (PC) Administrators can delete the user data stored in FRIS II. The users deleted in FRIS II are still available in FingerTec terminals.
Click here to start download process To display the information of the selected FingerTec terminal Tick this column to include the FingerTec terminals in the download process. Download process will run for multi terminals. To display the progress of download process. To display all connected FingerTec terminals. To display the total of transaction logs downloaded. Duration of download process also display. All downloaded transaction logs are stored inside FRIS II, and ready for viewing.
Time Zone Management FRIS II allows administrators to configure the time zones for users. There are total of 50 sets of time zones ready for configuration. To show all connected FingerTec terminals. Please tick the terminals before updating changes to them. To display date and time of last update to FingerTec terminals. Time Zone Page Click here to update time zones to FingerTec terminals. Update must be done to send changes of time zones to FingerTec terminals. A total of 50 sets time zone.
User Access Control Management User Time Zone Group: After time zone and group time zone configuration, administrators must include the users with same access time period into groups, and then update them to the connected FingerTec terminals. The default time zone group is 1. All new enrolled users are automatically assigned to this group. To display all created group time zones. Select the group before start to assign users. Users assigned under the selected group time zone.
To display all 15 verification methods available. Refer to the hardware manual for details. Users assigned under the selected verification method. User Access Control page Make sure you choose for User Time Zone Group before configuration. Click here to update changes to FingerTec terminals. To include or exclude users into then selected verification method. To display all connected FingerTec terminals. Choose for the terminals before update starts.
INFORMATION ABOUT FINGERTEC TO LEARN ABOUT VISIT Company and the products www.fingertec.com The latest updates Facebook Fan Page: FingerTec Worldwide Twitter: FingerTec Worldwide To subscribe for FingerTec newsletter: fingertec.com/subscribe/newsletter/subscribe_newsletter.html Technical Tips and Latest Product Updates and Upgrades user.fingertec.com Email info@fingertec.com(Sales) support@fingertec.com (Technical) Register for Warranty fingertec.com/ver2/english/e_warranty.
www.fingertec.com For technical tips and manuals in other languages, refer to http://user.fingertec.com © 2010 FingerTec Worldwide Sdn. Bhd. All rights reserved.