Face Recognition System for Door Access & Time Attendance User Guide
CONTENTS 3-4 Chapter 1 • getting started Viewing the User Guide on the Internet Included Accessories Included Printed Materials Installation Tips Activating Terminal Registering Warranty 5-8 9-13 Chapter 2 • BASICS Introduction Overview The Display of LCD Panel Main Menu Touch Keypad Keyboard Date/Time Voice Control Security Features Cleaning Restarting and Resetting Chapter 3 • Connection – Syncing TERMINALS 17-19 General Settings Display Settings Fac
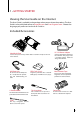
1 • GETTING STARTED Viewing the User Guide on the Internet The User Guide is available in the package when you purchase the product. The User Guide is also published online at fingertec.com and user.fingertec.com. Choose the language you prefer to view the User Guide in. Included Accessories DC 12V Power Adaptor Metal Back Plate Secure this plate on top of the rubber cushion and place the terminal onto it.
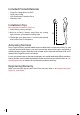
Included Printed Materials • • • • FingerTec Comprehensive DVD Quick Start Guide User Enrollment Template Form Warranty Card Installation Tips Best installation location for Face ID 4d: 1. Avoid facing strong sunlight. 2. Must be at least 2 meters away from any strong light source e.g. fluorescent ceiling light 3. The height must be at least 1.2m from the ground level to the Face ID 4d camera. Activating Terminal Every FingerTec access control model comes bundled with a unique license key.
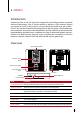
2 • BASICS Introduction Introducing Face ID 4d, the new facial recognition technology product combined with card technology. Face ID 4d can identify an identity in split seconds without any contact or hassle. It only requires a user to look at the machine to get verified. Face ID 4d is loaded with powerful microprocessor that can process facial authentication method for accurate personal identification and for collection of precise data for time attendance and door access.
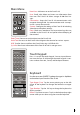
The Display of LCD Panel Take a closer look at the touch screen LCD panel for some basic and important information. Press moderately on the LCD when input commands to maintain a longer lifespan of the terminal. Clean the camera area with a microfiber cloth to maintain the performance of face scanning. Standby Mode Enrollment Mode Date/Day w Displays image of user captured during enrollment. Position your eye to appear in this area. Time Terminal is in standby mode, ready for scanning.
Main Menu New User: Add new user to the Face ID 4d. User: Enroll, edit, delete and insert user information from New User User Connection System Data Date/Time Auto Test USB Sys Info User icon. The Face ID 4d allows storage of 400 facial images. Connection: Setup the Face ID 4d communication with computer through LAN. Set communication with a computer for a secure data transfer. System: Configure the settings of the Face ID 4d including attendance and update settings.
Date/Time The Face ID 4d displays date and time at the home screen. Choose a date and time format based on your preference. Press Menu > Date/Time > Select value > Save. You can select the time format to be either the 12-hour format or the 24-hour format. Voice Control Voice Control lets you control the level of volume emitted by the Face ID 4d. Turn On/Off – The Face ID 4d lets you to turn on/off the voice based on your preference.Press Menu > System > General > Voice Prompts > On/Off >Save.
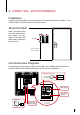
3 • CONNECTION – SYNCING TERMINALS Installation FingerTec terminals offer several connections for power and communications. To install the Face ID 4d, follow the instructions below. Mount On Wall Attach the back plate on to the wall securely and attach the terminal on to the back plate when mounting it on the wall. Back Plate support@fingertec.com 4 feet / 1.2 meter (recommended) Communication Diagrams Connection points for power and communication are available at the back of the terminal.
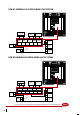
\ For NC (normally close) door lock system DC12V 3A + GND Door Sensor SEN Alarm Device (NC) 12V GND NC1 BUT Alarm Device (NO) COM1 NO2 COM2 NO1 + NC2 EM Lock (NC) 2 Emergency Break Glass 3 (NC) A Override Key Switch C (NC) Release Button For NO (normally open) door lock system DC12V 3A + GND Door Sensor SEN Alarm Device (NC) 12V GND NC1 BUT Alarm Device (NO) COM1 NO2 COM2 NO1 NC2 + EM Lock (NO) 2 Emergency Break Glass 3 (NO) Release Button A Override Key Switch C (NO) Pleas
Descriptions of Available Connections USB Port Linking with USB flash disk for remote data transfer. 1 8 1 8 TOP FRONT TCP/IP Port Connect with a CAT 5 cable for LAN connection, one end to terminal’s port and another end to the computer’s TCP/IP Port. JOINT 1 PIN TCP/IP for Single Connection Linking the terminal to a single computer using TCP/IP requires Ethernet 10/100Base-T Crossover Cable. The cable can be used to cascade hubs or to connect Ethernet stations back-to-back without a hub.
Ingress Online Activation Ingress is a genuine software by FingerTec. Every FingerTec access control model comes bundled with a unique license key. To start using the terminal with Ingress, you must connect the terminal to Ingress and perform online activation. Ingress reads the serial number of your terminal and sends it for verification at the FingerTec server via Internet. In case you do not have an Internet connection, you would need to do offline activation.
Using RS232 Connection For connection via RS232,baudrate is the determinant of communication speed between the terminal and the software. The higher the baudrate, the faster the speed is. To turn on RS232 connection and set the baudrate: Press Menu > Options > Comm Opt > RS232 > Change the RS232 connection to Y. To change baudrate: Press Menu > Options > Comm Opt > Baudrate > Change the Baudrate accordingly.
4 • USER Enrolling Users The Face ID 4d can contain up to 400 face templates and 10,000 card users. Face Enrollment One face registration would take approximately 30 sec to complete. The terminal snaps images of your face and generates a 3 dimensional template for storage. During enrollment on the Face ID 4d, please stand straight and do not move your face or body, and make sure that your face is calm with no extreme expression.
Voice / Message What Does It Mean? “Admin Affirm” You are not the administrator of the system and you cannot access Menu page. “Invalid ID” For 1:1 verification, User ID entered does not match the face. Face Verification 1:N – 1:N verification does not require any input of your user ID. Stand in front of the Face ID 4d until you can see the reflection of your face on the panel and look at the cameras. The Face ID 4d takes a second to verify your face.
Deleting User Only an administrator can perform user deletion at the Face ID 4d. To delete certain user(s), press Menu > User > Select User ID to delete > Press Delete > Press Yes to confirm > Press Delete another time for confirmation. Access Level/Privilege The Face ID 4d offers four types of access level or privilege. PRIVILEGE USER ROLES Normal User Only use the terminal to verify your identity. You cannot access into the Menu and make changes on settings and system.
5 • SYSTEM General Settings Adjusting Date/Time The Face ID 4d is a terminal that records time attendance and door access* activities (*Face ID 4dd only) of employees. Precision in time and date cannot be compromised for the system to work efficiently. Adjust Date/Time according to your time zone. Press Menu > Date/Time > Select Value >Save Date format Date format can differ based on countries for example in America, month-date-year format is used while in Asian countries the month comes first.
View Toolbar You can choose to either hide or display the toolbar on the screen. Always Display: The toolbar will always be displayed at the side of the screen. Auto Hide: The toolbar is hidden and will reappear when you touch the soft touch panel. Menu > System > Display >Toolbar > Choose your style > Save Sleep Time Sleep time is a period before the Face ID 4d goes into sleep mode. This setting is available as a power saving feature of Face ID 4d. The time range is from 0-99 minutes.
Log Settings Every time the Face ID 4d is being used, transaction logs are kept in the memory. These settings are for the Face ID 4d to regulate housekeeping of logs. Log Alert When log storage is at a certain level, users/administrator need to be alerted to avoid underperformance of the terminal. The recommended value is 99.
6 • DATA Every time an enrollment is performed or verification is done, a transaction log is stored inside the Face ID 4d. The data contains Terminal ID, date, time, user ID and transaction activities. For example, 0105021009000000000010000: Description Terminal ID Date (ddmmyy) Time (hhmm) User ID Transaction Code Terminal Activity Code 01 050210 0900 000000001 00 00 These logs need to be managed to maintain the effectiveness of the terminal.
Delete Records In the event where you will not be using the software to download records or you do not need the transaction records, you may delete the records manually. This is to avoid the records from exceeding the storage limit of the Face ID 4d. Besides that, you will also need to delete the records if you are using a USB flash disk to download transaction records from the Face ID 4d to avoid hang issue. To delete the records: Press Menu > Data > Delete Transaction > OK to confirm.
7 • USB Understanding the Need for USB Flash Disk Communication between the Face ID 4d and a PC is very important to upload and download transaction data for time attendance and door access reports. The Face ID 4d offers communication options such as LAN and USB (Universal Serial Bus) connectivity. USB can connect Face ID with a computer for download and upload of user information and transaction logs. Type of USB There are various types of USB flashdisks available in the market.
8 • SHORTCUT KEY Shortcut Keys in Short Shortcut keys give you quick access to your most used functions. A total of 6 shortcut keys are an available for you to configure. They are labeled with defined names and displayed on side of the screen. Configuring Shortcut Keys Menu > System > Shortcut Definition > Tap on the key one at a time and select the function you want for the specific key > Save Some of the functions you can configure for your shortcut keys include status key, work code, viewing of sms.
9 • AUTO TEST Who should do the Auto Test? Auto Test page is to diagnose or analyze the conditions in the Face ID 4d. There are several tests available in the Auto Test page and only an administrator is allowed to perform the tests. Before running any tests, kindly contact your reseller for advice or you could email support@fingertec.com. Is the Screen OK? Test Screen determines the quality and sensitivity of the Face ID 4d touch screen panel.
10 • CALIBRATION Calibrating Screen Sensitivity to Default Level Menu > Auto Test > Calibration The screen will display five dots, one at a time in all corners of the screen and one at the center. You need to touch the center of the dot for the system to calibrate the screen automatically. When the process is done, the screen will return to the main menu.
11 • BELL Definition of Schedule Bell Schedule bell is a function to alert employees or users at a certain time based on your company’s scheduling and preference. For example, a group of employee’s lunch time is at 10:30a.m while the other group is at 2:00p.m. The Face ID 4d offers up to 15 schedules you can define.
12 • ACCESS (Face ID 4dd only) Most Commonly Used Access Features The Face ID 4dd can be connected to door access accessories like electromagnetic lock and doorbolt to control access to doors. FingerTec provides all kinds of doorlock accessories which can be viewed at accessory.fingertec.com. Under Access Control Parameter In Access icon, you can configure 4 most common used functions, which are explained below.
TROUBLESHOOTING “Unable to Connect” Appears When this message appears, it means that the settings for the Face ID 4d and the computer are not properly done. Find out which method you are using to connect. The Face ID 4d offers LAN and USB communication methods. Refer to Chapter 3 to further understand the topic. “Admin Affirm” Appears You are not the administrator of this Face ID 4d terminal. Only an authorized administrator of the system is allowed to access the Menu.
OTHER RESOURCES Information About FingerTec TO LEARN ABOUT GO TO? Company and the products www.fingertec.com The latest updates Facebook Fan Page: FingerTec Worldwide Twitter: FingerTec To subscribe for FingerTec newsletter: info.fingertec.com/subscribenewsletter Technical Tips and Latest Product Updates and Upgrades user.fingertec.com Email info@fingertec.com (Sales) support@fingertec.com (Technical) Register for Warranty info.fingertec.com/productwarranty FingerTec Accessory accessory.
© 2014 Timetec Computing Sdn Bhd. All rights reserved.