We Make Things Easy TA100 Series AC100 TimeLine 100 Fingerprint & RFID Card Time Attendance System User Guide
CONTENTS 5-7 8-12 13-16 17-20 21-25 Chapter 1 • GETTING STARTED Viewing the User Guide in the Internet Terminal Included Accessories Included Printed Materials Activating Terminal Registering Terminal Chapter 2 • BASICS Introduction to Products Overview Power On/Off Button Keypad Battery Date/Time Voice Control Turn On/Off Adjust Volume Security Features Admin Affirm Cleaning Terminal Cleaning the Body Cleaning the Fingerprint Prism Restarting and Resetting Terminal Restarting the Termi
26 Chapter 6 • DATA Deleting Transaction Logs Deleting All Data Managing User Privileges Resetting to Factory Settings 27 Chapter 7 • USB 28 Chapter 8 • RFID CARD FUNCTION 29-31 Understanding the Need for USB Flash Disk Type of USB Downloading Attendance Logs Downloading User Data Uploading User Data from USB to Terminal Uploading Short Messages Enrollment of RFID Card Verification Using RFID Card Only Multi Verification Methods Using RFID Deleting RFID Card Changing Card ID Chapter 9 • MIFARE CARD
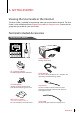
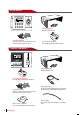
1• GETTING STARTED Viewing the User Guide in the Internet The User Guide is available in the package when you purchased the terminal. The User Guide is also available online at fingertec.com and user.fingertec.com. Choose the language that you prefer for your User Guide. Terminal Included Accessories TA100 Series model Cable Protector To keep cables intact. DC 5V Power Adaptor For supplying power to the terminal.
AC100 model Cable Protector To keep cables intact. A Packet of Bolts Use the screws to hold the back plate of the terminal against a wall. DC 5V Power Adaptor For supplying power to the terminal. TimeLine 100 model Cable Protector To keep cables intact. DC 5V Power Adaptor For supplying power to the terminal. USB Extension A Packet of Bolts Use the screws to hold the back plate of the terminal against a wall. To connect to the USB port of a computer for uploading and downloading of data.
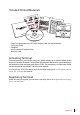
Included Printed Materials 5 RE SOFTWAGS SET TIN r to 4 RE SOFTWALATION INSTALTCMS V2 5 4 7 80 6 9 MENU TCMS r to *Refe al Manu ESC 3 2 1 OK *Refe V2 TCMS al Manu V2 TCMS allation V2 Inst TCMS V2 Management TCMS Time Control nication Commu ings Sett rt k Sta Quic re For mo ://u to http info go e Guid ger ser.fin tec.
2 • BASICS Introduction to Products FingerTec is a renowned brand name for commercial products for door access and time attendance systems. FingerTec offers a wide range of products to cater to the growing needs for biometrics products in office/home automation as well as in security industry. FingerTec terminals are loaded with powerful microprocessor that can process biometrics authentication methods for accurate personal identifications and for collection of precise data for time attendance.
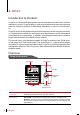
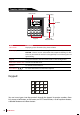
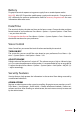
ITEM FUNCTION Keypad To input instructions into the terminal and to allow configuration. Fingerprint Sensor To scan finger for confirmation of identity. RFID Card Induction Area Area that reads RFID cards. Speaker For terminal voice emission. Reset Button Restart the terminal as and when required. AC100 model LCD Screen Speaker L.E.D Display Fingerprint Sensor Keypad ITEM FUNCTION LCD Screen Displaying status of terminal, day, date and time.
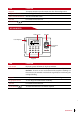
TimeLine 100 model LCD Screen L.E.D Display Speaker RFID Card Induction Area Keypad ITEM FUNCTION LCD Screen Displaying status of terminal, day, date and time. LED Display Green LED – The terminal is working fine and it is in standby mode. Red LED – There is an error at the terminal that requires checking. For first time use, the terminals need to be charged fully to avoid having the red light blinking. Keypad To input instructions into the terminal and to allow configuration.
Battery Fingerprint terminals operate using power supply from a standard power outlet. Mini UPS: Mini UPS 5V provides mobile power supply to the terminals. Charge the mini UPS sufficiently for optimum performance. Refer to accessory.fingertec.com for more information about accessories. Date/Time The terminals display the date and time at the home screen. Choose the date and time format based on your preference. Press Menu > Options > Systems Options > Date/Time > set your time and save.
Cleaning Terminal Cleaning The Body Use a dry cloth to clean the terminal’s body. Do not use any liquids, household cleaners, aerosol spray, solvents, alcohol, ammonia and abrasive solutions to clean the body of the terminal because it could damage it. Cleaning the Fingerprint prism (This feature is NOT available in TimeLine 100 model.) Clean the fingerprint prism with a cellophane tape for (silicon coated prism). View the video on how to clean the fingerprint prism at this link fingertec.
3 • INSTALLATIONS & COMMUNICATION Installations FingerTec terminals offer several connections for power and communications. Installations of FingerTec time attendance terminals are simple. Mount On Wall Back Plate 4 feet / 1.2 meter (recommended) Attached the back plate on the wall securely and attach the terminal to the back plate when mounting it on the wall. For AC100, screw two bolts on the wall to hang the terminal. Flexi-Kit FingerTec offers flexi-kit for all its time attendance models.
Communications Connection points for power and communication are available on top of the terminals. Refer to the following diagrams for the terminals you require. USB PORT TCP/IP PORT RS484 PORT 1. RS485 Single Connection POWER ADAPTER PORT RS232/RS485 SERIAL CABLE PORT RX+ RXRS232/ RS485 Data Converter 2. RS485 Network Connection RX+ RXRS232/ RS485 Data Converter RS232 PORT USB Port Linking with USB flash disk for remote data transfer.
Power Supply Port Insert the Power Adapter point to this port for power. RS232/RS485/Wiegand Connection Port RS232 – Connection to a computer using RS232 cable. RS485 Single Connection - Connection to a single computer using RS485 wire. RS485 Network Connection - Connection to multiple computers using Daisy Chain connection. Wiegand Output – Connecting with third party connector or terminal(s).
Setting up Ethernet It is important to setup the Ethernet to connect the terminals using TCP/IP connection. Setting up Ethernet is by enabling the Ethernet function: Press Menu > Options > Comm Opt > Ethernet > Yes. Turn off the terminal after you have set the Ethernet to Yes. Now, plug the network plug to the Ethernet interface and turn the power on. Note By enabling this function, the RS232/RS485 will be disabled.
4 • USER Enrolling User The terminals can enroll fingerprint templates, passwords and card information. This chapter covers all possible user enrollments in the terminals. Caution: Enrollment of supervisor or administrator is important to making sure of the terminals data safety. Prior to enrolling new user, supervisor has to be enrolled first by using any of methods mentioned below. Select Enroll Admin > Choose the Privilege Level either Supervisor or Administrator to proceed.
Fingerprint and Password Enrollment (This feature is NOT available in TimeLine 100 model. Please skip page 19,20 and 21 if you are using TimeLine 100) The terminals offer a combination of fingerprint and password enrollment for better security.
· Make sure the center point of your finger is placed in the middle of the scanner for a good read. Center point · · · · Recommended to use index finger. The terminal accepts other fingers but index is the most convenient. Make sure the finger is not wet, too dry, injured or dirty Do not press hard on the sensor, just place it comfortably Avoid direct sunlight or bright light Password Verification Password can be an option for those who do not prefer to use other verification methods.
Access Level/Privilege The terminal offers various types of access level or privilege. 20 PRIVILEGE USER ROLES Normal User Only use the terminal to verify your identity. You cannot access into the Menu and make changes on settings and system Enroller You are allowed to access into the menu to enroll user only.
5 • SYSTEM General Settings Adjusting Date/Time The function of the terminal is to record time attendance and door access activities of employees. Precision in time and date cannot be compromised for the system to work efficiently. Adjust Date/Time according to your time zone. Press Menu > Options > System Opt > Date/Time > Select Value > OK Date Format Date format differs based on countries for example in Malaysia the format used is, datemonth-year whereas in America, month comes first.
system. The higher the threshold level, the more points are being read, and the more restricted the system. Configure the threshold for 1:1 and 1:N methods. For 1:1, the range is from 15-50 and the recommended value is 35. For 1:N, the range is from 5-50 and the recommended value is 45.
System Information The terminals keep information of the system and this information is available for viewing by administrators. Number of Users in the Terminal (User Count) Every model of the terminal has different user capacity depending on the number of templates a user has in a terminal. For example, if a terminal could contain 3000 fingerprint templates and a user is entitled to 2 templates enrolment, the total user of the system would be 1500.
Device Information (Dev Info) Find out the information about your terminal through this function. Press Menu > Sys Info > Dev Info > View the info Information available includes: FPCnt (100): Showing the number of fingerprint templates stored in the terminal, for example for FP(100) 30 is 100 x30= 3000 templates (This feature is NOT available in TimeLine 100 model.
Log Information (Log Opt) A terminal can only retain certain amount of information before the terminal becomes full and stops accepting any more data . To maintain the performance of a terminal, you can set an alarm to alert you when the data reaches a certain warning level. Alarm SuperLog To instruct terminal to alert user if the transaction storage for administrator login is less than as configured. Default value is 99.
6 • DATA Every time an enrollment is performed or a verification is done, a transaction log is created and stored inside the terminal. The data contains created terminal ID, date, time, userID and transaction activity. For example, 010502100900000000 0010000:Code These logs need to be managed to maintain the effectiveness of the terminal.
7 • USB Note This feature is available in all TA100 series it is made to order for AC100 model. Understanding the Need for USB Flash Disk Communication between the terminal and a PC is very important to upload and download transaction data for time attendance and door access reports. The terminal offers a few communication options such as LAN and serial cable connections but sometimes there are scenarios that require USB (Universal Serial Bus) connectivity.
8 • RFID CARD FUNCTION Note This feature is NOT available in TA102, TA103 and AC100 models. The fingerprint terminals are versatile and it can accept card verifications. This chapter covers the Radio Frequency Identification or better known as RFID system. The terminals accept RFID card with specifications of 64-bit, 125kHz. Enrollment of RFID Card RFID can be enrolled alone, with fingerprint or with password.
9 • MIFARE CARD FUNCTION Note This feature is not a default function and it’s made upon request. Check your terminal card system to identify the type of card the terminal is using. This feature is NOT available in AC100. This chapter covers the MiFare card system or better known in MC system. The terminals accept MiFare card with specifications MF1S50/S70, 13.56MHz. Fingerprint Card Key (FP Card Key) FP Card Key function provides extra security to the MiFare card users.
Press Menu > User Manage > FPCard Mng > Enroll FPCard > Input a User ID (Make sure that this User ID has been enrolled with a fingerprint > Show the Mifare Card at the induction area > The LCD will display “Write Succ” to indicate that the process is successful. Now you can gain access or report attendance using the card or the fingerprint. Registering FPCard “Register FPCard” is a function available if you want to use your FP Card in other terminals in the company.
print template from its memory. Press Menu > User Manage > FPCard Mng > Move to FPCard > Show the Mifare Card at the induction area > The LCD will display “Write Succ” to indicate that the process is successful.
10 • HID CARD FUNCTION Note This feature is not a default function and it’s made upon request. Check your terminal card system to identify the type of card the terminal is using. This feature is NOT available in AC100. The terminals accept HID card with specifications of 1325, 26-bit, 125kHz. The Prox II cards support 26-bit and it comes with unique programming information into its contents, which include card reading bits, card number range, facility code, site code, etc.
11 • AUTO TEST Who should do the Auto Test? Auto Test page is to diagnose or analyze the conditions in the terminal. There are 6 tests available in the Auto Test page and only the administrator is allowed to perform the test. Before running any tests, kindly contact your reseller for advice or you could email support@fingertec.com.
12 • TROUBLESHOOTING “Unable to Connect” Appears When this message appears, it means that the settings for the terminals and the computers are not properly done. Find out which method you are using to connect. FingerTec offers LAN, RS232, RS485 and USB communication methods. Refer to Chapter 3: Connection - Syncing Terminal, page 14 to further understand the topic. “Admin Affirm” Appears You are not an administrator of this terminal.
“Duplicate Finger” Appears (This feature is NOT available in TimeLine 100 model.) FingerTec is an intelligent terminal. It will not accept the same fingerprint twice into its system. If you have registered a finger into FingerTec, the system would prompt, “Duplicate Finger” when you try to enroll that same finger again. Choose a different finger to proceed.
INFORMATION ABOUT FINGERTEC TO LEARN ABOUT GO TO? Company and the products www.fingertec.com The latest updates Facebook Fan Page: FingerTec Worldwide Twitter: FingerTec Worldwide To subscribe for FingerTec newsletter: www.fingertec.com/subscribe-R/newsletter.html Technical Tips and Latest Product Updates and Upgrades user.fingertec.com Email info@fingertec.com (Sales) support@fingertec.com (Technical) Register for Warranty www.fingertec.com/GPW/warranty.htm FingerTec Accessory accessory.
www.fingertec.com For technical tips and manuals in other languages, refer to http://user.fingertec.com © 2010 FingerTec Worldwide Sdn. Bhd. All rights reserved.