CHRONOTHERMOSTAT 1C.91 ENGLISH IB1C91 - 06/19 - Finder S.p.A.
B Finder Bliss
INDEX TECHNICAL FEATURES Page 2 DIMENSIONS Page 2 INSTALLATION Page 2 POWER ON THE DISPLAY Page 6 CHRONOTHERMOSTAT OFF Page 6 DESCRIPTION OF KEYS AND SYMBOLS Page 7 DATE AND TIME SETTING Page 8 MANUAL PROGRAMMING Page 9 WEEKLY PROGRAMMING Page 10 COPY PROGRAM Page 11 PROGRAM REVIEW Page 12 OFF STATE & FROST PROTECTION FUNCTION Page 12 SUMMER-WINTER SETTING Page 13 UNLOCKING CHRONOTHERMOSTAT - PIN Page 14 PAIRING WITH PHONE Page 15 CHRONOTHERMOSTAT Wi-Fi CONNECTION TO THE NETWO
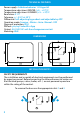
TECHNICAL FEATURES Power supply: 4 alkaline batteries 1.5V type AA Temperature adjustment WINTER: (+5…+37)°C Temperature adjustment SUMMER: (+5…+37)°C Resolution: 0.1°C Tolerance: +/– 0.
POSITIONING Install the chronothermostat away from heat sources (radiators, direct sunlight, kitchens) and doors/windows. Mount about 1.5 meters above floor level. FIXING Use screws 0 3.5 mm MAX - maximum head thickness 3 mm. When fastening, do not over tighten the screws to avoid distorting the base. CLEANING Use only a damp cloth for cleaning.
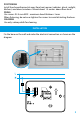
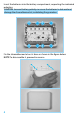
Insert the batteries into the battery compartment, respecting the indicated polarities. CAUTION Incorrect battery polarity can cause the batteries to leak acid and damage the chronothermostat, invalidating the guarantee.
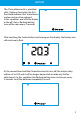
BATTERY The Chronothermostat is provided with 2 battery thresholds: the first threshold indicates that the batteries are low and must be replaced. In this condition, and with the display in the off state, a flashing battery icon will be seen every 5 seconds After touching the Finder button and turning on the display, the battery icon will continue to flash.
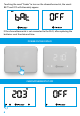
Touching the word “Finder” to turn on the chronothermostat, the words BATT and OFF will alternately appear If the chronothermostat is not connected to the Wi-Fi, after replacing the batteries reset the date and time.
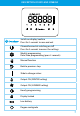
DESCRIPTION OF KEYS AND SYMBOLS Switch on display/confirm Press for 2 seconds to save and exit Chronothermostat switching on/off Press for 4 seconds to access the settings Weekly programming Date/time programming (press 3 seconds) Manual function Back to previous step Slide to change values Output ON (WINTER setting) Output ON (SUMMER setting) Hourly programming Display locked Low battery Degree centigrade 7
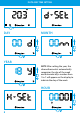
DATE AND TIME SETTING 3” DAY MONTH 1 1 2 2 YEAR 1 2 NOTE After setting the year, the chronothermostat automatically recognizes the day of the week and automatically a number from 1 to 7 will appear on the display to indicate the day of the week HOUR 1 8 2
MINUTES 1 2 NOTE At each programming step it is possible to go back one step using the back button . Holding down the Finder button for 2 seconds saves and exits (returning to the main menu). MANUAL PROGRAMMING 1 2 To exit the manual setting and return to the main screen, press the “hand” button.
WEEKLY PROGRAMMING Press the numbers corresponding to the days of the week to be programmed (1 = Monday ... 7 = Sunday). At the end of the selection, press the Finder key. The screen indicates that the temperature will be programmed (right) at the time indicated on the left. Set the desired temperature with the cursor at the indicated time (in this case between midnight and one in the morning). Press Finder to confirm the schedule and move to the next hour.
Set the desired temperature with the cursor at the indicated time (in this case between one and two in the morning). Press Finder to confirm the schedule 1 and move to the next hour. 2 Proceed in the same way until reaching the 23:00 Hour time period. 1 2 NOTE To go back to the previous step, use the back button or the Finder button to switch to the next time programming. To exit programming and save the values set so far, press the Finder button for 2 seconds.
PROGRAM REVIEW Example: reviewing day 3 (Wednesday) 1 2 Repeatedly press the Finder button to step through and display the hours together with the appropriate set temperature. To go back to the previous step use the back button. Press the Finder button for 2 seconds to save and exit the review. OFF STATE & FROST PROTECTION FUNCTION When the chronothermostat is off, the display will show the word OFF. But in this condition the frost protection function remains active.
SUMMER-WINTER SETTING 3” 1 2 13
UNLOCKING CHRONOTHERMOSTAT - PIN The chronothermostat can only be locked using the Finder Bliss application. When the lock mode is activated, the Chronothermostat will display a lock icon. To unlock the chronothermostat you will need to enter the PIN as shown below 1 2 Caution By entering an incorrect PIN code, the Chronothermostat will display Err for an instant and then propose a re-try.
PAIRING WITH PHONE Download the Finder Bliss application to your smartphone. The pairing procedure will be described in the application. Turn on Wi-Fi and search for a network 2 1 In the case where the APP credentials were not inserted by the expiry of the timeout, the Chronothermostat performs a RESET of the configuration and the internal Wi-Fi is turned off.
CHRONOTHERMOSTAT Wi-Fi CONNECTION TO THE NETWORK After connecting the timer-thermostat to the home network, the update will take place within 4 to 40 minutes, depending on the update time set on the application. To immediately connect the chronothermostat to the App, with display off, press the Finder button for 3 seconds. Segments will appear to indicate waiting for parameters to be synchronized with the APP.
GENERAL CHARACTERISTICS Type Wi-Fi wall-mounted weekly programmable thermostat Wi-Fi frequency 2.4 GHz Encryption WPA2 / PSK Display LED Resolution 1 hour (1 minute via APP*) Daylight Saving Time Automatic Update Battery life About 1 year (Over 1 year depending on the mode set by APP) Functions Additional settings available on the APP * The time slot can not start and end at the same time DEFAULT PARAMETERS Season set Winter Frost protection Fixed at 5°C Thermal differential 0.
TROUBLE SHOOTING - Depending on the chronothermostat version, special characters such as “&” “!” “.” “_” “/” may not be detected. In this case replace the router name (SSID) using letters and numbers. Same for the password. - The chronothermostat connects exclusively to 2.4 GHz networks. In the case of routers covering from 2.4 to 5 GH z it may in some cases be necessary to separate the two frequencies, then name an SSID for 2.4 GHz and one for 5 GHz.