
Manual


After Spraying .
After use, fill the sprayer tank part way with water.. Start the
sprayer and allow the clear water to be pumped through the
plumbing system and out through the spray nozzles
Refill the tank about half full with plain water and use a chemical
neutralizer, such as 'Nutra-Sol', or equivalent, and repeat cleaning
instructionsabove.. A mix of water and some detergent, such as
'Dawn' dish soap would be a sufficient alternative.
Flush the entire sprayer with the neutralizingtcieaning agent, then
flush out one more time with plainwater. Follow the chemical
manufacturer's disposal instructionsof all wash or rinsing water.
For the boom, if applicable, remove the tips and screens from the
nozzle assemblies. Wash these components thoroughly with water
or cleaning solution appropriate for the chemical being used Blow
out the orifice clean, and dry. If orifice remains clogged, clean it
with a fine bristle (NOT WIRE) brush, or with a toothpick.. Do not
damage the orifice Water rinse and dry tips before storing.
DO NOT USE PUMP IN AN EXPLOSIVE
ENVIRONMENT. DO NOT USE TO PUMP
FLAMMABLE FLUIDS, GASOLINE,
KEROSENE, FUEL, OIL, ETC.
Winter Storage
Drain all water out of your sprayer, paying special attention to the
pump, handgun, and valve(s). These itemsare especially prone to
damage from chemicals and freezing weather
The sprayer should be winterized before storage by pumping a
solution of RV antifreeze through the entire plumbing system.. This
antifreeze solution should remain in the plumbing system during
the winter months When spring time comes and you are preparing
your sprayer for the spray season, rinse the entire plumbing
system out, clearing the lines of the antifreeze solution Proper
care and maintenance will prolong the life of your sprayer.
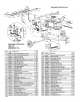
#5275703 Pump
(12 Volt, 8 Amp, 2.1 gpm, 60 psi)
Troubleshootinq a 2.1 g.p.m. Pump:
Pump will NOT run:
- Check inline fuse on the wires on the pump If blown,
replace with new fuse. (7..5Amp mini-blade fuse #5157205)
- Make sure BOTH on/off switches are in the 'on' position (-)
- Make sure you 12 volt source (battery) is fully charged
Insure a tight connection at the battery clips
If none of the above will work, try pullingwire terminal "A" off
of the spade terminal of the pressure switch, and cross it
over and touch terminal "B".. (You will need to remove the
pressure switch cap before doing this) If your pump runs
when you do this, you know you will need to replace your
pressureswitch
Another thing you can try is totake apart the switch box on
the lead wire assembly (#5274443) with the (2) phillips head
screws, and 'hot-wire' it together Take the (2) wires that are
screwed to the rocker switch, off of the switch and twist
them together. This will insure you are getting the full 12
voltsto the pump if your pump runs after doing this, you will
know that your lead wire assembly needs to be replaced.
Pump runs, but does not prime:
- Check line strainer (screen) at the inlet location, at the
tank You will need to unscrew the knuded nut to access
this screen.. (see exploded view later in this manual) The
ON/OFF valve should be closed while performing this, to
insureyou do not lose any solution. Periodically take the
screen at this location out and clean it..
- Make sure the bypass fine valve is closed, to allow the
pressure to build up in your system..
- Unscrew the head portion of your pump and remove the
check valve assembly from inside.. You need to make sure
the O-Ring comes out with this piece as well. (See the
exploded view to help identifythese components) These
pieces can be cleaned which, in most cases, will help
restore some, if not most, of your prime. Soak this check
valve in a solution of hot, soapy water.. "Dawn" brand dish
soap works well for this A little bit of'scrubbing' with
perhaps an old toothbrush may be required to actually break
up any build-up that may be on the check valve. Rinse off
the pieces and replace them back into your pump
Reassemble the pump. Hook it back up and test
/
I
!
Fittings with an asterisk (*) by
them, come together in a bag,
;i12"MNPT
(1) 5168833 - 1/2" Hose Barb
(1) 5168836- 3t8" Hose Barb
l_m Pad
No Number
t 5157205
2 5168820
3 516_837
3,1 5168839
3,2 5157202
3.3 2040B-090
4 5168838
5.1 5157207
5,2 5095202
Lisl
Qty Description P_ce
7.5 Amp Mini Fuse 1,00
Check Valve Kit W/_Ring & Fogies j 19.95
- Upper Housing Assembly 39,95
Plunger Kit 12,99
Pm.-ssure Switch Assembly .23.95
Pkg, (2) Clips (Port Ft_ng) ,,. 3,41,,
Diaphragm/Cam/Beating Kit 18.99
- Rocker Switch 14.99
- Pump Foot(l,0 & 2,1g,p,m.) 1,25
Page 3