Owners Installation, Operation, and Safety Manual Remote Dispensing Cabinet 902V Series Cabinet Dispenser Models FR902R, non-UL, gallon FR902LR, non-UL, liter FR902RU, UL, cUL listed, gallon FR902LRU, UL, cUL listed, liter 1
Table of Contents Owners Installation, Operation, and Safety Manual .............................................................. 1 Table of Contents .................................................................................................................. 2 About This Manual ................................................................................................................ 2 Safety Information ............................................................................................
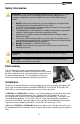
Safety Information WARNING! To ensure safe and proper operation of your equipment, it is critical to read and adhere to all of the following safety warnings and precautions.
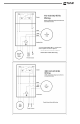
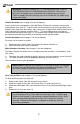
Mechanical Installation 1. 2. 3. 4. 5. 6. Install the pump (not included) securely to the top of the fuel tank per the instructions included with the pump. Install mounting plate to tank (if applicable for your installation). Refer to the mounting plate “Tank Mounting” section of the mounting plate instructions. Remove the dispenser cover to allow inside access to the bottom of the dispenser. Begin by pulling the reset knob off its shaft.
RED RED 110 VAC *Connect Red and Black Wires to 110 VAC wire unless separate circuits are required.
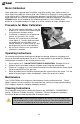
Meter Calibration Meter calibration is required upon installation, after disassembly, after significant wear, or when dispensing a different viscosity fluid. Your FR902 series dispenser is factory calibrated using mineral spirits. Calibration must be done between 6 and 40 GPM (23 and 151 LPM). Meter calibration can be easily changed by following the calibration procedure. A container of KNOWN volume will be needed for the calibration procedure.
Storage If your dispenser is to be stored for a period of time, clean it thoroughly. This will help protect the dispenser from possible damage. Troubleshooting The following troubleshooting guide is designed to help you with basic diagnostics and repairs if you should encounter abnormal service from your FR902 series dispenser. We recommend you use only genuine Fill-Rite parts. These parts, and additional service information is available through your authorized Fill-Rite dealer.
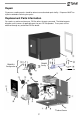
WARNING! TURN ALL POWER OFF TO THE DISPENSER AND PUMP AT THE BREAKER PRIOR TO PERFORMING ANY SERVICE. Release any pressure in the piping, hoses, and nozzle prior to performing any service. Failure to comply with these warnings can result in explosion, fire, bodily injury, and possibly death. Cabinet Assembly (refer to page 9 for item # diagram) Access to the internal components of the 902 Series Dispenser is gained by removing the metal cabinet cover (item 3).
Repair Dispensers needing repairs should be taken to an authorized repair facility. Dispenser MUST be triple rinsed before returning for repairs. Replacement Parts Information For repairs or routine maintenance, Fill-Rite offers the parts you need. The following parts diagram and list covers all applicable parts for your Fill-Rite product. These parts can be obtained through any authorized Fill-Rite dealer. FR902R Config.
FR902 Repair Kits Kit # Description KIT902HA Switch Handle Assembly Kit KIT902LS Line Switch Kit KIT902SV Solenoid Valve Kit KIT902RFP Faceplate kit for FR902R KIT902LRFP Faceplate kit for FR902LR KIT902RUFP Faceplate kit for FR902RU KIT902LRUFP Faceplate kit for FR902LRU KIT902MB Mounting Bracket Kit KIT902CC Clear Cover Repair kit for 900 Series Meter 900KT Contents #2 Switch Handle Assembly #7 Fasteners #19 Rod #2 Switch #7 Fasteners #8 Solenoid Valve Assembly # Gasket (not shown) #
900 Series Meter Sub-Assembly Parts Kit # Description 900KT 900 Series Meter Repair Kit 11 Contents #1 Pin Gear #2 Cluster Gear, Liter or Gallon #3 Drive Gear, Liter or Gallon #4 Bevel Pin #5Driver pin gear #6 Gear Frame #7 Chamber Assembly #8 Required O-rings #9 Required Fasteners
Cabinet Exterior Dimensions 12
Optional Mounting Platform Dimensions 13
Cabinet to Platform Orientation 14
Typical Above Ground Tank Installation 15
Tuthill Product Warranty Tuthill Transfer Systems (“Manufacturer”) warrants each consumer buyer of its Fill-Rite products (“Buyer”) from the date of invoice or sales receipt, that goods of its manufacture (“Goods”) shall be free from defects of materials and workmanship.