
Installation guide
44 FileMaker Server Getting Started Guide
4. In the create shortcuts dialog box, click Yes to create a shortcut that you can use to start Admin Console
again later.
1 Windows: A shortcut is created on the desktop and in the Start menu under FileMaker Server.
Depending on the version of Java installed, the shortcuts may be created without prompting you.
1 Mac OS: After you click Yes, specify a name and location in the Save dialog box where to save the
shortcut, and then click Save.
The shortcut is helpful to manage several deployments of FileMaker Server from the same machine. The
shortcut name starts with “FMS10-” and is followed by the FileMaker Server name that you specified in
the Deployment assistant.
5. In the Login dialog box, enter the User Name and Password that you chose in the Deployment assistant
when you initially deployed FileMaker Server.
Admin Console starts and displays the FileMaker Server Overview pane.
Tip The best method for remote administration outside the administrator’s physical network is to keep a
firewall in place and use a secure mechanism to connect to your network, such as a virtual private network
(VPN). Use Admin Console to administer FileMaker Server on a remote computer once you are securely
connected to your network.
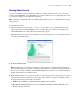
Uploading a database
Use the FileMaker Server Upload Database assistant to transfer FileMaker Pro database files from your
computer’s file system to FileMaker Server. You can copy database files from a Windows or Mac OS
computer that is on the same network as the FileMaker Server computer.
The Upload Database assistant copies the specified database files to a FileMaker Server folder and sets file
permissions and privileges so that you can access the databases after they are uploaded.
To start the Upload Database assistant, choose the Admin Console Server menu > Upload Database.
Note If any of your databases require a plug-in, see FileMaker Server Help for information about managing
plug-ins.
Backing up databases
Use the FileMaker Server Schedule assistant to create a scheduled task to:
1 back up all hosted databases
1 back up hosted databases that are in a specified folder
1 back up a specified database
To create a scheduled task for backing up databases, choose the Admin Console Schedules pane, select
Create a Schedule from the Actions menu, and click Perform Action. Then, choose Back Up Databases, and
specify whether you want to back up hourly, daily, weekly, or on a custom schedule.
Database backups are saved in the default backup folder or in a folder that you specify. You can specify the
default backup folder on the Admin Console Database Server > Default Folders tab. You can also select the
maximum number of database backups you want to keep for a scheduled backup.