
Installation guide

Chapter 4
|
Administration overview 43
Starting Admin Console
You can start Admin Console on a Windows or Mac OS computer that has network access to the master
machine running FileMaker Server. FileMaker Server delivers Admin Console as a lightweight Java client
to your remote computer via Java Web Start technology.
Note Your remote computer must have Java Runtime Environment version 5 at a minimum before starting
Admin Console.
To start Admin Console:
1. Open a web browser and enter http://[host]:16000 where [host] is the IP address or host
name of the machine running FileMaker Server as a master. This is the address you noted when you
installed FileMaker Server. The Admin Console Start Page appears.
Tip Bookmark the Start Page in your web browser. Come back to this page to access documentation and
to use the web publishing tools.
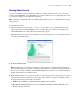
2. Click Start Admin Console.
Note If nothing happens, your browser might have downloaded the Java Web Start file but might not
have started it. Check your web browser configuration to enable Java or automatically open downloaded
files. You can also look for admin_console_webstart.jnlp where your browser saves downloaded files.
Double-click this file to start Admin Console.
3. Before Admin Console starts, you must respond to a security message. The security message is a signed
certificate that ensures the authenticity of the product and it must be accepted to start Admin Console.
To suppress this message in the future and continue:
1 Windows: Select Always trust content from this publisher, then click Run.
1 Mac OS: Click Show Certificate and open Trust Settings. For When using this certificate, choose
Always Trust, then click Trust.