
Installation Guide

1. Carefully take the glass shade out of the frame, then
discard the bubble bags.
2. Pull out the wires and grounding wire from the post.
Make wire connections using the wire nuts:
---The black wire from the fixture to the black wire
from the post.
---The white wire from the fixture to the white wire
from the post.
---The grounding wire from the fixture to the grounding
wire from the post.
Carefully put the wires back into the post.
3. Place the post cap on the post, then secure it with the
set screws.
CAUTION: With silicone caulking compound, caulk
completely around where the post cap meets with
the post surface to prevent water from seeping into
the post.
4. Secure the heading side of the stem into the coupling.
Then put the glass shade into the frame carefully by
inserting the stem.
5. Secure the buckles to fix the glass shade by using three
pads and three screws. (See Fig.1)
6. Attach the candle tubes to the sockets, then install a bulb
(not included). See relamping label at socket area or
packaging for maximum allowed wattage.
7. Attach the dome to the frame by inserting the stem, then
secure it with the finial.
8. Turn on the power at the main fuse or circuit breaker box.
Fig.1
Glass Shade
Frame
Screw
Pad
Buckle
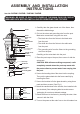
ASSEMBLY AND INSTALLATION
INSTRUCTIONS
Item No:
543PHM / 543PHB / 544PHM / 544PHB
Grounding Wire
Fixture Wire
Wire Nut
Set Screw
Post Cap
Post
Finial
Dome
Glass Shade
Frame
Stem
Candle Cover
Socket
Coupling
Set Screw
Pad
Buckle
Bulb Type B Max.60W
(not included)
WARNING: BE SURE TO SHUT OFF POWER AT THE MAIN FUSE OR CIRCUIT
BREAKER BOX BEFORE INSTALLING OR SERVICING THIS FIXTURE.