
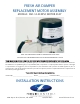
Install Instructions
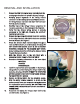

1. Verify that the service switch on the replacement motor assembly is in the “Automatic”
position, as denoted on the motor cover. (See Figure 2)
2. Con rm if the damper with the replaced motor assembly is the return, outside, or relief
damper.
3. Following the ventCool™ Instructions, press “Mode”, and “O ” on the smart thermostat to
put the HVAC system on standby.
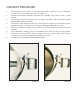
4. Verify that a return damper reaches the open position (see Figure 3) and relief and outside
dampers reach the closed position (see Figure 4) within approximately 15 seconds.
5. Enter the “Installation Settings” menu, select “Free Cooling” and temporarily disable “Free
Cooling.”
6. From “Installation Settings” select “Test Outputs” and select “Cooling 1st Stage button.
7. Verify that relief and outside dampers reaches the open position and a return damper
reaches the closed position within approximately 15 seconds.
8. Re-enable Free Cooling Mode and the HVAC System.
CHECKOUT PROCEDURE
FIGURE 3 FIGURE 4