
Cascade Series Install Manual


page 8 of 16
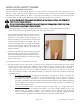
7. Using a drywall saw or other appropriate device, carefully cut out the rough opening into the ceiling. Use
care to avoid damaging the surrounding areas of the ceiling that will not be covered by the edges of the
eggcrate inlet grille.
8. Place the fan assemblies, exible ducts, and damper assembly in the attic space. If necessary, the fan and
damper assemblies may be passed through the rough opening into the attic. It may be necessary to
detach the exible duct from the fan assembly to allow passage of the fan and duct into the attic space. It is
recommended to pre-attach the ex ductwork to fan assembly prior to placing unit in attic.
9. Move the damper assembly into place in the rough opening, with the bottom edge of the assembly
protruding into the opening. If more than two anges were removed from the damper assembly for
installation clearance, make sure that the bottom edge of the damper assembly does not protrude below
the surface of the ceiling.
10. Attach the damper assembly to the framing by installing drywall screws (as supplied) or wood screws
through the inside wall(s) of the damper assembly into the framing. If addition framing is to be added,
place the framing over the damper assembly anges and fasten in place.
If using fasteners long enough to penetrate through the framing, use extreme caution
If using fasteners long enough to penetrate through the framing, use extreme caution
to avoid drilling
to avoid drilling
into hidden wiring, plumbing, or other building elements of concern!
into hidden wiring, plumbing, or other building elements of concern!
11. From below, install drywall screws through the ceiling and through the anges of the damper assembly,
and into any addition framing positioned above the anges. Use care to avoid installing screws outside
of the area that will be covered by the eggcrate inlet grille!
12. Hold the eggcrate grille in position on the ceiling, and install the included white screws through the holes
in the ange of the grille, through the ceiling, and into the damper assembly anges and/or framing
above.
Make sure that the eggcrate grille mounting screws penetrate into either the damper box anges or
Make sure that the eggcrate grille mounting screws penetrate into either the damper box anges or
framing above, and that the grille is securely fastened in place!
framing above, and that the grille is securely fastened in place!
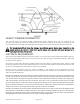
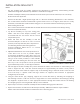
FIGURE 2 - DAMPER BOX INSTALLATION
4. Make sure that the exact location chosen for
the rough opening will allow installation of the
eggcrate inlet grille, and will not interfere with
any lighting xtures, smoke alarms, or other
objects installed in the ceiling.
5. Remove any insulation from the area of
the exact chosen location, and make sure that
no wiring, plumbing, bracing or other building
elements will interfere with the damper
assembly installation.
6. With the template laying on top of the
ceiling in the exact chosen location, mark the
outline of the template onto the ceiling. If the
ceiling hole is to be cut from below, drill or
punch a small hole at each corner of the
template, and mark the outline of the template
from below the ceiling.
P/N 780105002 01/21 Rev A