
Product Overview

page 3
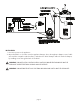
Disconnect the appliance damper control cable, and reconnect it to the receptacle inside the ADA-1, 3.
using an appropriate knockout on the ADA-1. Use care to align the groove in the plug with the spline
in the receptacle. If the damper control cable does not have a knockout hole strain relief, use the one
provided with the ADA-1.
Connect the ADA-1 damper cable to the automatic damper, using care to align the groove in the plug 4.
with the spline in the receptacle. If the automatic damper has a strain relief bracket, use the strain relief
provided with the ADA-1.
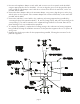
Connect the 24V ADA-1 control cable to the combustion air/venting equipment being installed, by 5.
connecting the three fork terminals marked T1, T2, and T3 (orange, black, and yellow respectively) to the
corresponding T1, T2, and T3 terminals on the equipment being installed. Use an extra strain relief or
plastic bushing if none is provided with the equipment.
To complete the installation, complete the line-voltage wiring to the combustion air/venting equipment 6.
being installed, following the installation instructions for the particular equipment. Be sure to replace all
wiring covers.
Complete the checkout procedure for the equipment being installed, following the instructions for the 7.
particular equipment.