
Installation Guide


THANK YOU
We appreciate the trust and confidence you have placed in Fiberon through the purchase
of these hidden fasteners. We strive to continually create quality products designed to
enhance your home. Visit us online to see our full line of products available for your home
improvement needs. Thank you for choosing Fiberon!
INSTALLATION INSTRUCTIONS
ARMORGUARD
®
HIDDEN FASTENERS
Pre-Installation
IMPORTANT: Follow local applicable building codes. Careful
planning of the nished deck layout will result in better looking
nished projects. Failure to follow installation guidelines could void
the warranty.
IMPORTANT: Read the instructions for both the decking and
railing systems planned for the project. Thoroughly reading all
instructions rst will make for more protable projects. Failure
to do so may result in more difcult installation and may void the
warranty.
The Fiberon
®
ArmorGuard
®
Hidden Fastener is a deck fastening
system designed specically for grooved (GV) deck boards, and is a
fast and simple way to create a smooth deck surface, uninterrupted
by visible screws or nails.
Fiberon ArmorGuard Hidden Fasteners are not recommended for
use in installations above elevations of 6,500 ft. Hidden Fasteners
are not intended for use on stair treads. Stair treads require the use
of straight-edge boards and must be surface fastened/screwed.
BEFORE YOU BEGIN THIS INSTALLATION
Airflow And Drainage
Make sure there is adequate and unobstructed air ow under 50%
of the deck. Allow a minimum of 1.5 in. unobstructed/net-free
space between the bottom of the joists and the ground. Water must
be able to ow away from under the deck. Improve drainage or
grade at areas where standing water may gather. Do not install
decking directly to an existing or solid surface and do not enclose
the decking to the ground.
Joist Spacing Considerations
Joist location is important for the safety of the deck and will affect
the layout, cost, and ease of installation for the railing system. If
railing will be installed, determine rail post placement prior to joist
construction. Joist spacing in residential installations is 16 in. o.c.
if laying decking perpendicular to the joists. Diagonal installations
require 12 in. o.c.
Expansion And Spacing Considerations
All decking materials, whether wood, composite, or metal, undergo
some degree of linear expansion with the changes of weather and
the seasons. For best spacing results, keep boards out of direct sun
during storage and cutting processes, and throughout installation
if possible. To compensate for the effects of contraction and
expansion, use short boards (where possible) with splitter/divider
boards between each continuous run of boards.
Adequate board spacing of a minimum 3/16 in. between board
sides will provide proper drainage and ventilation and assist with
the removal of small organic debris. Allow a minimum of 1/4 in.
spacing between boards and any permanent structure. Spacing
requirements must be met for full warranty coverage.
End-To-End Spacing By Temperature
Fiberon ArmorGuard
35° and under 35°– 69° 70°– 89° 90°– 109° 110° and up
1/4 in. 3/16 in. 1/8 in. 1/16 in. 1/32 in.
Model # BKT BRD VER HF C90
BKT BRD VER HF C900
Safety Information
Read and understand this entire manual before you begin the
installation of your decking using Fiberon ArmorGuard Hidden
Fasteners.
WARNING: Use extreme caution when using power tools.
CAUTION: Fasteners have sharp edges. Use proper care when
handling. The use of gloves is recommended.
Questions, problems, missing parts? Before returning to the store,
call Fiberon Customer Service
8 a.m. - 5 p.m., EST, Monday - Friday
1-800-230-7547
FIBERONDECKING.COM
Retain this manual for future use.
FIB-662-PKG 1/19
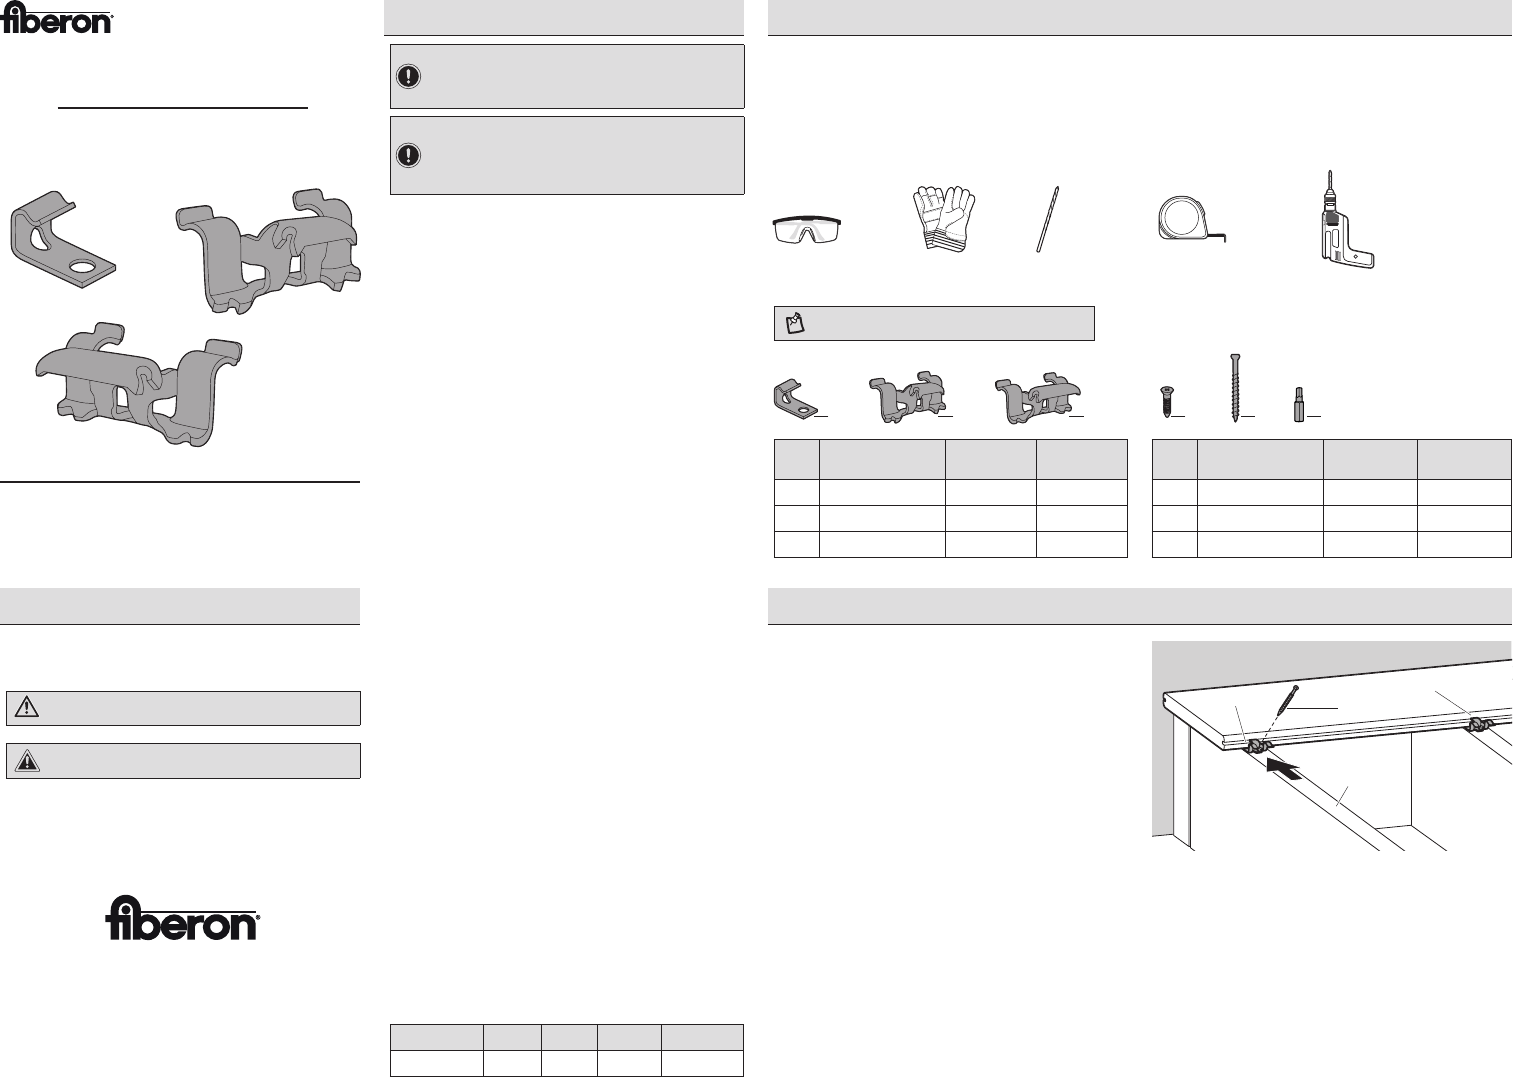
Installation
1
Installing the first deck board
Secure the start/stop fasteners (AA) a minimum of 1/4 in.
from the wall with a single screw (DD) into the joist.
Space the start/stop fasteners (AA) no greater than 12 in.
apart.
Position the deck board and insert the start/stop fastener
(AA) into the edge groove. It may be helpful to angle the deck
board slightly to fully seat it onto the fasteners.
Ensure that the start/stop fastener (AA) is fully inserted into
the edge groove.
BB
Groove
Joist
EE
Pre-Installation (continued)
HELPFUL TIPS
□ Start screws using a slower speed until the screw is engaged into the joist. Increase speed while maintaining sufcient pressure to
drive the screw fully without overtightening. Starting with too much speed, or without enough pressure, can cause stripping.
□ Change driver bits regularly.
TOOLS REQUIRED
Safety
goggles
Gloves
1/8 in. Drill
bit (wood)
Measuring
tape
Drill
HARDWARE INCLUDED
NOTE: Hardware not shown to actual size.
DD EE FF
AA BB CC
DD EE FF
AA BB CC
Part Description
Quantity
(90 ct box)
Quantity
(900 ct box)
Part Description
Quantity
(90 ct box)
Quantity
(900 ct box)
AA Start/stop fastener 6 60 DD #8 x 7/8 in. Screw 6 60
BB Line fastener 80 800 EE #8 x 1 5/8 in. Screw 95 950
CC Butt joint fastener 10 100 FF #1 Square drive bit 1 8