
Instruction Manual

6
Any tube amplier/power amplier requires an initial pre-heating (or „burn-in”) period, in order so that it achieves its full sonic
potential. This is due to the presence of residua polarization of dielectric elements and due to a necessary stabilization of
working parameters of the vacuum tubes. The stabilization of the electrical parameters of the system occurs in a natural process
whilst playing music through your audio system.
A preliminary degree of pre-heating of the amplier is reached after about 10 hours of quiet music playback.
The full sonic capabilities shall stabilize and unfold within a time-span ranging from
40 to 60 hours of music reproduction at a moderate volume levels.
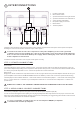
Your power amplier is equipped with automatic bias module. It’s necessary to use vacuum tubes that have previously been
pre-selected and paired up in quads or pairs.
1) Disconnect the amplier from the mains socket, the power supply network.
2) Remove the currently installed tubes from their respective sockets. Plug in the new replacement vacuum tubes in these
sockets.
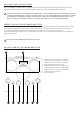
Make sure that all of your wiring is connected in accordance with the information as provided above on page 9 of this manual.
Turn on the mains power of the Titania power amplier – the vacuum tubes shall begin to glow. Make sure that the sound source
is turned on, playing, and then gradually increase the volume level in your preamplier.
Every power tube has its own safety fuse (symbol - m100mA). When power tube will fail. Safety fuse will blow and prevents
any further damage of the amplier. Please replace foulty power tube with new one. Please replace the power tube fuse with
new m100mA if needed.
BURING-IN PROCESS
VACUUM TUBES REPLACEMENT
VACUUM TUBES PROTECTIVE CAGE
PREMIUM TUBES SET
Make sure that the power amplier is switched o. Connect the power cord to the IEC socket on the rear panel of the power
amplier.
The power amplier is designed to operate at a rated voltage of 230V / 50-60Hz. Connecting the device to a mains network
with incorrect parameters can lead to damage that is not covered by manufacturers warranty.
STEP 3 POWER CORD CONNECTION