
Instruction Manual

5
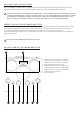
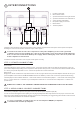
1 Preamp signal input
2 Mono/Stereo switch
3 Speaker terminals for the right channel
4 Speakers terminals for the left channel
5 Signal ground on/o switch
6 IEC power supply cord socket
7 Mains switch
8 Terminal jumpers
The gure above shows the rear panel view of the power amplier, together with a description of the inputs and outputs
allowing for connection of the other elements of your audio system.
Follow the instructions below to connect your sound system correctly.
Stereo mode:
Check the impedance of the speakers set that you own. Connect the speaker cable to the appropriate terminals on the rear
panel of the amplier. Depending on the impedance of the speakers that you own, connect it to the terminal marked either 4
Ω or 8 Ω. If your speaker impedance is 6 Ω - connect the speaker wire to the terminal 8 Ω.
Mono mode:
Bridge mono mode combines two amp channels into one mono,it gives much more powerful amplier channel. Be sure your
power amplier is turned o. Set the MONO MODE switch to the “MONO” position and connect the speaker terminal using
terminal jumper to the terminals marked ‘L +’ 4 Ω and ‘R+’ 4 Ω and second terminal jumper ‘L +’ 8 Ω and ‘R+’ 8 Ω ensuring that
the ‘L+’ is connected to the ‘+’ terminal on your loudspeaker and the ‘R+’ is connected to the loudspeaker’s ‘-’ terminal. See
picture above.
Connect the preamplier output to the signal source in the Titania power amplier input (IN)
In order to achieve the highest sound quality, use only high-quality RCA cables. Pay attention to the proper connection and
distinction of the right (R) and the left (L) channels. For the best sound quality, we suggest using the Fezz FAC 01 interconnect
cable dedicated for Fezz Audio vacuum tube ampliers.
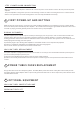
STEP 1 SPEAKERS CONNECTIONS
STEP 2 AUDIO SIGNAL SOURCES CONNECTIONS