
User Manual


Follow the instructions below to connect Your sound system correctly.
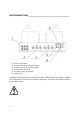
STEP 1 / HOOK-UP OF THE SPEAKERS
Check the impedance of the speaker set that you posses. Connect the speaker cable to the
appropriate terminals on the rear panel of the amplifier. Depending on the impedance of the
speakers that you posses, connect it to the terminal marked either 4 Ω or 8 Ω. If your
speaker impedance is 6 Ω - connect the speaker wire to the terminal 8 Ω.
STEP 2 / HOOK-UP OF THE SIGNAL SOURCES
Connect the signal source to the amplifier inputs IN1, IN2 or IN3. Select the source of input
signal by rotating the input selector located on the front panel of the amplifier. In order to
achieve the highest sound quality, use only high-quality RCA cables. Pay attention to the
proper connection and distinction of the right (R) and the left (L) channels. For the best
sound quality, we suggest using the Fezz FAC 01 interconnect cable dedicated for Fezz Audio
vacuum tube amplifiers.
STEP 3 / HOOK-UP OF THE POWER SUPPLY CORD
Make sure that the amplifier is switched off. Connect the power cord to the IEC socket on
the rear panel of the amplifier.
The amplifier is designed to operate at a rated voltage of 110V / 50/60Hz. Connecting the
device to a mains network with incorrect parameters can lead to damage that is not covered
by manufacturers warranty.
FIRST POWER-UP AND GETTING STARTED______________________
Make sure that all of your wiring is connected in accordance with the information as
provided above on page 9 of this manual.
Select the source of signal using the rotary selector switch located on the front panel. Set the
volume control to minimum. Turn on the mains power of the Mira Ceti amplifier – the
9