
User Manual


4
EN
RADIAL MITRE SAW
MSM1039
Thank you for buying this Ferm product.
By doing so you now have an excellent product,
delivered by one of Europe’s leading suppliers.
All products delivered to you by Ferm are manu-
factured according to the highest standards of
performance and safety. As part of our philosophy
we also provide an excellent customer service,
backed by our comprehensive warranty.We hope
you will enjoy using this product for many years
to come.
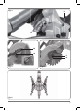
The numbers in the following text refer to the
pictures on page 2-3
Read the operating instructions carefully
before using this device. Familiarise
yourself with its functions and basic
operation. Service the device as per the
instructions to ensure that it always func-
tions properly. The operating instructions
and the accompanying documentation
must be kept in the vicinity of the device.
Intended use
The electro tool is intended as a stationary
machine for making straight lengthways and
crossways cuts in wood. Horizontal mitre angles
of -45° to +45° as well as vertical bevel angles of
-45° are possible.
This saw is intended for sawing wood
only. Do not use the saw to cut materials
other than wood.
1. MACHINE INFORMATION
Technical specifications
Mains voltage 220-240V~, 50Hz
Capacity 1500 W
Machine class II (double insulated)
No load speed 4.500/min
Saw blade measurement 210x30x2.8mm
Angle for mitring 45º (left and right)
Angle for bevelling 45º (left only)
Mitre saw maximum sawing capacity:
Mitre 0º, Bevel 0º 70x305mm
Mitre 0º, Bevel 45º 35x305mm
Mitre 45º, Bevel 0º 70x210mm
Mitre 45º, Bevel 45º 35x210mm
Weight 12 kg
Lpa (sound pressure) 93.6+3 dB(A)
Lwa (acoustic capacity) 106.6+3 dB(A)
Vibration level
The vibration emission level stated in this instruction
manual has been measured in accordance with a
standardised test given in EN62841-1; it may be
used to compare one tool with another and as a
preliminary assessment of exposure to vibration
when using the tool for the applications mentioned.
- using the tool for different applications, or with
different or poorly maintainted accessories,
may significantly increase the exposure level
- the times when the tool is switched off or when
it is running but not actually doing the job, may
significantly reduce the exposure level
Protect yourself against the effects of vibration by
maintaining the tool and its accessories, keeping your
hands warm, and organizing your work patterns.
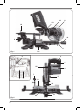
Features
Figs. 1, 2, 3, 4 and 5
1. On/off switch
2. On/off switch for laser
3. Lock-off button
4. Carbon brush cover
5. Lock-pin
6. Blade protective cover
7. Workpiece clamp
8. Guide fence
9. Knob adjusting saw angle
10. Locking knob
11. Locking paddle
12. Knob over sliding support
13. Connection dust bag
14. Bevel angle
16. Cover
17. Saw blade bolt
18. Flange
19. Screw
20. Screw retraction arm
21. Extension pieces (left and right)
22. Lock-button saw blade
23. Angle indicator