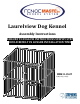
Laurelview Dog Kennel Assembly Instructions FAILURE TO FOLLOW INSTRUCTIONS STEP BY STEP COULD RESULT IN LONGER INSTALLATION TIME HBK11-13659 5'(W) x 5'(L) x 5'(H)
Important Safety Information Explanation of Attention Words and Symbols used in this guide This is the safety alert symbol. It is used to alert you to potential personal injury hazards. Obey all safety messages that follow this symbol to avoid possible injury or death. WARNING indicates a hazardous situation which, if not avoided, could result in death or serious injury.
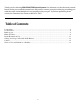
Thank you for choosing FENCEMASTER Kennel System. Our mission is to be the most trusted brand in the pet ownership experience.We want to ensure your pet’s safety by providing you with the tools and techniques to successfully train your pet. If you have questions, please contact the Customer Care Center at 800-451-2612. Table of Contents Components ..................................................................................................................................................
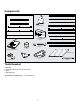
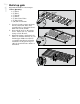
Components Gate Components Tube I Tube A (3 pcs.) Tube B (3 pcs.) (1 pc.) Tube H (3 pcs.) Tube J (2 pcs.) Corner Brace (3 pcs.) Tube K (1 pc.) Tube C (3 pcs.) Tube D (1 pc.) Tube L (1 pc.) Tube M (1 pc.) Gate Fence Tube (5 pcs.) Tube E (1 pc.) Corner Clamp (8 pcs.) Tube G (1 pc.) Tube F (1 pc.) Tube Plug 5/16” x 1.83” Carriage Bolts (58 pcs.) Fence Tube (49 pcs.) (5 pcs.) Assembly Instructions Sunblock Top Flat Brace Gate Latch Gate Clamp (8 pcs.) (2 pcs.) Cable Ties (25 pcs.
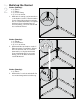
Step Build up gate 1 Important: Assemble on a level surface. Gather (Quantity): • (1) Tube I • (2) Tube J • (1) Tube K • (1) Tube L • (5) Gate Fence Tubes • (4) Gate Clamp • (10) 5/16" bolt and nut 1. Lay tube I on the ground, and insert the five Gate Fence Tubes, then assemble tube J as the picture shows. Make tube I in the middle. 2. Insert tube K and L as the picture shows. Adjust tube I to catch the clamps on tube K and L. 3. Mount the clamps, and fix the bolts.
Step Build up the Kennel 2 Gather (Quantity): • (2) Tube A • (1) Tube C • (1) Corner Clamp • (2) 5/16” bolt and nut 1. Make tube C stand up, and mount tube A to the bracket on tube C. Then mount the Corner Clamp. Mount the bolts and nuts, but do not fasten them until you complete the kennel. Some adjustment may be necessary during your work. Nuts should face outside the kennel. C Corner Clamp A A Gather (Quantity): • (2) Tube B • (1) Corner Brace • (6) 5/16” bolt and nut 2.
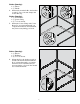
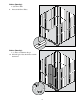
Gather (Quantity): • (1) Tube A • (1) Tube B 4. Mount tube A and tube B to the brackets on tube C. Do not mount clamps and bolts in this step. Gather (Quantity): • (1) Corner Brace • (1) Corner Clamp • (8) 5/16” bolt and nut 5. Mount the Corner Clamp and Corner Brace. Do not fasten them until you complete the kennel. Some adjustment may be necessary during your work. Corner Brace C B Corner Clamp A Gather (Quantity): • (1) Tube D • (1) Flat Brace • (4) 5/16” bolt and nut 6.
Gather (Quantity): • (1) Tube E • (1) Tube F • (1) Tube G 7. Mount tube E to the brackets on tube C and tube D. Then mount tube F to the bracket on tube C, then insert tube G to the bracket on tube E. Finally, push tube F, and insert it to the bracket on tube G. C F D G E Gather (Quantity): • (2) Corner Clamp • (1) Corner Brace • (1) Flat Brace • (2) Gate Clamp • (17) 5/16” bolt and nut 8. Mount the clamps, bolts and nuts as the steps above. Do not fasten them until you complete the kennel.
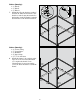
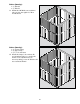
Gather (Quantity): • (49) Fence Tube 9. Insert all 49 Fence Tubes. Gather (Quantity): • (1) Gate, assembled in Step 1. 10. Insert the gate. Nuts should face outside the kennel.
Gather (Quantity): • (1) Tube M • (3) Tube H 11. Mount tube M. Make sure each fence tube gets into the right hole. Then mount tube H. H H M H Gather (Quantity): • (4) Corner Clamp • (2) Gate Clamp • (11) 5/16” bolt and nut 12. Mount the clamps, bolts and nuts. Do not fasten them until you complete the kennel. Some adjustment may be necessary during your work. Nuts should face outside the kennel.
Gather (Quantity): • (5) Tube Plug • (1) Gate Latch 13. Knock in the 5 tube plugs. One is on the gate, the remaining four are on the kennel. Then assemble the gate latch on the gate. The latch should be mounted approximately 41 inches to the ground. A hammer is necessary when you knock the tube plugs. 14. Fasten all bolts. Step Install the Sunblock Top 3 Gather (Quantity): • (1) Sunblock Top kit 1. Install the Sunblock Top.
Getting Your Dog Comfortable In His Kennel A bit of effort on your part can go a long way to ensure your dog adjusts well to his new kennel. Taking the time to introduce your dog to life in the kennel will lead to a better experience for both you and your pet. Kennel familiarization may take several days or even weeks, depending on your dog’s age, temperament, and past experiences.
Terms of Use and Limitation of Liability 1. Terms of Use This Product is offered to you conditioned upon your acceptance without modification of the terms, conditions and notices contained herein. Usage of this Product implies acceptance of all such terms, conditions, and notices. 2. Proper Use This Product is designed for use with pets where training is desired. The specific temperament of your pet may not work with this Product.
2015 Stephens Pipe & Steel, LLC FENCEMASTER Kennel System 2151 N Main St. Jamestown, KY 42629 Phone: 800.451.