Electric Paper Trimmer PowerTrimTM E Please read these instructions before use. F Lire ces instructions avant utilisation. S Lea estas instrucciones antes del usarlo.
INDEX TRIMMER CONTROLS / QUICK START GUIDE ENGLISH 3 4-9 FRANCAIS 10-15 ESPAÑOL 16-21
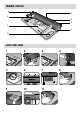
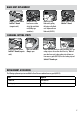
TRIMMER CONTROLS A H E G B F C D QUICK START GUIDE 1 2 3 4 5 6 7 8 9 10 11 12” 3
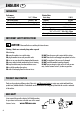
ENGLISH E CAPABILITIES Performance Cutting length Max cutting capacity Trimming mechanism PowerSave Auto Shut-off 16.5” / 420mm 30 sheets / 20lb Electric trimming 30min Technical Data Main voltage 120V AC Frequency 50/60Hz Wattage 80 Watts Amps 1.8 Amps Max. Machine rating 24V DC / 1.8 Amps Dimensions (WxDxH) 24.5” x 12” x 4.75” / 620 x 300 x 120mm Net weight 11lbs / 5 kg IMPORTANT SAFETY INSTRUCTIONS CAUTION: Please read before use and keep for future reference.
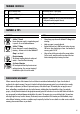
TRIMMER CONTROLS A On/off switch (at side) E Overload protection - Paper gauge B Cut-Control LED touch pad F Illuminated LED cutting bed C SafeCut™ Clamp G SafeCut™ Guard (at rear) to protect internal mechanism - with power breaker (magnetic closure) D Carry point H Window for paper alignment FEATURES & TIPS FEATURES TIPS SafeCut™ Guard Ensures that power supply is stopped when guard is opened – for service and maintenance.
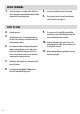
BEFORE TRIMMING 1. Ensure the machine is on a stable surface. Check that there is enough clear space behind the machine to allow trimmed items to pass through freely. 2. 3. Connect the supplied power lead to the machine. Plug the power lead in to an easily accessible main socket. Switch the main supply on. STEPS TO TRIM 4. 5. 6. 7. 8. 6 Switch the power on. 9. Insert document to trim. Use the document gauge at the sides of the cutting base to check that items do not exceed maximum capacity. 10.
BLADE UNIT REPLACEMENT Unplug PowerTrim. Remove SafeCut™ Guard (magnetic catch). Unscrew the 2 cross head screws on either side of the cutter blade unit (Phillips type screwdriver). Remove the cutter blade unit by pulling the button on the blade unit. Replace with new blade unit (#54125). Tighten screws. Re-secure SafeCut™ Guard. CHANGING CUTTING STRIPS Unplug PowerTrim. Remove SafeCut™ Guard (magnetic catch). Make sure SafeCut™ Clamp is open.
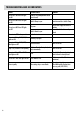
TROUBLESHOOTING AND LED INDICATORS Status Possible Cause Solution Scissor icon is ON. Base LED lights are ON Ready to trim (clamped down and all covers closed) - Scissor Icon is OFF. Base LED lights are ON SafeCut Clamp is open Insert item and close SafeCut Clamp No power Turn on main supply and switch on machine SafeCut Guard is open Ensure SafeCut Guard is correctly closed Touched scissor icon - Scissor Icon is OFF.
FCC CLASS B NOTICE Note: This equipment has been tested and found to comply with the limits for a Class B digital device, pursuant to part 15 of the FCC Rules. These limits are designed to provide reasonable protection against harmful interference in a residential installation. This equipment generates, uses and can radiate radio frequency energy and, if not installed and used in accordance with the instructions, may cause harmful interference to radio communications.