
Specification Sheet
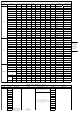


Sony
6100
Type-c to Multi(Use the Type-C to
Micro (A03) data cable to charge
the Sony camera, but not control it,
use the Type-c to Multi cable to
control the camera by wire but not
to charge the camera)
1、Take photos
2、Start/Stop recording video
3、Half-press to focus
4.Zoom in&out
5.Switch photo/video
1. Can control motorized zoom lens to zoom.
2. Can only control digital zoom while using non-motorized
lens.
3.Users need to use Hyperlink remote controller to control
zooming
6.00
6600
1. Can control motorized zoom lens to zoom.
2. Can only control digital zoom while using non-motorized
lens.
3. Select "Network" and then turn off "Ctrl w/Smartphone" in
camera setting.
4. Set up the USB Connection to PC remote in camera setting
menu.
5.Users need to use Hyperlink remote controller to control
zooming
1.30
α6500
1. Can control motorized zoom lens to zoom.
2. Can only control digital zoom while using non-motorized
lens.
3.Users need to use Hyperlink remote controller to control
zooming
1.00
RX10 IV
1. Can control motorized zoom lens to zoom.
2. Can only control digital zoom while using non-motorized
lens.
3.Support up to 200 focal length
4.Users need to use Hyperlink remote controller to control
zooming
zv1
1. Can control motorized zoom lens to zoom.
2. Can only control digital zoom while using non-motorized
lens.
3.Users need to use Hyperlink remote controller to control
zooming
1.00
A7S3
1.Users need to use Hyperlink remote controller to control
zooming
1.01
AK2000c_HUB_V106
A7C Type-c to TypeC(C02)
1、Take photos
2、Start/Stop recording video
3、Half-press to focus
1. Please turn on the "PC Remote Function" of camera first:
MENU →
(Network) → [PC Remote Function] → [PC Remote] → [On]
2.Please set the "PC Remote Cnct Method" as USB: MENU →
(Network) → [PC Remote Function] → [PC Remote Cnct
Method] → [USB]
3.Set the "Still Img. Save Dest." as "Camera Only" in camera
(Network) menu: MENU →
(Network) → [PC Remote Function] → [Still Img. Save Dest]
→ [Camera Only]
1.00
Canon
M50 Type-c to micro (A03)
1、Take photos
2、Start/Stop recording video
---
1.0.0
AK2000c_HUB_V104
EOS RP
Type-c to TypeC(C02)
EOS R 1.0.0
M6 mark II 1.0.0
G7X mark III Please turn off the WIFI connection for Cable control. 1.0.1
EOS 200D II
Type-c to micro (A03)
---
1.0.0
EOS 90D 1.0.0
80D
Type-c to mini( B02)(not a
standard cable)
1.0.2
6D
5D MarkIII 1.3.5
6D MarkII 1.0.3
5D MarkIV Type-c to micro (A03) 1.1.2
EOS R5
Type-c to TypeC(C02)
1. Due to camera system, please switch the shooting mode
to photo mode before taking photos. When shooting a video
is needed, switch the shooting mode to movie mode.
2. For EOS R5/R6, shutter release can't be used to control
video shooting in photo mode otherwise the camera will
easily crash.
3、Please set camera's HDMI display setting in shooting(
)tab as , in order to control camera to take
photo/record video during camera output via HDMI
1.1.1
EOS R6 1.1.1
Panasonic
GH5s Type-c to Type-c(C02)
1、Take photos
2、Start/Stop recording video
1、USB mode choose PC(Tether)
2、WiFi and USB cable control cannot be used
simultaneously
1.2
AK2000c_HUB_V104
GH4
Panasonic Shutter Cable
Type C to DC2.5
1、Take photos
2、Start/Stop recording video
To control recording, you need to turn the camera to video
mode .
2.7
G9 2.0
S5
Panasonic Shutter Cable
Type C to DC2.5
1、Take photos
2、Start/Stop recording video
3、Half-press to AF
1、Need to manually switch to camera recording mode
Type-c to TypeC(C02)
1、Take photos
2、Start/Stop recording video
1、No need to manually switch to camera recording mode
2、Camera will focus automatically first before taking photo
Nikon
Z7
Type-c to TypeC(C02)
1、Take photos
2、Start/Stop recording video
1、After turning on the camera, it takes a few seconds for
the camera to connect successfully
2、Make sure the camera live view function is on when using
the gimbal control function (LV)
3、To control recording, you need to turn the camera to
video mode .
1.00
AK2000c_HUB_V104
Z6 2.00
D7500 Type-c to micro (A03)
1、After turning on the camera, it takes a few seconds for
the camera to connect successfully
2、Make sure the camera live view function is on when using
the gimbal control function (LV)
3、To control recording, you need to turn the camera to
video mode .
4.The camera only has the light indicator and the screen does
not display the duration during recording
1.00
Fujifilm
X-T200
Type-C to TRS3.5(T03)(not a
standard cable)
1、Take photos
2、Start/Stop recording video
3、Half-press to focus
1、Please set up "MIC/REMOTEO RELEASE“to REMOTE,
Steps:Press Menu,Video Setting》MIC/REMOTEO
RELEASE》REMOTE
2、To control recording, you need to turn the camera to
video mode .
3.To control the photo, you need to turn the camera to
photo mode.
1.00
AK2000c_HUB_V104
XS-10 1.02
X-T30
Type-C to TRS2.5 (T02)
1.00
X-T20 2.01
X-T4 1.00
X-A5
1、Take photos
2、Half-press to focus
1、Please set up "MIC/REMOTEO RELEASE“to REMOTE,
Steps:Press Menu,Video Setting》MIC/REMOTEO
RELEASE》REMOTE
2.To control the photo, you need to turn the camera to
photo mode.
2.00
X-T100 2.00
X-H1
1、Take photos
2、Start/Stop recording video
3、Half-press to focus
1、Please set up "MIC/REMOTEO RELEASE“to REMOTE,
Steps:Press Menu,Video Setting》MIC/REMOTEO
RELEASE》REMOTE
2、To control recording, you need to turn the camera to
video mode .
3.To control the photo, you need to turn the camera to
photo mode
2.01
X-T3 3.01
X-A7
1、Take photos
2、Half-press to focus
1、Please set up "MIC/REMOTEO RELEASE“to REMOTE,
Steps:Press Menu,Video Setting》MIC/REMOTEO
RELEASE》REMOTE
2.To control the photo, you need to turn the camera to
photo mode
1.00