
Installation Sheet

Remove the fixture and the mounting
package from the box and make sure that
no parts are missing by referencing the
illustrations on the installation instructions.
MODEL FP11/4WY/NK
GENERAL
All electrical connections must be in accor-
dance with local and National Electrical Code
(N.E.C.) standards. If you are unfamiliar with
proper electrical wiring connections obtain
the services of a qualified electrician.
Remove the fixture and the mounting package
from the box and make sure that no parts are
missing by referencing the illustrations on the
installation instructions.
CAUTION
TURN OFF THE MAIN POWER
AT THE CIRCUIT BREAKER
BEFORE INSTALLING THE
FIXTURE, IN ORDER TO
PREVENT POSSIBLE SHOCK.
MOUNTING INSTRUCTIONS
READ IMPORTANT SAFETY INFORMATION FIRST ON REVERSE SIDE OF THIS SHEET.
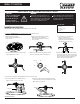
PARTS INCLUDED: QTY
1. Mounting Bracket 1
2. Lamp unit 1
3. #8-32 x 1/2 screws 2
4. Toggle Bolts 4
5. Wire nuts
3
a) Twist and unlock the mounting
bracket from the round LED flat panel
fixture to remove.
c) Secure the bracket to the junction box
using the Junction box screws
provided. If securing the bracket with
toggle bolts is also desired, follow steps
i to iii. Otherwise, proceed to step 2.
b) Identify all three wires (Black-line- voltage,
White-neutral, Green- ground) from
junction box and make them accessible for
easy connections.
1. To attach the Mounting Bracket to the Junction box in the Ceiling, follow these steps:
LED EDGE LIT FIXTURE INSTRUCTIONS
Ground
Neutral
Line
Voltage
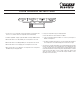
i) Use a pencil to mark the four hole positions for the
toggle bolts going in the ceiling.
ii) Remove the bracket and use a drill with 3/8" drill bit to
make holes on the marks made for the toggle bolts.
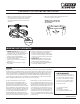
2. Connecting the electrical wires and installing fixture into place, follow these steps:
a) Hook up the support wire to hold fixture while you
make the electrical connections. (See Fig.1)
b) Connect the 3 wires coming from the fixture to the wires
coming out the junction box. (See Fig.2) (Black-line voltage,
White-neutral, Green- ground).
FEIT ELECTRIC COMPANY | PICO RIVERA, CA | (800) 543-3348 | FAX (562) 908-6360 | www.feit.com
SAVE THESE INSTRUCTIONS.
iii) Install the toggle bolts into place on the mounting
bracket. Raise and feed the junction wires through
the mounting bracket center hole. Secure mounting
bracket to junction box by inserting toggle bolts
into the ceiling holes and tighten screws.
Wire Nuts
Fig.2
x
x
x
x
Junction box
Fig.1
Support Wire