
Use and Care Manual

FEIT ELECTRIC COMPANY | PICO RIVERA, CA | (800) 543-3348 | FAX (562) 908-6360 | www.feit.com
Wall Installation
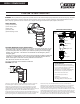
MODEL S10VWM/850/GRY
WARNING: TURN OFF THE MAIN POWER AT THE CIRCUIT BREAKER BEFORE
INSTALLING THE FIXTURE IN ORDER TO PREVENT POSSIBLE ELECTRIC SHOCK.
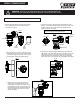
2. Loosen the 2 screws on the LED canopy base holding the LED
housing. Turn the LED housing to allow the screws to exit out of the
keyholes. Unscrew the 4 screws on the LED canopy base and
remove it from the J-box (Fig B).
3. Using the two tabs, mount the round J-Box on the
desired surface area. Use the appropriate hardware
(not included). Supply power to the J-box by using
the appropriate conduit (not included) (Fig C).
4. Feed the power supply through the LED canopy and reattach the
LED canopy to the J-box. Using the wire nuts provided, connect the
LED housing. The green wire connects to the house ground, the
white wire connects to neutral and the black wire connects to the
power supply wire. Connect all wires per all applicable codes (Fig D).
5. Align the LED housing keyholes to the LED
canopy base. Turn the LED housing to the
secure position and tighten the screws. Screw
the LED glass cover into the LED housing, lock
the glass guard back into the LED housing and
secure it by tightening the side screw on the
glass guard (Fig E).
Fig A.
Fig B.
Fig C.
Fig D.
Fig E.
WARNING:
This luminaire should be installed by qualified electrician.
Note: Make sure to reinstall the gaskets between the
parts when putting the fixture back together.
1. Remove the glass guard by loosening the side screw,
turn the glass guard to remove it and unscrew the
LED glass cover (Fig A).
Screw
Glass
Guard
LED
Glass
Cover
Front View
Gasket
Screws
Round
J-Box
LED Housing
Screws