
Installation Instructions
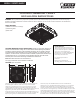

MODEL S10CNPY/850/BZ
Junction Mount Installation (continued)
Ceiling Mount Installation
FEIT ELECTRIC COMPANY | PICO RIVERA, CA | (800) 543-3348 | FAX (562) 908-6360 | www.feit.com
Screw
Drill out
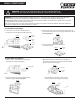
5. Once the canopy fixture is in the fixed position,
fasten screw “A” to lock the fixture into place (Fig H).
1. Loosen screw “A” on the side of canopy fixture and
remove the mounting plate and set aside (Fig I).
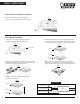
3. Using a drill and drill-bit, drill out 4 holes on the canopy fixture
for ceiling mount. Mount canopy onto the ceiling surface using
4 anchors and screws (not included) (Fig K).
5. Assemble the Reflector and Diffuser lens back onto
the canopy fixture (Fig M).
4. Make sure power is off. Remove the 1/2 inch plug from the
direction you intend to feed the conduit. Connect the power
supply wires to the fixture (Fig L). See the wiring diagram below.
2. Disassemble the canopy fixture by using a Philps screwdriver
to loosen the 8 screws on the diffuser lens. Remove the diffuser
lens from the canopy fixture, then remove the reflector (Fig J).
Supply Line (Black)
Supply Neutral (White)
Supply Grounding (Green)
Box Grounding (Green)
Neutral (White)
Line (Black)
LED DRIVER
Twist-on wire connector
Connector
to LED
WIRING DIAGRAM
Fig H.
Screw
Mounting plate
Canopy
Reflector
Diffuser
lens
Fig J.
Canopy
Reflector
Diffuser
lens
Fig M.
Fig I.
Fig K.
Fig L.
Plugs