
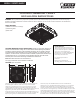
Installation Instructions

FEIT ELECTRIC COMPANY | PICO RIVERA, CA | (800) 543-3348 | FAX (562) 908-6360 | www.feit.com
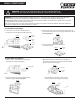
Pendant Mount Installation
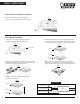
Junction Mount Installation
MODEL S10CNPY/850/BZ
Screw
WARNING: TURN OFF THE MAIN POWER AT THE CIRCUIT BREAKER BEFORE
INSTALLING THE FIXTURE IN ORDER TO PREVENT POSSIBLE ELECTRIC SHOCK.
WARNING:
This luminaire should be installed by qualified electrician. To avoid the risk of fire, explosion or electric shock, this product
should be installed, inspected and maintained by a qualified electrician only, in accordance with all applicable electrical codes.
To avoid electric shock: Be certain electrical power is OFF before and during installation and maintenance. Luminaire must be connected
to a wiring system with an equipment-grounding conductor.
Make sure the supply voltage is the same as the rated luminaire voltage. Do not operate in ambient temperatures above those indicated on
the luminaire nameplate. Keep lens tightly closed when in operation.
1. Loosen screw “A” on the side of the canopy fixture
and remove the mounting plate and rubber plug (Fig A).
2. Make sure the power is off. Connect the power supply wires from
the pendant rod to the fixture. Feed the wires into the fixture. (Fig B).
See wiring diagram.
3. Connect and screw in the 3/4 inch pendant rod
into the fixture (Fig C).
1. Loosen screw “A” on the side of the canopy fixture
and remove the mounting plate (Fig D).
3. Hang the canopy fixture on the mounting plate and
finish wiring (Fig F). See wiring diagram.
4. Feed the wires into the J-Box. Lock the canopy
fixture towards the mounting plate hooks (Fig G).
2. Make sure the power is off. Feed the power supply wires
through the center of the mounting plate. Attach the mounting
plate onto the junction box (Fig E).
Fig B.
Fig C.
Fig A.
Mounting
plate
Pendant
Rod
Rubber
plug
Canopy
fixture
Screw
Fig F.
Fig G.
Fig E.
Mounting plate
Junction box
Hooks
Mounting
plate
Lock
Lift