
Operation Manual


24
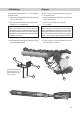
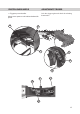
Trigger weight
The trigger weight consists of the trigger slack
weight and trigger point weight.The trigger is ca-
refully adjusted at the factory in accordance with
the ISSF regulations, but additional adjustments
are possible.
The trigger weight can individually be adjusted by
trigger slack weight and trigger point weight.
a) Trigger slack weight F1
Turning the screw (46) to the left will reduce the
trigger slack weight and turning to the right (clo-
ckwise) will increase it.
b) Trigger point weight F2
Turning the screw (45) to the left will reduce the
trigger point weight and turning to the right (clo-
ckwise) will increase it.
Trigger slack (distance until trigger point) S1
Turning the screw (48) to the right (clockwise) will
extend the trigger slack and turning it to the left
will shorten it.
Trigger point
The trigger point is carefully adjusted at the factory.
Trigger stop
Turning the screw (43) to the right (clockwise) re-
duces the “creep” after releasing the shot, turning
to the left increases the “creep”.
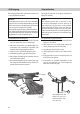
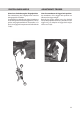
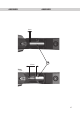
Basic settings of the trigger point
Gun has to be unloaded and the safety engaged.
⇒ Turn triggerstop screw (43) anti-clockwise for
approx. 1 turn to the left.
⇒ Turn p.ex. screw (44) 2 turns anti-clockwise to
the left
⇒ Push cocking lever back to the end stop
⇒
⇒ Turn screw (44) slowly to the right (clockwise)
until the trigger releases
⇒ Turn screw (44) from the point of release for
approx. 10 (minutes) to the left, anti-clockwise
Abzugsgewicht
Das Abzugsgewicht setzt sich aus Vorzugsgewicht
und Druckpunktgewicht zusammen. Der Abzug ist
werkseitig gemäß den ISSF-Regeln eingestellt, kann
jedoch vielseitig an die persönlichen Bedürfnisse
angepasst werden.
Das Abzugsgewicht kann individuell über Vor-
zugsgewicht und Druckpunktgewicht feinjustiert
werden.
a) Vorzugsgewicht F1
Drehung der Stellschraube (46) nach links ver-
ringert, Drehung nach rechts (im Uhrzeigersinn)
erhöht das Vorzugsgewicht.
b) Druckpunktgewicht F2
Drehung der Stellschraube (45) nach links ver-
ringert, Drehung nach rechts (im Uhrzeigersinn)
erhöht das Druckpunktgewicht.
Vorweg (Weg bis zum Druckpunkt) S1
Drehung der Schraube (48) nach rechts (im Uhrzei-
gersinn) verlängert, Drehung nach links verkürzt
den Vorweg.
Druckpunkt
Der Druckpunkt wird im Werk optimal eingestellt.
Triggerstop
Drehung der Schraube (43) nach rechts (im Uhr-
zeigersinn) verkürzt den "Nachweg" nach der
Schussauslösung, Drehung nach links verlängert
den Nachweg.
Grundeinstellung des Druckpunktes:
Waffe muss entlladen und gesichert sein!
⇒ Triggerstopschraube (43) ca. 1 Umdrehung im
Gegenuhrzeigersinn nach links drehen.
⇒ Schraube (44) z. B. 2 Umdrehungen nach links,
gegen den Uhrzeigersinn, drehen.
⇒ Spannhebel bis zum Endanschlag nach hinten
spannen.
⇒ Trainingsschieber (1) nach links drücken bis er
einrastet (Trockentraining).
⇒ Schraube (44) langsam nach rechts (im Uhrzei-
gersinn) drehen, bis der Abzug auslöst.
⇒ Vom Auslösepunkt aus Schraube (44) um ca. 10
(Minuten) nach links, gegen den Uhrzeigersinn,
zurückdrehen.
EINSTELLUNGEN ABZUG ADJUSTMENTS TRIGGER