
User manual
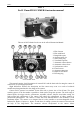

FED-2 Instruction manual
– 4 –
Then aim the camera at the object to be photographed. In the center of the
field of view of the view-
and range-finder a disc differing in color is seen,
in which the image will be doubled.
By turning the distance ring of the lens align the image
into one. It
is recommended to set the camera
approximately in the middle third of
the light field.
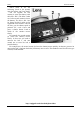
In order to set the necessary exposure, slightly raise
the head, turn it
till index coincides with the division
of the exposure scale and lower
the head back in place.
The exposure can be set only with the shutter
wound up.
Do not turn the head in the interval between 30 and 1.
The number on the scale show the exposure values provided
automatically by the shutter (1/25(1/30)-1/500sec) “B”
serves for
obtaining prolonged exposures “by hand”.
In order to wind the automatic releaser the lever is
turned counter clock-wise from the bottom
position and
into the top position. Then press the release button of
the automatic releaser and stand in the spot selected beforehand. The shutter
will go of from 9 to 15
sec after the automatic releaser is switched on.
It is possible to wind the shutter with the automatic releaser either released
or wound up. A flash
lamp can be used only at a 1/30 (1/25) sec exposure. When
photographing with a lamp place the lamp
reflector in the camera shoe and
insert the lamp plug pin wire in the synchronizer socket. The
diaphragm should be selected in accordance with the sensitivity of the film, the distance to the
photographed objected and the lamp power.
More detailed information on photographing with flash lamps can be obtained by
referring to a
manual on lamps and photography.
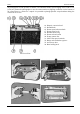
The following order of
working
with the camera is
recommended.
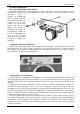
Open the case; remove the
protective cover from the
lens.
Looking into eyepiece
of the view-
and range finder
select the spot to be
photographed and he desired
arrangement of image in the
picture.
Focus the lens.
Set the diaphragm in
accordance
with the required
field depth. Turning
the
lever, wind up the camera
shutter.
Set the shutter
exposure head at the
required
exposure. Aim the camera at
the object to be photographed and
smoothly and evenly press the release
button. If the light source is in
front of
the camera, use a sunshade.
IMPORTANT!!! NEVER CHANGE SHUTTER SPEEDS WITHOUT FIRST COCKING
THE SHUTTER!!!
In the worst case, you may do major damage to the mechanism. At best, you will
find the shutter
behaves erratically for a few frames.
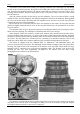
Before opening the camera the exposed film should be rewound into the magazine.
For rewinding
the film disengage the shutter mechanism by pressing the fluted
edge of the disengaging bush
downwards with the thumb of he right hand and
turning the bush towards letter “B” (return)
whereupon the disengaging bush
should sink. In rewinding the film the lens should be covered.
The rewinding head is turned in the direction indicated by the arrow. Complete
rewind of the film is
defined by the effort needed for pulling out the film
from the take-up reel. Open the camera and take
out the film.
The camera is designed for long service life when used properly.