
Manual


FUSION Operations Manual
8.3 Replacements
WARNING:
DO NOT CONNECT OR DISCONNECT CABLES OR OTHER SYSTEM
COMPONENTS WITH POWER APPLIED. FOLLOW LOCKOUT/TAGOUT AND
OTHER APPLICABLE SAFETY PRECAUTIONS WHEN CONNECTING OR
DISCONNECTING CABLING, WIRING, AND EQUIPMENT.
NOTE:
When replacing the
gured with the same Hardware and the same Firmware version as the unit being replaced.
(Controller Unit
displays the
lected. Version
will sh
8.3.1 Controller
Unit Replacement (No Partial Replacement)
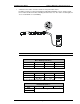
All tools operate from one model of Controller (HFC
ing replaced with another, it is important to verify that
unit being removed.
1. Verify the controller
power is off. Ensure all cables connected to the
(for ease of reconnection).
2. Disco
nnect all cables from the rear (& front if applicable)
I/O terminal on the controller and to avoid removing all the I/O wires, you may simply disassemble the
terminal block from the controller using the top and bottom screws holding the terminal block to the
controller, and reass
emble the terminal block to the new controller.
3.
Turn the controller on the cover hinges 90 degrees and
4. Verify the new
controller
Section 4.10.
5.
Verify the SAN Units have the same configuration (hardware and software).
6. Install the new
controller
7. Apply power
and confirm operation
Power On
Self Test (POST)
The new Controller
will require reentry of the preset data. Refer to Chapters 6
and 7.
FUSION Operations Manual
Chapter 8: Maintenance and Inspection (
Page 8-7
DO NOT CONNECT OR DISCONNECT CABLES OR OTHER SYSTEM
COMPONENTS WITH POWER APPLIED. FOLLOW LOCKOUT/TAGOUT AND
OTHER APPLICABLE SAFETY PRECAUTIONS WHEN CONNECTING OR
DISCONNECTING CABLING, WIRING, AND EQUIPMENT.
When replacing the
FUSION System Controller
unit, ensure that the new unit is conf
gured with the same Hardware and the same Firmware version as the unit being replaced.
displays the
Firmware Version number
when “WORK” 00 D
will sh
ow in the Data Display. ie. 1.02)
Unit Replacement (No Partial Replacement)
All tools operate from one model of Controller (HFC
-EC-16).
When one
ing replaced with another, it is important to verify that
the new unit
is set
unit being removed.
power is off. Ensure all cables connected to the
controller
nnect all cables from the rear (& front if applicable)
of the unit.
If wires are connected to the
I/O terminal on the controller and to avoid removing all the I/O wires, you may simply disassemble the
terminal block from the controller using the top and bottom screws holding the terminal block to the
emble the terminal block to the new controller.
Turn the controller on the cover hinges 90 degrees and
Lift up
on the controller
controller
unit dip switches are set the
same as the unit being replaced
Verify the SAN Units have the same configuration (hardware and software).
controller
in reverse order of removal.
and confirm operation
. (After approximately 5 seconds, the
controller
Self Test (POST)
).
will require reentry of the preset data. Refer to Chapters 6
Chapter 8: Maintenance and Inspection (
Rev. 2
)
DO NOT CONNECT OR DISCONNECT CABLES OR OTHER SYSTEM
COMPONENTS WITH POWER APPLIED. FOLLOW LOCKOUT/TAGOUT AND
OTHER APPLICABLE SAFETY PRECAUTIONS WHEN CONNECTING OR
unit, ensure that the new unit is conf
i-
gured with the same Hardware and the same Firmware version as the unit being replaced.
when “WORK” 00 D
-NO 01 is se-
When one
Controller unit is be-
is set
-up identical to the
controller
are clearly marked
If wires are connected to the
I/O terminal on the controller and to avoid removing all the I/O wires, you may simply disassemble the
terminal block from the controller using the top and bottom screws holding the terminal block to the
on the controller
unit to remove.
same as the unit being replaced
. Refer to
controller
will finalize the
will require reentry of the preset data. Refer to Chapters 6