NET SatisFAXtion™ 8.6 Server Installation Guide NET SatisFAXtion Carrier Edition NET SatisFAXtion Enterprise Edition NET SatisFAXtion Small Business Edition 8.6 Contents 1. Installing Fax Hardware Drivers . . . . . . . . . . . . . . . . . . . . . . . . . . . . . . . . . . . 3 IP Fax . . . . . . . . . . . . . . . . . . . . . . . . . . . . . . . . . . . . . . . . . . . . . . . . 3 AudioCodes Media Gateways . . . . . . .
NET SatisFAXtion 8.6 Installation Guide — Page 2 The main server install for NET SatisFAXtion 8.56™ is a straightforward process. Please insure you have a NET SatisFAXtion 8.56 CD or a “full download” from our web site, http://www.faxback.com/. Please disable all anti-virus, anti-spyware, popup blocking applications and anything that may interfere with installing NET SatisFAXtion or prevent it from running scripts.
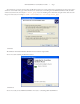
NET SatisFAXtion 8.6 Installation Guide — Page 3 1. Installing Fax Hardware Drivers IP Fax AudioCodes Media Gateways No additional drivers are required for IP Fax. Please continue to “2. Installing NET SatisFAXtion.” Brooktrout TR1034 and Lead-Free (RoHS) TruFax Power off your server and install the TR1034 or TruFax card. Power the server on. The Windows Found New Hardware wizard will start. The Brooktrout drivers cannot be installed at this time. Click Cancel. Click Cancel.
NET SatisFAXtion 8.6 Installation Guide — Page 4 Brooktrout TR114 and TruFax This does not apply to lead-free (RoHS) Brooktrout cards. For lead-free TruFax cards, please refer to “Brooktrout TR1034 and Lead-Free (RoHS) TruFax” installation above. The NET SatisFAXtion CD or download will have the required drivers. Please have it ready prior to installing your Brooktrout hardware.
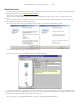
NET SatisFAXtion 8.6 Installation Guide — Page 5 You will need to specify the location where the Brooktrout drivers are stored. Check the box “Include this location in the search:” and browse to the folder “bfax_pnp” where the drivers are stored. If you are installing from the NET SatisFAXtion CD, the folder will be located on the CD, for example D:\bfax_pnp\. If you are installing from a download, the path will be where the CD image was extracted to, for example C:\NET SatisFAXtion CD Image\bfax_pnp.
NET SatisFAXtion 8.6 Installation Guide — Page 6 Eicon Diva Server Your Eicon Diva Server hardware will have come with a driver CD. Please have it ready prior to installing your Eicon hardware, or download the latest drivers from http://www.eicon.com/. Power off your server and install the Eicon Diva Server card. Power the server on. The Windows Found New Hardware wizard will start. This cannot be used to install the driver. Click Cancel. Locate and run the Setup.
NET SatisFAXtion 8.6 Installation Guide — Page 7 Mainpine RockForce and RockForce IQ Express Your Mainpine hardware will have come with a driver CD. Please have it ready prior to installing your Mainpine hardware, or download the latest drivers from http://www.mainpine.com/. If you download the drivers, you will need to extract the ZIP file to a folder Power off your server and install the Mainpine RockForce card. Power the server on. The Windows Found New Hardware wizard will start.
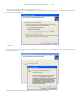
NET SatisFAXtion 8.6 Installation Guide — Page 8 If you have the Mainpine driver CD, please skip to the next step. If you have downloaded the drivers from Mainpine’s site, select “Include this location in the search” and specify the folder where you extracted the driver ZIP file to. Click Next. You will likely see a warning alerting you that the driver you are installing has not passed Windows Logo testing. This is normal. Click “Continue Anyway.
NET SatisFAXtion 8.6 Installation Guide — Page 9 Click Finish. You are now done installing the primary RockForce Fax Board device. You will next be prompted to install one device for each fax port on the board, as well as the RockForce SideBand device. Repeat the above steps for each device. You are now ready to install NET SatisFAXtion. Proceed on to the next section.
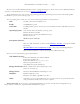
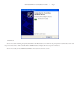
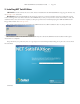
NET SatisFAXtion 8.6 Installation Guide — Page 10 2. Installing NET SatisFAXtion CD ROM: Insert the CD into the server’s drive. Autorun should launch the NET SatisFAXtion setup program. If it does not, run Setup.exe on the CD. Download: Run the downloaded file. It will prompt for a directory, to which it will then extract the installer. The contents of this “CD Image” directory will be identical to the CD ROM. If you wish, you may burn the contents of the folder to a CD, and install from there.
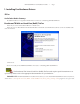
NET SatisFAXtion 8.6 Installation Guide — Page 11 Setup will display the NET SatisFAXtion License Agreement. Please review it, then click “I accept the license agreement.” Click Next. Setup will ask which directory to install NET SatisFAXtion. It is recommended you accept the default.
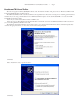
NET SatisFAXtion 8.6 Installation Guide — Page 12 Click Next. Setup will then allow you to enable the monitoring service. Monitoring allows the NET SatisFAXtion server to notify an email address of server loads or unloads. This is an option, you may uncheck “Enable Monitoring” to disable it. If you would like to use monitoring, enter a mail server and an email address.
NET SatisFAXtion 8.6 Installation Guide — Page 13 Next, Setup will check to see if the server has Microsoft SQL Server 2005 Express or Microsoft SQL Server Desktop Engine. If not, Setup will install Microsoft SQL Server 2005 Express. The installation of Microsoft SQL Server Desktop Engine may take a while.
NET SatisFAXtion 8.6 Installation Guide — Page 14 The NET SatisFAXtion 8.6 Installation Wizard Click Next. Setup will ask for the Administrator’s full name and organization. This is only used for the setup program. It will also allow you to install NET SatisFAXtion for only the current user. This is not recommended as it will prevent the server administration programs from functioning correctly for any user but the one currently running the install process. Click Next.
NET SatisFAXtion 8.6 Installation Guide Setup will now install the NET SatisFAXtion files.
NET SatisFAXtion 8.6 Installation Guide — Page 16 Server Installation Wizard Setup will now launch a wizard to configure your fax ports. This wizard can be accessed again later (for example, to add new fax hardware) from the Start menu under All Programs > NET SatisFAXtion > Re-detect Fax Devices. Setup will next need to know what types of fax devices you would like to configure NET SatisFAXtion for. You may choose one or more types of devices, as appropriate.
NET SatisFAXtion 8.6 Installation Guide — Page 17 IP Fax Only If you are not configuring an AudioCodes device or other VoIP device or service, please skip to the next step. To configure a new AudioCodes device, select the option “Assign IP Address to New AudioCodes Gateway,” click Next and reboot the AudioCodes device. For other VoIP devices or VoIP service, click the “Show Advanced Settings” option, and enter the required information. Now Setup will detect all selected fax devices.
NET SatisFAXtion 8.6 Installation Guide — Page 18 Click Next when it becomes available. Setup will now ask you for a Called Subscriber Identification (CSID). A CSID is how your fax server will identify itself to other fax devices. It is also typically printed at the very top of all faxes it sends out. It may be set to anything. Most users will set this to their fax number or their company name.
NET SatisFAXtion 8.6 Installation Guide — Page 19 HTTPS Trunk If you are not configuring an HTTPS Trunk, please skip to the next step. You will have received an account name, password, and URL from your trunk provider. Enter this information and click Next. Setup will also give you the option to specify a digit to get an outbound line. For example, if calls go through a PBX phone system that requires a “9” to get an outside line.
NET SatisFAXtion 8.6 Installation Guide — Page 20 You will now see a list of all detected ports. You will be given the option of configuring certain ports for inbound faxes only or outbound faxes only. It is generally fine to allow all ports to send and receive. Click Next. Setup is nearly ready to run NET SatisFAXtion for the first time. Click Finish.
NET SatisFAXtion 8.6 Installation Guide — Page 21 Setup will now create the NET SatisFAXtion service. The service must be configured to log on as a Windows user account. Setup will now ask for the Windows user name, password, and domain to use for the service. The account used must have local Administrator permissions and a password. The window will default to your current user name and domain. It is recommended that you use a local Administrator account.
NET SatisFAXtion 8.6 Installation Guide — Page 22 Your web browser will now open the NET SatisFAXtion LaunchPad. The LaunchPad is web site running on the NET SatisFAXtion server and provides a central location to install all the additional NET SatisFAXtion client software as well as other server software. Make a note of the URL indicated by the arrow above. This is the location of the LaunchPad. You will need this URL later to install client software.