
User guide

Fax Machine Integration Server Installation Guide — Page 5
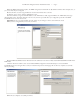
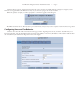
When the MSI install wizard completes, the FMIS configuration wizard will run. By default it will have three example users, so
you can see how they are configured.
Remove the three accounts using the Remove Account button below the account list.
To add your own accounts, click the “Add New Account”
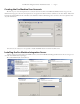
From the worksheet, assign the ATA IP Address to the “ATA Device” field, assign the DID to the “DID” field, and assign
the User Name to the “Username” field. It is not necessary to enter a password unless you configured a password on the NET
SatisFAXtion fax server for that account.
Important! Be sure to click the “Update Account” button or your changes to this account will not be saved.
When you have configured all your accounts, click next.
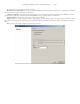
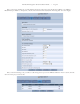
Enter the NET SatisFAXtion Server Domain from the worksheet in the “Server” field, and the NET SatisFAXtion URL in the
“URL” field.
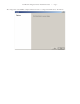
Click the “Test Server and Accounts” button and the FMIS configuration wizard will attempt to contact the NET
SatisFAXtion fax server using the first account you created on the previous wizard page. Be sure this test completes successfully
before proceeding.
When the test completes successfully, click next.