
User guide


Fax Machine Integration Server Installation Guide — Page 13
Inbound Fax
Link 1: NET SatisFAXtion to FMIS
When a fax is received by NET SatisFAXtion, it is placed in the Inbox briefly until the FMIS workflow picks it up from there.
Fax remains in Inbox: Either the FMIS workflow isn’t running, it cannot connect to the fax server, or it is not configured to check
the account the fax was routed to.
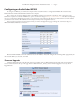
In the NET SatisFAXtion Inbox, verify the user name in the “User” column matches a user that is configured on the FMIS.
Also verify the DID string matches exactly with how it is configured on the FMIS.
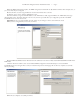
On the FMIS machine, run the “Workflow Designer” (you can find it in the Start menu). Expand the nodes to the left, until
you see the FaxMachineIntegrationServer workflow. If there is a green arrow over its icon, then the workflow is running. If not, then
that is the problem. Right click on the workflow and confirm “Autorun” is checked (if not, check it). Click “Start Workflow”. If the
workflow stops again, check the FMIS logs for more details.
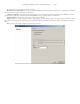
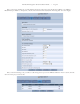
Right-click the FaxMachineIntegrationServer workflow, and choose “Configure Workflow.” Go to the NET SatisFAXtion tab
and verify the server and URL are correct. Click “Test Server and Accounts” to test communication and verify the accounts exist.
Link 2: FMIS to ATA
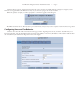
On the FMIS machine, run the “Fax Administration” console (you can find it in the Start menu). is will show the activity
and queues of the FMIS. With the Port Activity view open (View menu > Port Activity), send a fax to the fax machine. You will
see a port change to “Dialing”. is will likely be the bottom-most port in the view; you may need to scroll down to see it. If you do
not hear the fax machine ringing, or the fax goes directly to the Sent Queue with an error, then the ATA may have the line’s DID
misconfigured, or the fax machine isn’t plugged in.