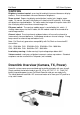
Fat Shark 1 RC Vision Systems TELEPORTER V3 RTF FPV KIT USER MANUAL Revision A 07/13/2013 For more product information, please visit: www.fatshark.
Fat Shark 2 RC Vision Systems Contents Product contents ..................................................................................................... 3 Controls Diagram .................................................................................................... 4 Controls ................................................................................................................... 5 Downlink Overview (Camera, TX, Power) ...............................................................
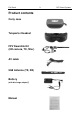
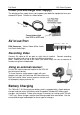
Fat Shark Product contents Carry case Teleporter Headset FPV Downlink Kit (HD camera, TX, filter) AV cable 5G8 Antenna (TX, RX) Battery (with discharge adapter) Manual 3 RC Vision Systems
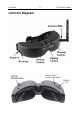
Fat Shark Controls Diagram 4 RC Vision Systems
Fat Shark 5 RC Vision Systems Controls Brightness/contrast control: pressing left and right increases/decreases display contrast. Press forward/back increases/decreases brightness. Zoom control: Depressing display control button (vertical axis) toggles zoom mode. On normal (no zoom) the display will show entire HD camera’s 16:9 image with black bars top and bottom. On zoom mode, the image will crop the sides to fill the 4:3 display which maximizes viewed image size.
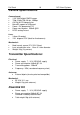
Fat Shark 6 RC Vision Systems Transmitter Channel select chart: Ch1 5740 MHz Ch2 5760 MHz Ch3 5780 MHz Ch4 5800 Mhz Ch5 5820 MHz Ch6 5840 Mhz Ch75860 MHz 1 On Off On Off On Off On 2 On On Off Off On On Off 3 On On On On Off Off Off 4 N/A N/A N/A N/A N/A N/A N/A WARNING: DO NOT POWER TRANSMITTER WITHOUT ANTENNA ATTACHED.
Fat Shark 7 RC Vision Systems Power (via discharge filter supply) The discharge filter supply allows you to power your downlink equipment from your onboard RC pack. Connect as shown below: AV in/out Port Ground Video AudR AuL RCA Connector: Yellow: Video, White: Audio Left, Red: Audio Right Recording Video Connect AV cable to AV out port on right side of headset. Connect recording device to cables and set up as per manufacturer directions.
Fat Shark 8 RC Vision Systems Note (1): If the charger fails to announce charge complete, but is showing battery voltage at 8.4V, the charge can be considered finished. DO NOT LEAVE BATTERY ATTACHED TO CHARGER WHEN CHARGER IS NOT PLUGGED IN. Note (2): If battery becomes fully discharged or shorted an internal safety circuit will trip To reset the battery, tap 9V direct to the barrel connector via the discharge adapter cable’s banana connector.
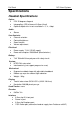
Fat Shark 9 RC Vision Systems Specifications Headset Specifications Optics: FOV 25 degrees diagonal Interpupillary (IPD) distance: 63.5mm (fixed) Optional diopter lens inserts available in -2, -4, -6 dpt Audio: Stereo User Controls: Channel selection Contrast/brightness Zoom function Volume adjustment Electrical: Power supply, 7-13V (2S/3S supply) Power consumption: 200/350mA (direct/wireless) Battery: 7.4V 760mAh lithium polymer with safety circuit.
Fat Shark 10 Camera Specifications: Camera board: 1/2.5” 5MP digital CMOS imager 720p (1280x720), 30 fps, 15Mbps AVI file, MJPG compression MicroSD support to 32Gb card Power: 5V (powered off TX) Power consumption: 250mA @5V NTSC analog live out Lens: 3.
Fat Shark 11 RC Vision Systems Operational advice For best performance, select a channel that has the least amount of interference. While the transmitter is turned OFF, turn on the video headset and look at the screen as you check each channel. Clear channels will have a consistent static background. Channels with interference will have horizontal static lines.
Fat Shark 12 RC Vision Systems Trouble shooting Observation No image, display is completely dark No image, display is glowing dark grey Static on all channels No image on one channel, static on the rest. Lots of interference lines (horizontal lines) Lots of interference lines (horizontal lines) when using 5.8Ghz receiver Battery DOA Battery won’t charge Short range Short range (con’t) White dots on LCD display Possible cause/solution - No power supplied. Check power connections.